
Email Tom
Tom's Website


Email Brian
Brian's Website
|
Email Tom Tom's Website |
|
Email Brian Brian's Website |
Go to the Table Of Contents
Did you read the Preface? Thanks!
There is an unpublished corollary to Special Relativity that states that time spent tracking down, identifying, and fixing problems with computers and software is completely disconnected from normal reality. Everyone who has had to re-install an entire operating system because an application didn't work properly fully appreciates this fact. By way of contrast, our overall experience with the OpenLinux installation and operating environment is a positive one. This is true even though we try to do everything possible wrong to break things and poke holes in them, in order to tell you all about it.
In this chapter, we're going to address various challenges that a user might encounter on the path to successfully running an OpenLinux system. Material is here freely adapted from the Caldera Knowledge Base (located at http://support.calderasystems.com/caldera) as well other parts of this book. Additionally, we have tapped our copious experience with doing silly things that break software, as this forces us to learn how to fix problems, again, so that we can write about it. Plus, as a hobby, it's slightly less painful than playing kickball on the freeway.
The basic structure that underlies effective troubleshooting is four-fold, involving the following elements:
Step-wise progress is the foundation of this structure. Its converse implies that making multiple simultaneous changes in a troubleshooting session leads quickly down the path of insanity. Making one change at a time allows results to be observed and documented. Taking effective notes on problems and potential solutions has two advantages. First, a written record helps record the problem and, eventually, its solution into your own memory for easy access at a later date. Also, a record written at the moment makes reporting a bug or a problem to a support organization much more likely to be successful. Concentration is necessary to prevent errors of the first two parts. Generalization is the final key to success, as many challenges are very similar to others.
There are a few pitfalls in loading OpenLinux 2.4, as the problems faced are similar to those of recent versions and should be useful for at least the next couple of editions. These troubleshooting guides are organized in a chronological manner corresponding to the stages of OpenLinux installation. Each section begins with a brief listing of the problems contained therein. We open this chapter before installation, progress through the install process, and hit the home stretch with establishing a solidly booting system. At the end, we've collected a few tidbits that didn't neatly fall into any of these categories.
Bear in mind that (nearly) every system is a little different, and what we've found to be a problem may work fine for you. On the other hand, there are undoubtedly learning opportunities that each user comes across that we managed to miss completely. That said, we'll do our best to be good Sherpas and get you to the peak via the best route. Let's get to work.
The challenges discussed here are as follows:
Problem: I have heard reports of computer speakers being "blown out" by a blast of sound as the OpenLinux installer starts up. Is this true?
Solution: We have heard the same reports, although we were unable to reproduce the problem directly - systems with built-in speakers like laptops only displayed a moderate volume level for us when the installation splash music played.
The concern is for speakers that do not have an independent volume knob, but that are run by a software control or from the sound card output alone. If you can't turn your speakers down, or off, for the beginning of the OpenLinux installation, you can temporarily unplug them from the system until the initial Lizard screen (Language Selection) is shown. Do have the speakers plugged in for sound output testing later in the install process, when an on-screen volume control is available.
When installing on a notebook, there are often BIOS controlled function keys which can be used to enable or disable the speakers. An alternative is to plug in external speakers that can be turned down, usually disabling the internal speakers in the process. We installed OpenLinux on three laptops without taking any of these steps, and found that the introductory music was neither too loud, nor did it damage our speakers.
Problem: When starting an OpenLinux installation from within Windows, the boot process recognizes the CD-ROM drive, but skips the installation from CD-ROM and fails to install, saying:
Unable to install OpenLinux on this system.

Please refer to the printed documentation.

Press <return> for more information.
What's wrong? Why does it tell me that my hardware isn't supported by Linux when I press Return?
Solution: This problem occurs with the retail package only, when you start the installation with the "Installation from Windows and Commercial Packages" disk. You must change to the Binaries and Installation disk when you see the text screen prompt "To start the installation, please insert your OpenLinux Installation CD, and Press any key to continue . . ." The confusion arises because, unfortunately, both discs have the word "Installation" on them. It is important to note that you can only begin the installation process from within Windows 95 or 98. For NT or Windows 2000, you must either boot from the Binaries and Installation CD-ROM (preferred and easier), or use boot floppies. The message that follows this failure implies that the most likely reason is a hardware incompatibility. This is usually untrue, unless you are using unusually esoteric or old hardware.
To change your default boot device, you need to make changes by using the BIOS Setup screens. When a computer is executing a POST (Power On Self-Test), there is a message printed somewhere on the screen that resembles "Press <DEL> to enter SETUP." When you do so, the BIOS Setup screens are available for modification. It is important that any changes to BIOS parameters be documented, with before and after information written down. In this manner, changes that negatively impact the performance of the computer can be easily reversed. Figure 5-1 shows a representative BIOS setup screen: there are many different types.
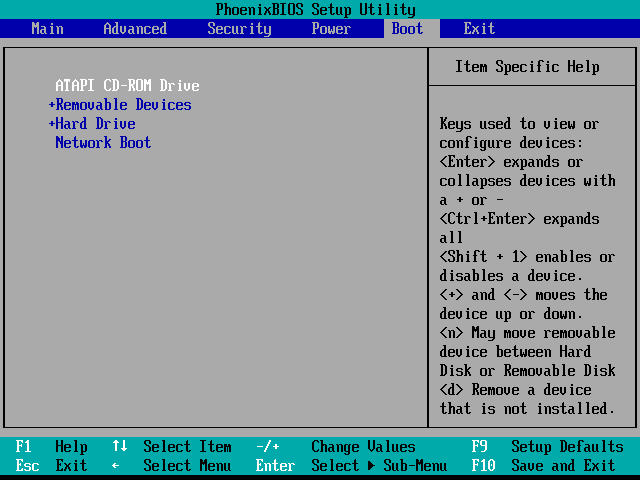
Figure 5-1
A brand-name BIOS setup screen, shown modifying the boot device order.
If the system still doesn't boot into the installer properly, there are three other routes that are feasible. Boot in Framebuffer or VESA mode, or start with either Lizard or LISA boot floppies (see Chapter 3 for details on installation options).
Hint
The LISA installer is definitely the last option to exercise - It uses a much older Linux kernel (2.0.36), which needs to be upgraded after a successful setup.
The VESA mode installation uses a VGA compatibility mode that is (theoretically) present on all video chips, even the newest ones that aren't yet recognized by OpenLinux. This mode from the Binaries and Installation CD-ROM boot is identical to the Framebuffer mode offered when the install is started from within Windows 95 or 98.
Boot floppies (either Lizard or LISA) are recommended when the system can't boot from the CD-ROM device. Additional boot parameters for fine-tuning the installation boot to the system hardware are listed later, in Table 5-1.
Since we're installing and de-installing operating systems quite frequently, we set up our machines for a boot order of CD-ROM, removable devices (or floppy or A:), and hard drive (or C:). This allows us maximum flexibility. If your BIOS does not allow booting from the CD-ROM device, then a boot floppy is the usual fall-back position for installing OpenLinux.
Problem: Can PartitionMagic change the size of a partition on a second hard drive?
Solution: A full retail copy of PartitionMagic can handle that task without difficulty. On the other hand, the PartitionMagic - Caldera Edition (PMCE), which is packaged with eDesktop, cannot. PMCE is designed to provide minimum functionality for resizing the system boot drive (the "C:" drive) only.
There is also a tool on the eDesktop Binaries and Installation CD-ROM called fips. Fips stands for the First (non-destructive) Interactive Partition Splitting program. We experimented, successfully, with fips. However, it is not for the technically faint-of-heart. If you want more control over your partitions than CEPM offers, and are feeling adventurous, then give fips a try. Like most normal filesystem modification programs, you run a better than normal chance of blowing away all the data on the drive, so make sure you have good backups before you begin any experimentation. Fips can be found at CD-ROM://col/tools/fips/*, DOS executables, documentation and all.
The last option involves blowing away your existing partitions altogether. Then reinstall Windows, using only part of the hard drive. Then restart the OpenLinux install.
Problem: How difficult is it to dual-boot Windows with OpenLinux?
Solution: The answer to this question is rooted in the version of Windows that needs to co-exist with OpenLinux. For Windows 95, 98, and 2000, the answer is that the systems live together easily. Windows NT is a beast of a different breed, however.
For the Windows 95 and 98 systems (as well as Windows 2000 installed onto FAT-formatted partitions), simply install the bootloader to the Master Boot Record (MBR) and let Grub (the GRand Unified Bootloader) handle booting into one system or the other. If you want to change the boot order, or set a different default booting OS, then check out "The Post-Installation Blues" section, later in this chapter for pointers on that very topic.
Warning
Windows NT and Win2K can be installed onto either FAT32, NTFS, or (in the case of the latter) NTFS5 formatted partitions. By default, OpenLinux cannot recognize any but FAT-formatted partitions for use in dual-booting situations. Brian often expressly installs these MS operating systems onto FAT32 partitions, so that they can be mounted, read from, and written to while running Linux (there known as VFAT formatted volumes). On the other hand, Tom has had a lot of difficulty in making OpenLinux coexist nicely with these OS's. Take all of the advice herein with a grain of salt: Your mileage may vary.
There are two different routes to take with Windows NT and Windows 2000. First, if you are working with the retail package of OpenLinux 2.4 eDesktop, then you have a Caldera Edition of BootMagic which will allow booting from multiple OS's easily. If using BootMagic or some other third-party boot manager, then do not check the "Write master boot record" box in the Set Up Boot Loader screen during the install.
The challenging method of having NT and Linux live on the same hardware together involves using NT's bootloader as an entry point for Linux. Here are the key gory details, gleaned from the NT OS Loader + Linux mini-HOWTO, located at http://www.linuxdoc.org/HOWTO/mini/Linux+NT-Loader.html. Start with a running OpenLinux installation where the bootloader is installed to the root partition (not the MBR).
dd if=/dev/hda2 of=/bootsect.lnx bs=512 count=1, substitute your root partition name for /dev/hda2. This makes a copy of the boot sector on the root device. The output file, which we have named bootsect.lnx, can be called anything at all. We try to choose 8.3 (DOS-style) filenames that convey as much information as possible, and suggest that you do the same.mcopy /bootsect.lnx a: (mcopy is part of the DOS tools set that is packaged with OpenLinux, installed with every package grouping).attrib -s -r c:\boot.ini, so that the file is not read-only, nor a system file (temporarily)C:\BOOTSECT.LNX="Linux"attrib +s +r c:\boot.ini.The difficulties addressed in this section are:
Problem: When running the installer to change over from another distro to OpenLinux 2.4, the custom (expert) partition screen doesn't show my partition table properly. If I continue with the install, can this impact partitions that I can't see in the installer?
Solution: Yes. Stop, and read the following carefully. There are two very different circumstances in which the Partition Manager portion of the Lizard installer can cause major problems.
The first circumstance is in using proprietery disk manager software, such as the recent software from Maxtor. These disk access programs provide BIOS extensions for computers that don't have the ability to recognize today's large hard disk drives. The software is not necessary for use in most computers produced in 1998 or later. Additionally, the software is not necessary for use with Linux at all. It does, however, interfere with some software reading the partition table properly. This is not a bug in the disk management software, but simply a case of conflicting requirements.
If you are running Linux only, then use the software tools that came with your hard drive to remove these management facilities from your hard drive. You may even need to get low-level disk formatting tools from the drive manufacturer to remove all traces of this from the drive. In this case, you must back everything up, as all data will be lost in the process of rebuilding the drive. For a dual-boot configuration, you would need to make use of the partition sizes that are available without the disk manager software, or use a separate second hard disk for the Linux installation, and do not write to or modify the partitions on the original drive.
Warning
Low level formatting of a hard disk is not recommended unless you know what you are doing. Used improperly, the formatting tools can render a disk useless.
The second situation (changing from another Linux distribution to OpenLinux) can arise when converting a pre-existing GNU/Linux installation to OpenLinux. There are some combinations of partition type, size, and layout that confuse the custom (expert) partitioning tool in the Lizard installer. The capable tech support crew at Caldera were able to replicate a problem we found with a nine partition setup left behind by a Mandrake 6.2 installation. We note that the partitioning tools that are available once OpenLinux is running recognize these partition setups perfectly, and regard this as a bug in the list. This box is followed by directions on the use of the editor (shown on the same screen): Up Arrow and Down Arrow are used to select entries. Press 'b' to boot, 'e' to edit the selected command in the boot sequence, 'c' to get a command line, 'o' to open a new line after the current line ('O' uppercase, for a line above the current one), 'd' to remove the selected line, or press Esc to go back to the main menu. This last option takes you to a text-mode version of the boot menu previously seen within the Lizard partitioning tool.
The safe solution here is to backup all the data to another media, then use the partition manager from the original distribution installer to delete all the existing partitions, leaving free space on the drive for OpenLinux to work with.
Problem: I am having problems starting the installer so that it doesn't choke on my hardware. Is there any way to set the boot parameters manually on the installer?
Solution: When the installer process begins, the OpenLinux boot screen is displayed with the first option "Standard install mode (recommended)" selected. Before the countdown at the bottom of the screen hits zero, press 'e' (lowercase only, please). This brings up the Grub boot editor, which has an edit screen that looks similar to the following:
GRUB  version 0.5.94  (636K lower / 130048K upper memory)
__________________________________________________________
root (fd0)
kernel /vmlinuz vga=274 nosmp noapic debug=2 vga=274
initrd /initrd.gz
__________________________________________________________
(The bold text of the first linestands in place of an inverse text highlight bar across the top line in the graphical view.)
To make modifications to the installer boot mode, the second line ("kernel...") is the one to edit. There are a variety of boot parameters that can be used - these are listed in Table 5-1.
Table 5-1
List of Installation Boot Parameters
| Parameter | Description |
| er=cautious | Cautious (less aggressive) probing of system hardware, recommended in the case of initial install failure. Sound, mouse, and network hardware are left to the user to specify. |
| er=demo | Does a full mock install. Caldera specifically recommends this choice for use at trade shows. We have found it useful in walking people through the install without committing to disk. |
| er=expert | Calls the installer with the -noskip option, to allow the user to see all screens during installation, even those that have had the associated hardware correctly identified and setup. |
| er=hwinfo | After hardware probing, but prior to starting the Lizard installer, the system prompts you to insert a DOS-formatted floppy into the A: drive. The file hwinfo0.txt is written to the diskette. This file can be e-mailed to Caldera Technical Support (if you have that option through purchasing a retail version), to help them in identifying your hardware and your problem. |
| er=modules | The "er=modules" parameter forces the installer to request the modules floppy, and wait for it to be loaded before continuing. |
| er=noether | This parameter excludes all ethernet card probing from the install process. This is useful when the install is hanging up in that part of the probing process, or taking too long. |
| er=nofloppy | Skip the modules floppy altogether. |
| er=noothercd | Don't probe for proprietary CD-ROM drives. |
| er=nopcmcia | Don't probe for PC card devices. |
| er=text | Good only in eDesktop 2.4, this starts a text-mode, stripped-down, and modified version of the LISA installer, using the latest kernel, hardware probing, and other features borrowed from the Lizard. Screens from LISA that are not needed are never seen. |
| insmod= | Often used in concert with er=cautious to provide a specific driver module for the kernel. For example,install er=cautious insmod=ne%io=0x280%irq=10Note the explicit use of the % character to stand in place of a space in the command. |
| lizard=xxxxx | These are the unattended install modes, where the xxxxx stands in for auto, floppy, IPADDR:/PATH, or device. Find more information at http://www.calderasystems.com/edesktop/usersguide/ch13.html, in the section Special OpenLinux Installation Procedures. |
| lz=yyyyy | A veritable cornucopia of Lizard installer parameters: display ip:display, redirect the output to the given display language language, set the default language noanim, do not show animation at startup anim, show animation mouseprobe, probe mouse nomouseprobe, do not probe mouse netprobe, probe network settings nonetprobe, do not probe network settings server server, the X-server to use noskip, do not skip autodetected pages skip, skip autodetected pages demo, fake installation sound, enable sound playback nosound, disable sound playback For example, lz=nosound,server= XF86_Mach64 |
| vga=274 | VGA BIOS graphic mode of 640x480 in 16 colors. |
| vga=785 | VESA (Framebuffer) graphic mode of 640x480 in 16 colors. This is a slow, reliable video mode that should work on every video card. Recommended if the standard mode seems to break the display. |
Alternatively, in OpenLinux 2.3 or eServer, many of these options may be entered at the Lilo boot prompt, consecutively. For example:
boot: install er=expert vga=785
Problem: My laptop has an ATI Rage Mobility (aka the ATI Mach64 Mobility) chipset in it. After I've tested the video mode, the screen is garbled; I can't read it to proceed with the install.
Solution: Some laptop/chipset combinations demonstrate an incompatibility during mode-switching. This prevents the system from effectively returning to the 640x480 mode used by the Lizard after the video test completes. We were unable to replicate the problem with an Acer laptop that incorporated that particular chipset. Your experiences might differ. However, we were able to make the failure mode happen on another, older laptop. The correct short answer is to refrain from testing the video mode. Continue on with the installation, and make changes to the display sub-system later if necessary by running XF86Setup as the root user from a console after the install is complete.
Problem: When booting the Installation CD from within Windows, sometimes the system hardware is detected properly, other times it isn't. What's happening?
Solution: Booting the installer from inside Windows is one of those good news/bad news propositions. Most of our experiences on this topic are on the bad news side of the coin. Here is what is happening: A running Windows installation pre-initializes some of the installed hardware, and that initialization confuses the Linux installer. For this type of problem, try starting the Binaries and Installation CD-ROM directly from a cold boot (power up), which ensures that all the hardware is reset properly.
This is also true for general booting of certain laptop models. A reboot from Windows that doesn't involve a power-down cycle can leave the pointing device (especially touch pads) in a state that can't be read by Linux on a [warm] reboot. The only cure for this problem is to shutdown the computer fully, and restart.
The good news side of starting the installer from within Windows is that it can assist the Lizard installer in correctly identifying some types of hardware. For example, a system using a Sound Blaster (SB) compatible soundcard might install better from Windows, since the card is pre-initialized in SB mode.
Problem: I have attempted to install OpenLinux on my laptop but when it gets to the loading Lizard part, it plays some music, the screen goes blank, and nothing more happens.
Solution: Laptops have long been regarded as the bane of Linux computing. In years past, many hardware compromises were made to shoehorn enough functionality into the small packages. Recently, both laptop hardware and GNU/Linux capabilities have improved tremendously. OpenLinux has generally been a very laptop-friendly distribution, and we have successfully installed it on several laptops ranging in age from zero to about five years.
To address the specific question: Display problems are the most common primary failure mode for installation onto a laptop. The video hardware is frequently a sub-set of a known (and recognized) piece of hardware, limited for both power consumption and heat dissipation purposes. This causes the Lizard installer no end of grief. Our counsel is to use the VESA or the Non-Graphical install modes from the CD-ROM. Failing that, try working with the Lizard or LISA boot floppies. The trick is to get through the install, get a working system, then play with getting the video system running.
Check the "Linux On Laptops" Web site at http://www.cs.utexas.edu/users/kharker/linux-laptop/. Additionally, there is a Linux Laptop HOWTO located on the Linux Documentation Project site at http://www.linuxdoc.org/HOWTO/Laptop-HOWTO.html
The problems at hand in this section are:
Problem: When the computer is turned on, it boots into Linux by default. How can I get the Grub bootloader to offer Windows as the default OS in my dual-boot system?
Solution: The Grub bootloader process is controlled by the file called /boot/grub/menu.lst. The following is a representative sample of a dual-boot system menu.lst file (line numbers added for convenience):
1  #
2  # /boot/grub/menu.lst - generated by Lizard
3  #
4
5
6  # options
7
8  timeout = 5
9  splashscreen = (hd0,1)/boot/message.col24
10
11 default = 0
12
13 title  = Linux
14 root   = (hd0,1)
15 kernel = /boot/vmlinuz-pc97-2.2.14-modular vga=274  noapic nosmp debug=2
16 root=/dev/hda4
17 title = Windows
18
19 chainloader = (hd0,0)+1
The critical point for the default boot OS is line 11. The choices are numbered starting with 0 (zero). The first title line is Linux (on lucky number 13), which is the first (or zero) OS. The second title, for Windows, is seen on line 17. To tell the Grub bootloader to run Windows by default, change line 11 to read default =0, using a text editor as root.
Hint
When modifying system files, first make a copy of the existing, working file. This is accomplished by the simple expedient of typing (for example) cp menu.lst menu.lst.orig from a command prompt prior to making your changes. That way, if the changes turn out to be a mistake, then a simple copy operation is all that's necessary to return to a known good point in the process.
There are usually a large number of questions about the Grub tool, as it is a fairly recent addition to the Linux toolbox. We have included larger sections on Grub and its older alternative, Lilo, in the section "Startup and Shutdown" in Chapter 19. If your goal is to remove Grub from the system and use Lilo instead, read on.
Problem: I want to use the Lilo bootloader instead of Grub. I don't need the special capabilities of Grub, and I know Lilo and its configuration. Are there any special problems in replacing Grub? I didn't see an option for Lilo in the installation routine.
Solution: While the Grub offers both ease-of-use features and added functionality, clearly Lilo has its adherents. Lilo is among the default packages installed with OpenLinux 2.4. Additionally, the /etc/lilo.conf file is pre-built to provide the same configuration as Grub. So using Lilo is a simple process (although our version varies from the Caldera Knowledge Base somewhat, and the comments before each command are for your benefit, not to type in):
Become the root user. Then change the current directory to /boot. (By the way, that's a really bad root password shown below. We recommend something more secure <g>)
[syroid@donovan syroid]$ su
Password: root_password

[root@donovan syroid]# cd /boot
Make a recursive backup copy of the Grub sub-directory into the temporary storage area of your filesystem. The recursion ensures that you get not only the sub-directory and its contents, but any existing structure below that point.
[root@donovan boot]# cp -R grub /tmp
Completely remove the Grub directory and all its contents. The "-rf" options to the rm command instruct that the removal be recursive (to include directories) and forced (no prompting). While this is a handy command, read it twice after you've typed it, then press Enter. If you make a typing mistake in an "rm -rf ..." (and we have), then who knows what you'll delete. It depends on the typo.
[root@donovan boot]# rm -rf grub
You should examine your Lilo configuration file to determine that it meets your needs. We use the cat utility, below. Immediately after installation, there should be no changes required. On the other hand, if you have made edits to the /boot/grub/menu.lst file to change boot parameters, and so on, then similar modifications need to be made to lilo.conf.
[root@donovan boot]# cat /etc/lilo.conf
#
# /etc/lilo.conf - generated by Lizard
#

# target

boot = /dev/hda
install = /boot/boot.b

# options

prompt
delay = 50
timeout = 50
message = /boot/message

default = linux

other = /dev/hda1
        label = Windows

image = /boot/vmlinuz-pc97-2.2.14-modular
        label  = linux
        root   = /dev/hda4
        vga    = 274
        read-only
        append = "debug=2 noapic nosmp"
To change your default boot loader from Grub to Lilo, simply type:
[root@donovan boot]# lilo
Added Windows
Added linux *
The asterisk next to linux indicates the default OS. This is set up by the "default=..." line in /etc/lilo.conf.
Hint
To see what the lilo command is going to do, without actually taking action, typelilo -v -t. This runs lilo in verbose (-v) test (-t) mode. For more details on the output from this, consult the lilo manual page.
[root@donovan boot]# reboot
There is only one way to test a Lilo configuration - that's to reboot your system. This process works for us. Caldera actually recommends simply removing the Grub files, then using RPM to delete the Grub package. We prefer to hold off on that measure on the off chance that we change our mind. The package can always be removed later. Now for some other challenges related to the Grub bootloader.
Problem: I am using eDesktop 2.4 and I would like to see the normal text scroll by as the boot processes start up. I cannot seem to disable this anywhere. Is it possible to eliminate the graphical boot screen?
Solution: This is easy to specify with two simple changes to the /boot/grub/menu.lst file. The additional text in the file is marked in bold text. We first made a backup of the existing data. Note that we put a modification comment into the file near the top. This is always a good practice when editing configuration files.
1  #
2  # /boot/grub/menu.lst - generated by Lizard
3  #
4  # 07/28/2000 Modified by Bilbrey - no splash and vga to normal
5
6  # options
7
8  timeout = 5
9  # splashscreen = (hd0,1)/boot/message.col24
10
11 default = 0
12
13 title  = Linux
14 root   = (hd0,1)
15 kernel = /boot/vmlinuz-pc97-2.2.14-modular vga=normal noapic nosmp debug=2
16 root=/dev/hda4
17 title = Windows
18
19       chainloader = (hd0,0)+1
By putting a hash mark (#) in front of the "splashscreen = ...", we prevent that line from being read by Grub altogether. Instead it is simply passed over as a comment. Replace the vga=274 option with vga=normal to disable the extended text mode of the default Grub boot sequence. Be careful not to introduce a newline (carriage return) into the "kernel =" line, as this usually causes the boot to fail, perhaps in a spectacular or confusing manner.
Problem: I have an old VGA monitor. It worked fine for me on Windows, but I can't find the name (or manufacturer) anywhere in the list on the Monitor Selection screen during an eDesktop install. What's the routine to configure OpenLinux for an unlisted monitor?
Solution: You can configure your monitor successfully as one of the generic models listed in the "typical" section during the installation. Login as the root user, and type lizardx at a command prompt. lizardx runs through the mouse, keyboard, video card and display setup processes with exactly the same dialogs as in the installer. Figure 5-2 shows the Select Monitor screen from Lizardx.
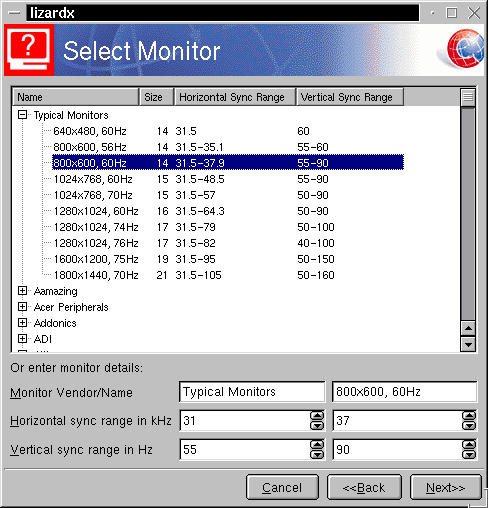
Figure 5-2
Choosing a "typical" display from the Select Monitor screen in Lizardx.
Unfortunately, there are some configurations (for instance, Brian's laptop) where lizardx doesn't work unless a graphical display is already up and running in some form. In these cases, or if lizardx isn't installed, you will need to run XF86Setup (typed as shown, with upper- and lowercase letters) to configure the X Window server. Figure 5-3 shows XF86Setup, which starts by running in a basic (640x480) VGA mode.
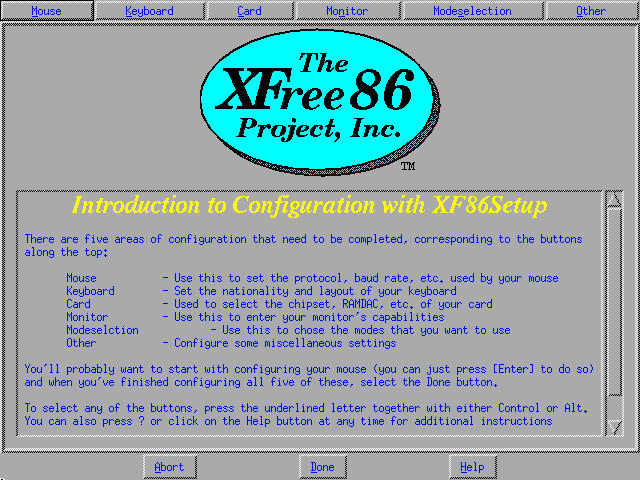
Figure 5-3
The splash screen from XF86Setup shows the five areas of configuration.
Problem: When running in 640x480 or 800x600 video resolutions, some applications such as the KDE Control Center cannot be used properly - the dialog box is larger than the viewable screen, and critical buttons, such as "OK" or "Cancel" cannot be seen or used.
Solution: Either during installation or by running either Lizardx or XF86Setup following installation, change your video mode to enable virtual desktops. This will turn your low-resolution screen into a scrollable "window" to a higher-resolution desktop. This will let you use all parts of a large window, such as the KDE Control Center. Figure 5-4 shows the specific screen from Lizardx, with a drop-down list box located at the lower left corner, which allows selection among the various higher "virtual" resolutions. The effect of a virtual desktop is to use the pointing device at the edges of the screen to "drag" a window the size of your actual physical resolution around on a larger virtual workspace.
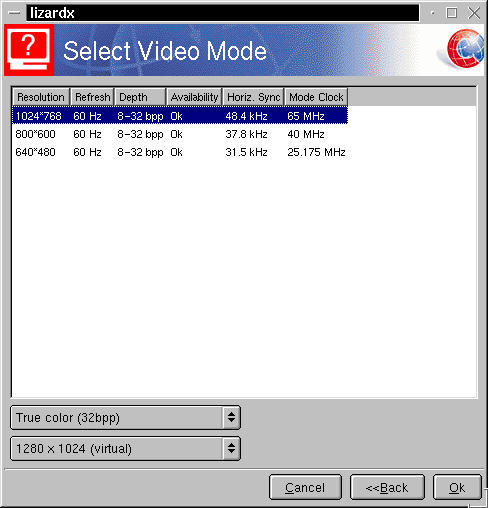
Figure 5-4
Video Mode Selection from Lizardx, with virtual screen option at lower left.
Problem: I can't create a boot floppy during installation (my laptop didn't come with a floppy drive). Can I boot into my OpenLinux system with the Installation CD-ROM?
Solution: Yes. This is also a useful method when there wasn't a boot floppy created during the installation process. We describe this procedure for an eDesktop system. Boot up your computer with your Binaries and Installation CD-ROM in the drive. Using the Arrow keys, highlight the Standard Install on the menu (or the cautious install, if you know that this is necessary for your hardware). Then type e. This displays three lines of parameters that you can edit. The first line should say "root (fd0)" The second line is a list of kernel parameters, and the third line specifies the initrd (Linux shorthand for INITial Ram Disk). Highlight the second (the "kernel=..." line), and type e to edit it. At the end of this line, add the following text:
root=/dev/[boot_partition] BOOT_IMAGE=boot
The [boot_partition] section should be replaced with your specific root device information. For example, to boot from /dev/hda2 you would type at the end of the kernel line:
root=/dev/hda2 BOOT_IMAGE=boot
After changing the line, press Enter to leave the edit mode, and type b to boot. The most common error in this process is leaving edit mode by pressing Esc (which aborts the edit and abandons the changed text) instead of Enter. We've tested this with both ATAPI SCSI devices.
Problem: I didn't make a rescue boot disk during installation. Can it be done now, or do I have to install the system again to make one?
Solution: While booting into your installed OpenLinux system with the Installation CD-ROM works, as noted in a prior solution, a backup boot floppy is always a good idea. In order to accomplish this procedure, you'll need an installation CD-ROM (either one from the retail package, or the downloadable ISO image CD-ROM), and a 1.44MB floppy disk that you can erase.
[syroid@donovan syroid]$ su
Password: your_root_password
[root@donovan syroid]# mount /mnt/cdrom

[root@donovan syroid]# cd /mnt/cdrom/col/launch/floppy
Make sure that the write protect tab is covering the slot, then insert the floppy. The following command copies the floppy image file onto the diskette:
[root@donovan syroid]# dd if=install.144 of=/dev/fd0
Once the floppy write process is done, mount the floppy in order to edit the syslinux.cfg file.
[root@donovan syroid]# mount /mnt/floppy

[root@donovan syroid]# vim /mnt/floppy/syslinux.cfg
This opens the vim editor (see Chapter 16 for details about vim and other editors) on the file syslinux.cfg, which controls the booting process. The changes are in boldface, and in the append line (at the bottom), substitute your root device for ours.
# default install
default boot
prompt 1
timeout 30
display boot.msg
F1 boot.msg
F0 syslinux.cfg
label install
  kernel vmlinuz
  append vga=274 debug=2 nosmp noapic BOOT_IMAGE=install initrd=initrd.gz local
label boot
  kernel vmlinuz
  append vga=274 debug=2 nosmp noapic BOOT_IMAGE=boot initrd=initrd.gz local
     root=/dev/hda2
Save the file. Then unmount the floppy. This is an important step and one that is often forgotten. Unlike Windows or DOS, Linux and its cousins don't always write directly to a device, but buffer the output so that the OS can continue. If you pop out the floppy without unmounting it first, it's likely to have corrupt data on it. Unmount the CD-ROM too, before you eject it from the drive.
[root@donovan syroid]# umount /mnt/floppy

[root@donovan syroid]# umount /mnt/cdrom
Now reboot your system to test the rescue floppy. Make sure that the BIOS is set to boot from the floppy drive (sometimes referred to in the BIOS setup as "Removable Drives") before the HDD.
Problem: The drive access light on my system is constantly blinking. The system is running OpenLinux eDesktop. Can I (or should I) make it stop?
Solution: There is a little Compact Disk icon in the KDE system tray (in the lower right corner of the desktop) from a program called kautorun. This progarm monitors the CD drive in order to auto-play audio disks or auto-start/mount data discs. Right-click on the icon, and select "Quit." As long as you log out of that session normally, kautorun won't return to bother you. If you logout of a later session with kautorun enabled, then it will return again at the next login.
Problem: OpenLinux is installed in 15GB of space at the back of a large hard disk (more than 30GB). The install went fine and the first boot went just fine. Now, neither Windows nor eDesktop will boot. I thought Grub could handle big drives better than the old bootloader. Do I have to start over?
Solution: There are several ways to approach this problem. We'll give you the easy, and then the fast answer. The easy solution is to boot with a DOS or Windows boot diskette, and at the DOS prompt, type fdisk /mbr. This clears the non-functioning version of the bootloader out of the drive, and has always returned our Windows partitions to regularity. Once Windows is booting again, reinstall OpenLinux. Ensure that you put a checkmark in the "Write master boot record" box on the Set Up Bootloader screen during install. Then Grub will properly manage booting both Windows and Linux.
Warning
There are no guarantees that come with our information. These sorts of solutions have worked well for us today and in the past. But programs like fdisk work on the hardware at low levels, and have the potential to kill as well as cure. Of course, if no operating system is booting, then there's very little to risk, is there?
The much faster (but more challenging method) involves booting into OpenLinux using either the rescue floppy, or starting up by booting into the system using the Installation CD-ROM, as discussed previously in this section. Then, as root, edit /etc/grub.conf, to reflect the locations to install the stage 1 and stage 2 bootloaders. A typical grub.conf file follows, used to dual-boot one of our systems (lines 6 and 7 are continued for display purposes, but should be typed as a single line):
1  #
2  # /etc/grub.conf - generated by Lizard
3  #
4  #
5  root (hd0,1)
6  install /boot/grub/stage1 (hd0,1) /boot/grub/stage2 0x8000
     (hd0,1)/boot/grub/menu.lst
7  install /boot/grub/stage1 d (hd0) /boot/grub/stage2 0x8000
     (hd0,1)/boot/grub/menu.lst
8  quit
The configuration file is actually a list of commands to the grub utility, instructing it where to put various pieces of the bootloader. Our actual partition table for this system currently has Windows loaded on hda1, OpenLinux loaded on hda2, and a swap partition as hda3. Grub speaks a slightly different language. Drives are numbered, rather than lettered (Linux hda is equivalent to Grub's hd0), and partitions are comma-separated from the drive ID, and are numbered, starting with zero. So Grub refers to hda2 as hd0,1.
In the configuration file, the Stage 1 bootloader is put into both the hda2 partition, and into the MBR. It is line 7 that is lacking, if your system won't boot. The key to writing the bootloader into the MBR (letting Grub handle boot management for you) is the "d (hd0)" part of line 7. You'll need to make the information specific to your system though. Pay special attention to the root drive specification. If your root partition is hdb7, then line 5 should read root (hd1,6).
Once you've modified the grub.conf file to your system's requirements, we need to install the modified Grub system. Unlike modifications to the /boot/grub/menu.lst file, grub.conf changes must be explicitly installed.
[root@donovan syroid]# grep -v ^# /etc/grub.conf | grub --batch
Probe devices to guess BIOS drives. This may take a long time.

    GRUB  version 0.5.94  (640K lower / 3072K upper memory)

 [ Minimal BASH-like line editing is supported.  For the first word, TAB
   lists possible command completions.  Anywhere else TAB lists the possible
   completions of a device/filename. ]

grub> root (hd0,1)
 Filesystem type is ext2fs, partition type 0x83

grub> install /boot/grub/stage1 (hd0,1) /boot/grub/stage2 0x8000 (hd0,1)/boot/g rub/menu.lst

grub> install /boot/grub/stage1 d (hd0) /boot/grub/stage2 0x8000 (hd0,1)/boot/g rub/menu.lst

grub> quit
The command line at the top of the listing uses the grep utility to strip out the comments from the configuration file, then feeds what remains to the grub program, in batch mode instead of the default interactive style. If Grub runs with no error messages then all is well. One caveat - if there's a blank line in the grub.conf file, then Grub will print a message like:
grub>
Error: Unrecognized command
This error is not a real problem, as Grub simply doesn't like blank input and displays its displeasure. Now, eject the boot floppy or CD-ROM, reboot the system (usually by typing shutdown -r now, where the -r stands for "reboot"), and test your freshly dual-booting computer.
In this section, we address various learning opportunities that aren't related directly to installation. However, these topics often provide an immediate target for that "urge to fix something broken" that overcomes us once in a while. In addition, there are a few problems mentioned in this section, like the upcoming Netscape issue, which are also security updates in disguise. Have a look around. If any of these items listed are giving you more excitement than you bargained for, then the answers are here.
Problem: Netscape crashes when I look hard at the screen! When I try to access a secured site, access my IMAP e-mail account, or use Webmin, Netscape 4.72 suddenly quits. How can I fix this?
Solution: Netscape 4.72 is the version that ships with OpenLinux 2.4. The Netscape program and a couple of shared libraries1 that are part of the XFree group of packages need to be upgraded for more stable Netscape operation. Additionally, the 4.73 version provides fixes for recently uncovered vulnerabilities in the SSL transaction handling routines. This upgrade is strongly recommended. The most recent (current as of July 2000) versions of the required RPM packages are:
XFree86-libs-3.3.6-4.i386.rpm

communicator-4.73-2.i386.rpm

xswallow-1.0.18-2.i386.rpm
[root@gryphon RPMS]# rpm -Fvh XFree86-libs-3.3.6-4.i386.rpm
XFree86-libs          #########################################################

[root@gryphon RPMS]# rpm -Fvh communicator-4.73-2.i386.rpm
communicator          #########################################################

[root@gryphon RPMS]# rpm -Fvh xswallow-1.0.18-2.i386.rpm
xswallow              #########################################################
The called options for the rpm utility above, "-Fvh", instruct that the new files should be used to "freshen" the existing installed software, be verbose (display messages about program activity), and print a list of hash marks (as seen previously) to visually indicate the installation of the requested package. By the way, the difference in RPM-speak between freshen, update, and install is that freshen only installs if an older package version is present. Update installs regardless, but runs the installation scripts in such a way as to be extra careful of user-modified configuration files.
Warning
A late security update just crossed our radar screens. We have seen warnings from several different Linux vendors that there is a buffer overflow exploit that affects all versions of Netscape between 3.0 and 4.73. At the time of this writing, there were no updates for this problem available from Caldera. However, we do anticipate a release soon. If you can't find it in the updates, then uninstall your Netscape RPMS, fetch the latest 4.75 from the Netscape, and install it manually following the excellent instructions on that site.
Problem: Does OpenLinux 2.4 come with any TrueType fonts? How do I use them?
Solution: OpenLinux 2.4 comes with a large number of TrueType fonts. They are found in the larabie-fonts RPM on the Installation CD-ROM, and are only loaded by default with the All Packages installation. Mount the disk and install the package as follows:
[root@gryphon RPMS]# mount /mnt/cdrom

[root@gryphon RPMS]# cd /mnt/cdrom/Packages/RPMS

[root@gryphon RPMS]# rpm -Uvh larabie-fonts-1.0.i386.rpm
xswallow              #########################################################

[root@gryphon RPMS]# cd ; umount /mnt/cdrom
Once you have installed larabie-fonts, restart the X Server. This can be accomplished by logging out of KDE, then using the "Restart X Server" option after selecting Shutdown from the Login dialog box, as shown in Figure 5-5.
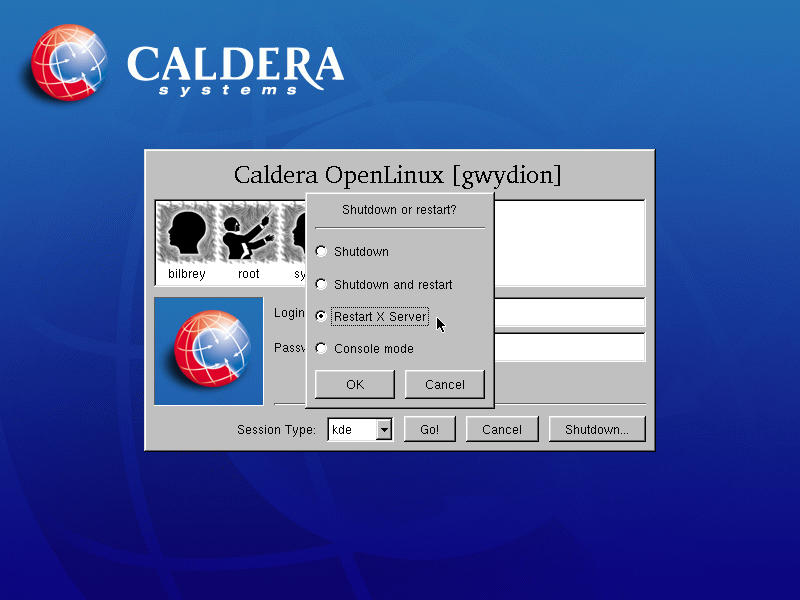
Figure 5-5
Restarting the X Server from the Login Dialog Box
Another way to restart the X Server is by typing Ctrl+Alt+Backspace, (after closing any open applications, since this method forcibly closes all running user processes, then kills and restarts X). If the fonts are still not available, be sure that the FontPath variable is defined in your /etc/XF86Config file for the TrueType fonts. There should be a line that reads:
FontPath "/usr/X11R6/lib/X11/fonts/TrueType"
If this line is not present, then enter it on a separate line next to the rest of the FontPath statements in the Section "Files" of /etc/XF86Config. Restarting the X Server is also necessary after modifying the configuration file as discussed.
Problem: One of the earliest oddities we noted when beginning this odyssey was an unexplained error message in the shutdown sequence, on a fresh installation. It is generally our experience that fresh installations are not supposed to have error messages, as this indicates a broken package. The error reads:
keyserver forget to set AF_INET in udp sendmsg. Fix it!
Solution: OpenLinux 2.4 comes with a "lite" version of the Caldera image management software, Cameleo. When installed, there are two services related to Cameleo that run by default - /opt/cameleo/bin/calserver and /opt/cameleo/bin/keyserver. There are some very interesting explanations for this behavior and the associated error message. Our best detective work indicates that the error lies with the keyserver program, and that it is probably harmless, as the Caldera Knowledge Base claims.
On the other hand, these services only need to be running if you are using Cameleo. To disable the Cameleo services, open the menu K --> Settings --> COAS --> System --> Daemons. From the displayed dialog box, uncheck the box next to Cameleo Servers. After one more system shutdown, the error message will trouble you no more (unless you re-enable the services).
Problem: How can I mount, read, and write to my windows (FAT32) partition as a normal user, rather than just as root?
Solution: Edit the /etc/fstab file and change the "/dev/hda1..." (or whichever partition is appropriate) line to read as follows:
/dev/hda1 /mnt/hda1 auto defaults,user,suid,nodev 0 0
Unmount the partition as root and then log in as a regular user. You are then able to mount it without problems. Test the read/write by typing touch /mnt/hda1/testwrite. If the file is created, then everything is working fine (and the file can be deleted).
Problem: I can't change my video modes - all I get is one resolution in X. I have read that I can use Ctrl+Alt+KP_Plus or KP_Minus (from the numeric keypad) to increase or decrease my screen, but when I do this, nothing happens. Why?
Solution: The installation process only allows the selection of a single video mode. Recall that a video mode is a combination of display resolution and color depth that your monitor can show, given its operating characteristics. In the screen section of the configuration file /etc/XF86Config, you can see that for each color depth, one or more display resolutions can be listed, as the following listing shows:
Section "Screen"
   Driver          "Accel"
   Device          "ATI Mach64 Mobility"
   Monitor         "LCD 1024x768"
   DefaultColorDepth 32
   BlankTime       0
   SuspendTime     0
   OffTime         0
   SubSection "Display"
      Depth        8
      Modes        "1024x768" "640x480"
      Virtual       0 0
   EndSubSection
   SubSection "Display"
      Depth        15
      Modes        "1024x768" "640x480"
      Virtual       0 0
   EndSubSection
   SubSection "Display"
      Depth        16
      Modes        "1024x768" "640x480"
      Virtual       0 0
   EndSubSection
   SubSection "Display"
      Depth        24
      Modes        "1024x768" "640x480"
      Virtual       0 0
   EndSubSection
   SubSection "Display"
      Depth        32
      Modes        "1024x768" "640x480"
      Virtual       0 0
   EndSubSection
EndSection
There are a number of sections in an XF86Config file, which address mouse, keyboard, and a variety of screen server types, from standard VGA16 through the specialized accelerated X Servers, shown in the preceding excerpt. Ignoring many of the other features, notice that the color depth (DefaultColorDepth) is set to 32. This instructs us to look to the Display subsection for 32-bit color, where the listed modes are "1024x678" and "640x480".
Inline Footnote
These modes are written as quoted and run-together strings because the data 1024 x 768 actually has no meaning for the X Server. These are just convenient human-readable labels which key into the complete mode lines which the X Server uses to setup the video hardware appropriately.
Running the program XF86Setup generated this particular XF86Config file, which already has multiple modes available for each possible color depth. Also addressed earlier in this chapter, XF86Setup has a control called "Mode Selection" that allows multiple modes (resolutions) to be chosen and written into the XF86Config file.
Log in to X as the root user, and type XF86Setup in a terminal window. An initial text dialog box appears in the terminal window, ending with the question "Is this a reconfiguration?" Press Tab until "< YES >" is highlighted (if it isn't already), then press Enter. XF86Setup then starts up in a new graphical window. Choose from the buttons at the top of the window. This will allow you to choose multiple resolutions and color depths using the buttons on the dialog box, as shown in Figure 5-6.
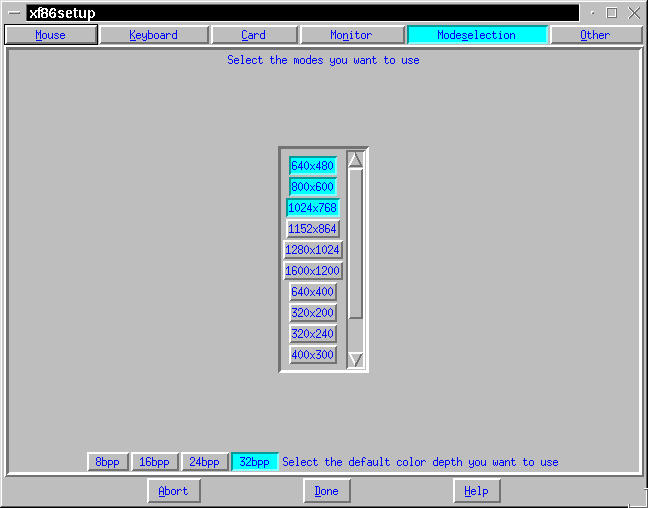
Figure 5-6
Choosing screen resolutions in the "Modeselection" dialog box from XF86Setup.
Depending on your hardware configuration, some options may be selected, yet not allowed. For instance, we can choose 1600x1200 for this laptop screen, but when we later examine the resulting XF86Config file, "1600x1200" is not one of the options available. This is because there is no way to display that resolution on this LCD, so there is no valid mode line with the "1600x1200" label, and it isn't accepted and written into the Screen section.
Once you have made these modifications to the configuration file, then restart X to incorporate those changes. Following that, you may use Ctrl+Alt+KP_Plus or Ctrl+Alt+KP_Minus to switch between valid resolutions without restarting the X Server.
Warning
Some laptops (like Gryphon, the previously mentioned Acer Travelmate) have a number of keys that are additionally designated as function keys, and using the Ctrl+Alt in combination with other keys often has unexpected results. This is especially true in the circumstances described here, since the numeric keypad is a special set of overlaid keys. You may not be able to do dynamic mode switching at all on a laptop computer.
Problem: After installing Perfect Backup from the commercial software disk of my retail eDesktop version, a new user, pbadmin, appeared on the list of users at the login dialog box when X starts up. Is this right, and can I make the pbadmin user disappear without breaking Perfect Backup?
<em>Solution: The user pbadmin is automatically created as a part of the Perfect Backup installation process. Do not delete pbadmin; this "user" is a necessary part of the Perfect Backup system, as it has the specific system permissions necessary to accomplish the required tasks. However, you can delete this user from the login screen dialog box. Login as the root user, and use the menus to select K --> Settings --> Applications --> Login Manager. While we cover the Login Manager in Chapter 8, Figure 5-7 shows the Users tab page from the KDM Configuration dialog box, displayed when Login Manager is run.
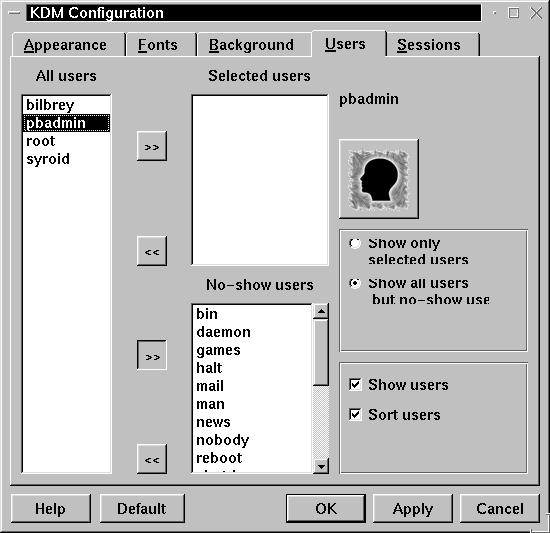
Figure 5-7
Moving users about in the KDM Configuration dialog (KDE Login Manager).
In order for the user pbadmin to not show at the Login dialog box, highlight the user on the list at left, then select the lower >> button to move pbadmin into the No-show users list.
Alternatively, move all the users back into the main list, then move the users you explicitly want into the Selected users list, and choose the "Show only selected users" radio button. Then, any additional users added during software installation are not shown by default. The drawback to this latter method is that adding new, real, users to the system requires the additional step of adding them directly via this method.
Problem: I've tried OpenLinux, and for now I want to go back to running just Windows. I formatted the whole hard drive. Then, during the Windows installation process when I reboot, I keep seeing Grub. How can I erase Grub from the hard disk (and how did Grub survive formatting the disk)?
Solution: Grub is written into the Master Boot Record of the booting hard disk, and is executed in order to load any operating system. In order to remove Grub, you should boot into the system using the DOS or Windows installation floppy and type fdisk /mbr. Then continue with the Windows installation.
Problem: In previous versions of OpenLinux that used the Lilo bootloader, I was able to specify a system runlevel at the boot prompt. How can I do this with Grub?
Solution: Changing from the default runlevel (usually 5, which is defined in OpenLinux as both multi-user and GUI) is a little better hidden in Grub than it is in Lilo. However, making the change is quite easy. When the booting Linux version is highlighted on the Grub boot screen, type e to begin the edit process. Use the arrow keys to select the second line, beginning with "kernel." Type e again, to edit that line. The cursor is pre-positioned at the end of the line (which may be wrapped on your screen, depending upon line length). Type the number of the desired runlevel (usually between 1 and 3, since 4 is unused, 5 is default, and 6 is shutdown), and press Enter to close the edit. Then type b to continue booting, using the revised entry. Descriptions of the OpenLinux runlevels (different distributions may define runlevels differently) are shown in Table 5-2:
Table 5-2
List of OpenLinux 2.4 eDesktop Runlevels
| Runlevel | Description |
| 0 | Complete system halt. |
| 1 | Single user mode, frequently used for system maintenance purposes. |
| 2 | Multi-user mode, without NFS. |
| 3 | Full multi-user mode. |
| 4 | nused in the current scheme. |
| 5 | Full multi-user mode plus launch GUI environment. |
| 6 | System restart mode (aka reboot). |
Note
This solution makes a one-time-only change. To craft a more permanent change to the system, edit the file /boot/grub/menu.lst. For instance, if you frequently need to boot into single user mode (runlevel 1), then create a new boot stanza which is a copy of the current one, give it a new title like "Linux Single," and add a "1" to the end of the kernel line. Then the new runlevel option shows on the boot screen, thereafter.
Problem: After running the Lizardx program from the console (to configure XFree86 after installation is complete), the console displays an error message:
Fatal IO Error: X Client Killed
Did the program crash (as it would appear), or did it work correctly?
Solution: This is a completely normal occurrence. From the perspective of the console process (where lizardx was started), the program dies inexplicably, thus the error message. As long as lizardx is completed by the user selecting the OK button, the program terminates properly.
Problem: I can't connect with the Internet after installation. No problems with the modem - I am on a network. Is there a problem with the gateway or DNS data? Can I change the DNS server configuration on my computer?
Solution: To check or change the DNS information for your system, use the taskbar menus: K --> Settings --> COAS --> Network --> TCP/IP --> Resolver. If you are the root user, the Name Resolver Setup dialog box is displayed (as shown in Figure 5-8).
Inline Footnote
Regular users may run the COAS tools. However, most of the utilities are superuser tools. Prior to the requested dialog, a root password prompt dialog appears, and it must be correctly completed to run the desired utility.
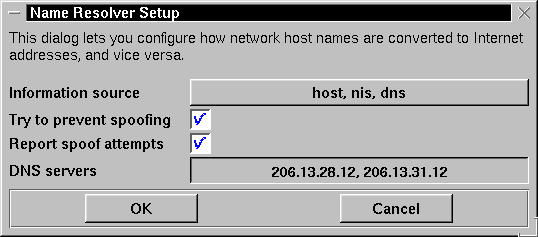
Figure 5-8
Making DNS changes with the Name Resolver Setup dialog box
To change or add DNS servers, press the button next to the "DNS servers" text. The button title is either "none" to indicate that no servers have been defined or, as Figure 5-8 depicts, a list of the current DNS servers. This action brings up the DNS Name Servers dialog box, which allows you to edit, add, delete, or change the query order of the defined servers in an intuitive manner.
Alternatively, for the command line aficionado, the file containing name resolution server addresses is /etc/resolv.conf. This file can be modified with any text editor.
However, the most common problem with network connectivity is that the route to the gateway server is sometimes left unset coming out of installation. To rectify the oversight, use K --> Settings --> COAS --> Network --> Ethernet Interfaces. An example of the resulting dialog box, Ethernet Interface Configuration, is shown in Figure 5-9.
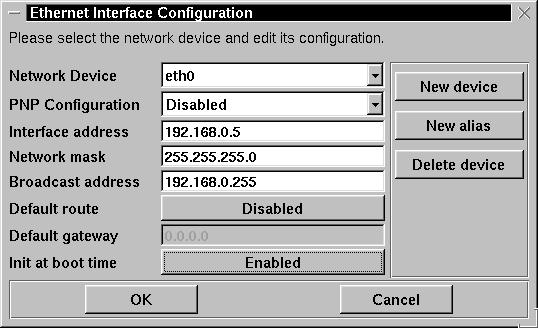
Figure 5-9
Ethernet card and interface configuration dialog box, default route disabled.
Press the Disabled button next to "Default route" to enable network routing, and then enter the correct information for your gateway server. If you are uncertain about the address of the gateway, then check with your ISP or System Administrator for the correct information. Close the dialog box by pressing OK.
Problem: After switching my drive to the second IDE controller, Grub stops at stage1. How can I make the drive work in a new location?
Solution: Mass storage devices are assigned in Linux according to their actual location on the IDE controllers, unlike the DOS/Windows environment, where the first hard drive is always drive C:, whether it is on the Primary or Secondary IDE controller. Table 5-3 shows the controller channels and device assignments:
Table 5-3
IDE Channels vs. Linux Device Names
| IDE Controller Channel | Linux Device Name |
| Primary Master | /dev/hda |
| Primary Slave | /dev/hdb |
| Secondary Master | /dev/hdc | Secondary Slave | /dev/hdd |
Let's assume for the purposes of illustration that the system was originally setup on a single hard disk designated as Primary Master (thus /dev/hda). The drive is then moved to the Secondary Master position (/dev/hdc), which breaks Grub. Our hypothetical prior partition layout is as follows:
Windows	/dev/hda1
/	/dev/hda2
swap	/dev/hda3
After moving the boot drive to another channel, there are only a few steps necessary to clean up the mess. First, note that all the partitions are now in the same device locations, except on /dev/hdc. So the OpenLinux root partition is on /dev/hdc2.
grep -v ^# /etc/grub.conf | grub --batch
1   # /etc/fstab on gryphon :: bilbrey
2   #
3   devpts /dev/pts devpts gid=5,mode=620 0 0
4   /proc  /proc proc defaults 0 0
5   /dev/cdrom /mnt/cdrom iso9660 ro,user,noauto,exec 0 0
6   /dev/fd0 /mnt/floppy auto defaults,user,noauto 0 0
7   /dev/hda1 /mnt/hda1 vfat ro 0 0
8   /dev/hda2 / ext2 defaults 1 1
9   /dev/hda3 swap swap defaults 0 0
reboot (or shutdown -r now, if you prefer as there's no functional difference). If the boot does not go according to plan, watch the error messages carefully for hints to the underlying misconfiguration, and repeat this process, checking all of the changes and additions. The first time we tried this, a simple typographical error took about 20 minutes to find. We were so sure that we had inputted all the changes correctly.Problem: How can I remove BootMagic from my hard disk?
Solution: Boot into Windows, then run the BootMagic configuration routine. Uncheck the box marked "BootMagic Enabled," then uninstall BootMagic. If that does not completely clear BootMagic from your drive, then boot your system using a DOS or Windows boot floppy, and type fdisk /mbr at the DOS prompt, to clean out the vestiges of BootMagic.
Problem: When I close my notebook and open it again, the system locks. I can't do anything but power-cycle the computer to reboot. Can I make Linux work properly with my notebook?
Solution: The behavior of Linux on a notebook is strongly dependent on the built-in routines that the hardware and BIOS provide for the various functions specific to portable hardware. On Gryphon the Acer Travelmate, closing the lid puts the machine to sleep automatically. Over approximately 25 cycles, only one ended with the system locked up solid. That's one too many, of course, as a hard boot is tough on the filesystem, and takes quite a bit of time (five to ten minutes) on reboot, to check and repair the partitions.
The solution is apmd, the Advanced Power Management Daemon. Unlike many other distributions, Caldera neither packages nor supports apmd. The Caldera Knowledge Base does note that apmd can be acquired from the site http://www.worldvisions.ca/~apenwarr/apmd, and installed using directions from that location.
Warning
Prior to installing apmd, you need to confirm that your kernel is compiled with Advanced Power Management BIOS Support enabled. By default, eDesktop does not have this feature enabled. Look to Chapter 7, Kernel Management, for details on compiling and installing a new kernel. The specific features to enable are located in the General setup section of the kernel configuration.
There are a wide variety of other resources for working with and troubleshooting OpenLinux specifically. We catalog both print and online assets in the following lists. By the time this is published, there are going to be changes and additions - use online search tools to locate resources and check them out. Find what works for you and keep learning.
Printed materials include:
Online OpenLinux resources can be found at:
Last, but by no means least, find and use your local Linux Users Group (LUG). We usually give readers GLUE (Groups of Linux Users Everywhere: http://noframes.linuxjournal.com/glue/) as a starting point in finding a local resource. Aside from usually regular meetings, LUG members often hold installfests. There the new user can bring in her hardware and GNU/Linux disks and get direct, hands-on assistance through installation. We strongly recommended this route for the utterly new user.
To reiterate, there are four keys to successful troubleshooting: Make one change at a time, document the process, concentrate on observing the results, and generalize from past successes and failures. The small number of possible challenges that we have addressed in this chapter are very similar to some of the other troubles that may crop up. The goal isn't to show you how to fix specific difficulties (although that's a useful side-effect), but to provide you with insight into the types of problem/answer combinations that appear in a freshly-installed Linux environment. This chapter covered the following points:
Go to the Table Of Contents