
Email Tom
Tom's Website


Email Brian
Brian's Website
|
Email Tom Tom's Website |
|
Email Brian Brian's Website |
Go to the Table Of Contents
Did you read the Preface? Thanks!
The developers of KDE got an odd idea from someplace: Provide a desktop environment and matching applications. If you point your favorite Web browser to http://www.kde.org/cvs-applications.html, you'll find a list of over 100 programs that are directly part of the KDE project. This includes programs like KFM (the KDE File Manager), which is part of the base installation, meaning that KDE doesn't run without it. KMail, KDevelop, and KWrite are also part of the project.
Additionally, there are numerous third-party programs written to the KDE environment. A listing of these applications (by type) is found at http://freshmeat.net/appindex/kde/. One of these is KIllustrator, a vector drawing package, which we'll look at in this chapter.
The KDE File Manager (KFM) is the core application of the KDE desktop. Many actions, from file management and application startup through browsing the Web, to FTP access and download, are all accomplished with this capable tool. Let's have a look at KFM, beginning with a home directory view depicted in Figure 10-1.
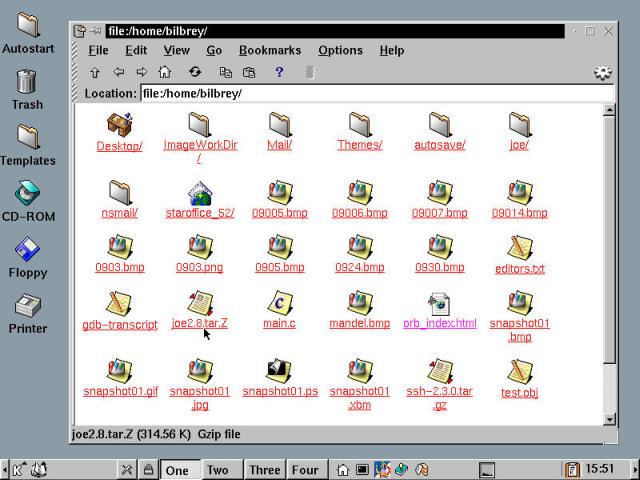
Figure 10-1
The KDE File Manager, showing an icon view of the home directory.
As shown in the figure, icon view provides a graphical representation of the file type. When the cursor is on a specific icon, the status bar at the bottom of the KFM window displays information about the file: name, size, and document type.
Hint
Directories are typically displayed as file folders under KFM. Some programs, however, modify this default (for example, StarOffice) and replace the folder image with an application specific icon (see the StarOffice directory in Figure 10-1). In cases like this, the only sure-fire way to tell if the icon is referencing a file or a directory is to look for a trailing slash (/) in the name - any object sporting a trailing slash is a directory.
There are several pull-down menus accessible from a KFM window: File, Edit, View, Go, Bookmarks, Options, and Help. The curious blend of headings is based upon KFM's dual identity as both a file manager (local and FTP sources) and Web browser.
The File menu is fairly stock with the exception of one special item: Open Terminal. Selecting this option opens a Konsole terminal (see Chapter 15 for details) for quick access to the command line. The Edit menu contains four special selections, in addition to the standard fare. These are Show History, Show Cache, Mime Types, and Applications. The cache selection, with the Edit menu pulled down, is pictured in Figure 10-2.
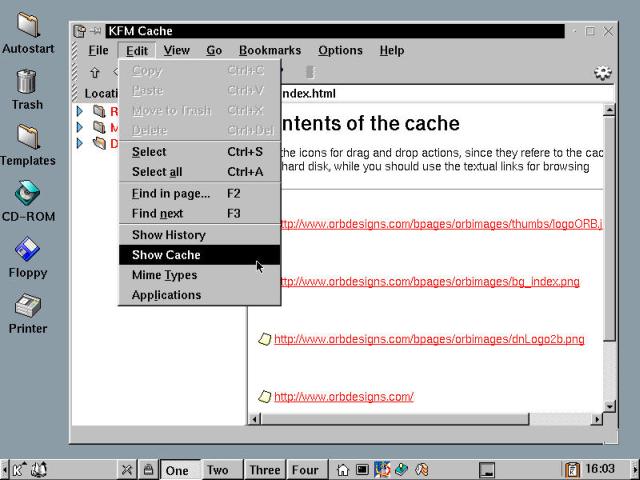
Figure 10-2
A KFM window with document cache and the Edit menu displayed.
The Show History and Show Cache options are views of saved prior states from KFM in its browsing mode. Mime Types and Applications are views of the "registered" applications and their associated document types. We touch briefly on this topic in Chapter 8.
The View menu provides a variety of choices for the style and selection of information displayed in the KFM window. Hidden files (also known as dot files, since they have a leading "." on the file name) can be toggled. A tree view (which appears in the background of Figure 10-2) is available as a separate pane. Additionally, icons can be replaced by thumbnails (of some image files) and a selection of text-only views can be chosen. Also, reload/rescan functions are available (for HTML pages, directories, and document/application type bindings). At the bottom of the View menu is a selection of HTML document controls, which are common to most browsers.
The Go and Bookmarks menus provide common browser functionality as well. Go is a dynamic menu listing of the most recent locations visited: Web, FTP, or local directory. Bookmarks can be set for all of those location types as well. The Options menu and a directory tree pane are shown in Figure 10-3.
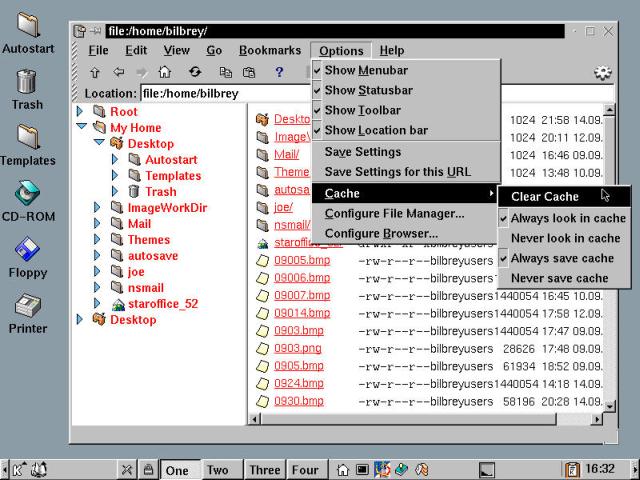
Figure <10-3/em>
A KFM window with the directory tree pane and Options menu open.
Aside from the window configuration items available on the Options menu, KFM settings can be saved globally or by URL. Selecting Cache opens a sub-menu with several option settings. The Configure File Manager and Browser options set the default aspects of KFM. These last two can also be configured from the KDE Control Center, under Applications.
Under the Configure File Manager option, fonts, and colors can be set on separate tab views from the dialog box displayed. The third tab, called Other, allows configuration of the tree view, as well as the selection of default programs invoked for terminal and editor applications. Both the File Manager and Browser configuration dialog boxes have help buttons that summon useful, context-specific KDE help pages.
The Browser dialog box contains setup details for Proxy and HTTP configuration. Additionally, per URL settings can be entered on the User Agent tab view, allowing the KFM to report itself to Web sites as a specific browser type. This is useful when the Web site contains validating code that restricts use to specific browser types. The final configuration tab is for Cookie control, and allows both general and site-by-site setup of a Web cookie acceptance policy.
The Contents selection from the Help menu is primarily useful if you're interested in an overview of the relationship between Mime types and application bindings.
The toolbar gives access to specific commonly accessed functions: Up, Back, Forward, Home, Reload, Copy, Paste, Help, and Stop. As with menu items, actions that don't apply in specific circumstances are grayed out. Also, right click in a KFM window, or on an item therein, to bring up a context menu that gives access to an applicable sub-set of the functions available from the menus.
Apart from its well-defined roles as file manager and Web browser, KFM is a capable FTP front-end as well. This is shown in Figure 10-4.
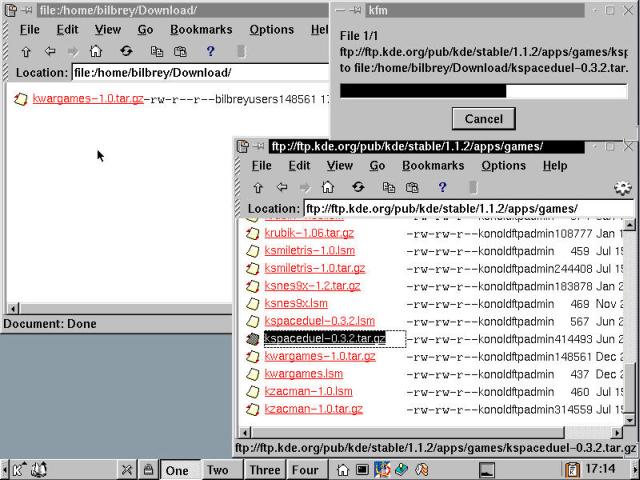
Figure 10-4
KFM offers drag and drop access to FTP site archives.
As a file manager with very configurable directory views, KFM is competent. As a browser, it is merely acceptable: it doesn't handle secure sessions at all, and its Java and Java Script functionality are non-existent (which, depending upon your tastes, may be an advantage).
However, the FTP site browser feature is elegant, simple, and built into the interface, the way it should be. Go to an FTP site, locate a specific file, drag it over to another KFM window (or onto the desktop, if you prefer that as a staging area) and drop. The FTP session is started and completed automatically, with a fully functional progress bar.
Coming Attraction
The KDE Help Browser, which is prominently featured throughout this book, is disappearing. The functions of a separate help browser tool have been included into the KFM tool, now formally called Konqueror, in the upcoming release of KDE 2.0. Look at Chapter 12 for some glimpses of things to come in the KDE environment.
KWrite is a text editor. It features a wide range of syntax highlighting rules for various writing and coding requirements, from HTML to C++ and far beyond. It can be invoked either by choosing K --> Editors --> Advanced Editor, by entering kwrite in response to the "Open with:" option from a file's context menu, or by typing kwrite onto the command line in an open terminal.
Warning
You can start KWrite from the command line. Keep in mind however, if KWrite or any other GUI application is started from within a virtual terminal session, then it is a child process of that terminal session. Functionally, this means that when the session is exited or closed, all of its child processes are killed as well. Try this by opening KWrite from a Konsole window, then close the window. This should remind you to save your work frequently. We do not often recommend starting GUI apps from the command line for this reason.
A KWrite window, open to the main.c file from the Joe editor code tree, is shown in Figure 10-5. One prominent feature of KWrite is that it uses what is commonly referred to as a ghost cursor. The figure shows a light cursor marking the current text insertion point, above and to the left of the "I" shaped mouse cursor. The insertion point can be placed anywhere, even beyond the end of text on any given line. When more text is entered, the blank between the insertion point and the ghost cursor is filled with space characters.
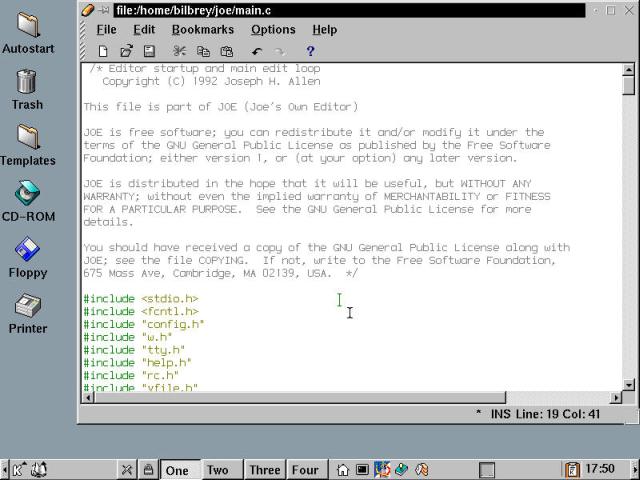
Figure 10-5
KWrite, the Advanced Editor of the KDE applications, open to a C file.
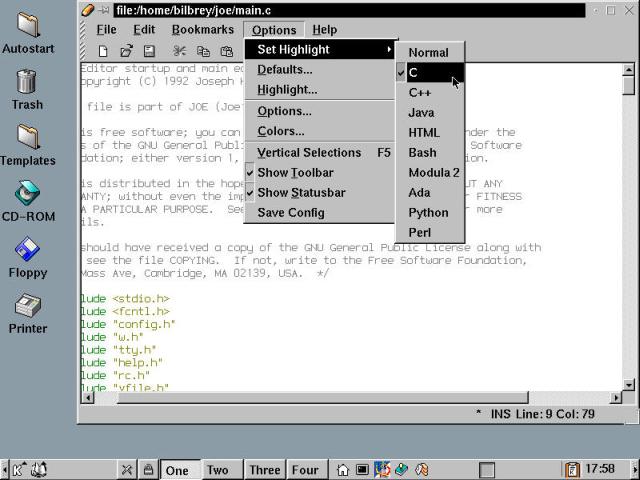
The KWrite menus and toolbar are standard and intuitive for users of GUI text editors from most other environments. Special features include bookmarks, which are dynamically configurable non-persistent targets into the current file (they do not live beyond the end of the editing session). The syntax highlighting is set from the Options menu, as shown in Figure 10-6.
Figure
The KWrite syntax highlighting menu.
Association with file type automatically chooses the highlighting rules by extension (.c and .h for C files, etc.). If there is no auto-selection, then the menu may be used to set the highlighting, by manually choosing the syntax rule set from the menu, as shown in Figure 10-6.
KWrite version 0.98, as packaged with Caldera OpenLinux eDesktop, does not directly support printing, nor is it configured directly as a programmer's editor with built-in compile and debug features. KWrite is a simple editor that works well.
KMail is a stable contender for an e-mail client if you only need POP or local (Linux) mail support. A basic configuration of KMail, demonstrating the mailreader panes (Folders, Message List, and Message Preview), is shown in Figure 10-7.
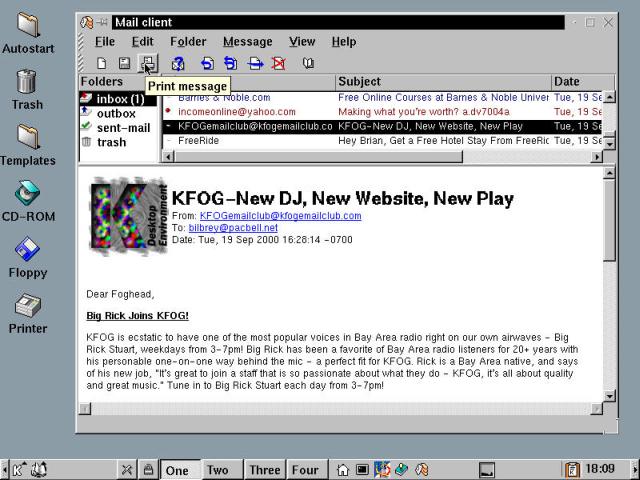
Figure 10-7
Reading incoming messages from a POP3 mailbox using KMail.
As illustrated, the expected functions are present on the toolbar in appropriate order: New Message, Save, Print, Check Mail, Reply, Reply All, Forward, Delete, and Address Book.
On the plus side of the ledger, KMail allows multiple POP identities for receiving messages. PGP/GPG message signing and encryption is easy to incorporate, once the tools are setup (see Chapter 22 for details on configuring PGP and GPG). The message filtering tools are powerful and intuitive, and the native message composer is simple to use. These are both shown in Figure 10-8.
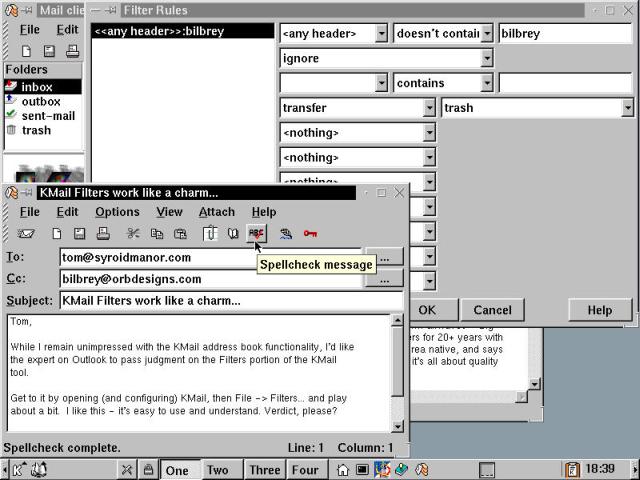
Figure 10-8
KMail Filter Rules in back, message composition window in the foreground.
Account creation is simple. Open the File --> Settings menu item within KMail, choose the Network tab, and select Add in the Incoming Mail section at the bottom of the dialog box. A sub-dialog is displayed. Choose between Local Mailbox and POP3 radio buttons. If you choose POP3, then the Configure Account dialog box is presented, as shown in Figure 10-9.
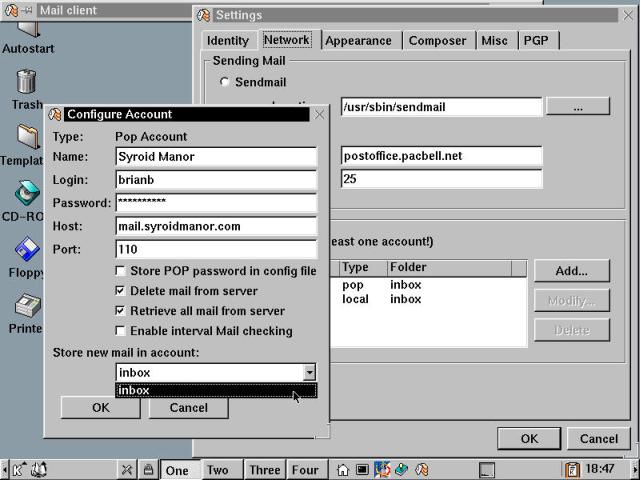
Figure 10-9
KMail Settings and Configure Account dialog boxes.
The defaults are generally good choices. One potential conflict of interest: Leaving the "Store POP password in config file" unchecked is a good thing for security reasons, in a shared, multi-user environment. The drawback is that you must enter a password every time it's needed. Once again, the battleground lies between ease-of-use and security.
Additional target folders (other than Inbox) must be created prior to starting the account creation process. Alternatively, monitoring a local mailbox for messages is quite easy - accept the default location for the mail spool file (usually of the form /var/spool/mail/username), and enable interval mail checking if desired. We haven't found a way to set the interval, which appears to default to about 60 seconds, so we leave interval checking off. Manually checking mail allows us more control over when we choose to deal with incoming messages.
On the Settings dialog box, there are six tabs: Identity, Network, Appearance, Composer, Misc, and PGP. Identity is a plain, fill-in-the-blanks form for Name, Organization, E-mail Address, Reply-To Address (optional), and Signature File. Be sure to fill in at least the first and third items when setting up KMail initially.
The Network tab view, which is partially visible in Figure 10-9, also contains items vital to proper setup. For outgoing mail, a local sendmail configuration can be used (see Chapter 25) or a smart host (mail service provided by another server on the local network or an ISP, as shown in the figure). The latter is the common configuration scenario for most users. At least one incoming account must also be defined, as previously discussed.
The Appearance tab provides configuration for Message List and Message Body fonts, in addition to a checkbox to set the folder pane to be equal to the combined height of the Message List and Preview panes on the left side of the KMail window.
The Composer tab view presents options for reply and forward text inclusion. Also automatic signature and PGP signature, word wrapping, and mono-fonts are configurable items. Lastly, outgoing messages can be set to be sent immediately or delayed until the next manual/automatic mail check, and 8-bit vs. MIME-compliant encoding can be enabled. Most people will want to set this option to MIME for compatibility with other common mail clients.
The Misc tab takes on the overflow from the other sections, allowing configurations for emptying the trash folder and sending mail on check. The Misc tab also contains settings for the automatic sending of confirmations (we always shut that off - no point in confirming our existence to a spammer automatically) and compacting folders on exit.
The PGP tab allows you to set the PGP/GPG User Identity, as well as offering to store the passphrase (DON'T!). Always encrypt to self as well (you never know when that laptop will grow legs).
KMail has three problems. First, HTML messages are entirely unsupported. Second, the KMail Address Book is virtually unusable. It doesn't tie in with the KDE Address Book, but instead is stand-alone and minimalist to the point of sheer silliness. Finally is a complete lack of support for IMAP servers. If none of these features are make or break for you, then this may be your e-mail client.
KDevelop is an IDE, or Integrated Development Environment. It is targeted towards (although not limited to) writing code for the KDE environment. Also, KDevelop is arguably the best-documented program we've found in the desktop, with a User Manual, Programming Handbook, Tutorials, and much more. A view of KDevelop in its Documentation personality is shown in Figure 10-10.
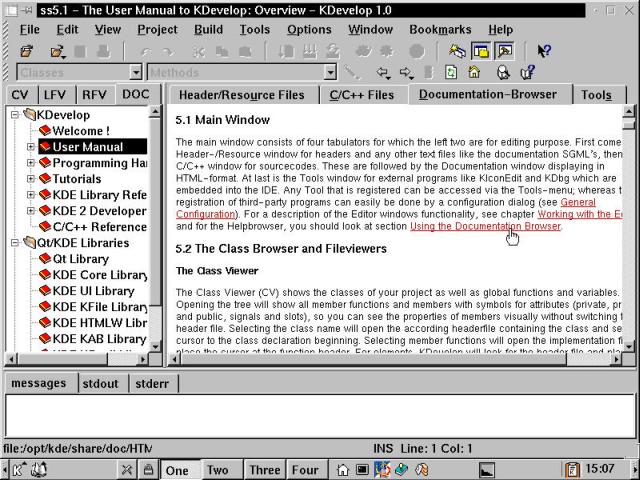
Figure 10-10
KDevelop, shown here while browsing through the extensive documentation.
KDevelop is a C++ development tool, and is strongly tied to the Qt GUI application development library. Qt provides the foundation of the KDE environment and is a product of TrollTech (at http://www.trolltech.com/). In its most recent version, Qt has been released as GPL licensed software. We recommend taking a brief look through at least the tables of contents from all of the bits of documentation so you can see what is where, for future reference.
Hidden Feature
An interesting oversight on the part of the program's developers is that the printing option is not available when viewing the documentation pages. To get to the manuals directly, point KFM atfile:/opt/kde/share/doc/HTML/en/kdevelop. This brings up the User Manual directly. Select View --> HTML (off) to see the tutorial. Other documentation is located under aptly named sub-directories.
Given the time constraints (we were trying to write a whole Linux book, not just a KDE development tome, after all), we bypassed the User Manual and the Programming Handbook and dove straight into the tutorial. The tutorial begins by covering highlights from the previous documentation. Then the fun begins. We open the Project menu, and select New. This action displays an Application Wizard that provides a series of form-filling dialog boxes. The Q&A culminates by choosing Create on the sixth and final screen of the dialog box, resulting in a functional KDE framework suitable for dropping in the code that defines our application. The wizard is shown running in Figure 10-11.
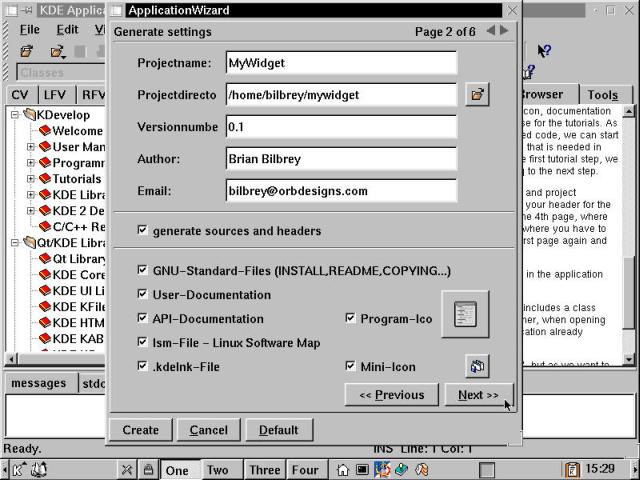
Figure 10-11
The KDevelop Application Wizard - it does the grunt work for you.
The latter pages of the Application Wizard set up CVS (version control software, optional) support, and comments for the file headers in the .h and .cpp files that make up an application's source code. On the final page, we're faced with a blank window, labeled Processes, in addition to the five buttons at the bottom of the dialog box. Following the tutorial's directions, we select Create.
The creation process which scrolls by our eyes over the ensuing two or three minutes looks very much like a make session, as the system environment is exhaustively checked, from the availability of programs needed for compilation to the presence of key system libraries. Then, all of the files defining the project are built from templates incorporating the data input in the Application Wizard screens. Everything from configure.in and a Makefile through the HTML templates ready to contain MyWidget documentation and the code files themselves are all put in place. After exiting from the wizard, we are presented with the screen as depicted in Figure 10-12.
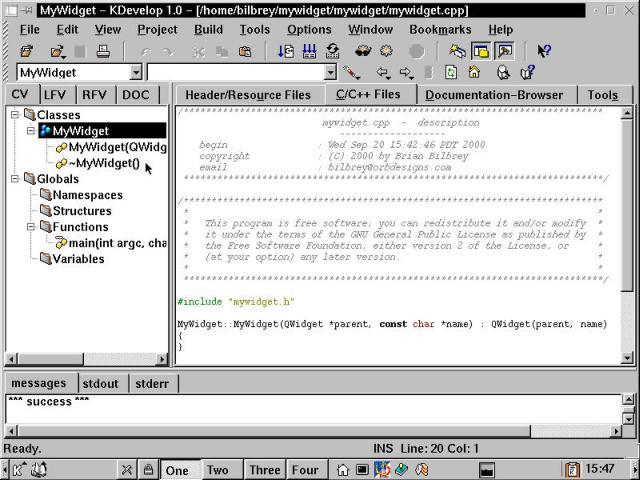
Figure 10-12
A ready-to-code KDE program, courtesy of the KDevelop Application Wizard.
Warning
You'll observe that the code defaults to GPL. This is important, since KDE programs link to KDE and Qt libraries that are GPL and/or QPL (the Qt Public License, under which this version of Qt was released). This requires that programs written to this environment, using these libraries, must also effectively be released under the GPL. For license information and restrictions, please refer to the license sources at http://www.fsf.org/ and at http://www.trolltech.com/; read and understand them if you plan on coding for the KDE desktop.
As we continue to follow the tutorial directions, we are told to cut a code example from the tutorial, and paste it directly into the program window, in the selected location. One small problem: No code sample. Hmmm.
A bit of hunting about later, we determine that the desired code sample is found in the KDE and Qt Libraries page of the Programming Handbook. We can just hear the documentation authors whispering, "We told you to read those first." Then we select File --> Save, followed by Build --> Make from the pull-down menu, which ends with the message in the lower output window, "*** success ***".
Choosing Build --> Execute first checks, then runs our simple first program, MyWidget. The application, which contains a single button entitled "Hello World!" is shown in Figure 10-13, floating over the Edit window. While working though this and the other tutorials doesn't make us KDE developers, this exercise is a baby step on that road.
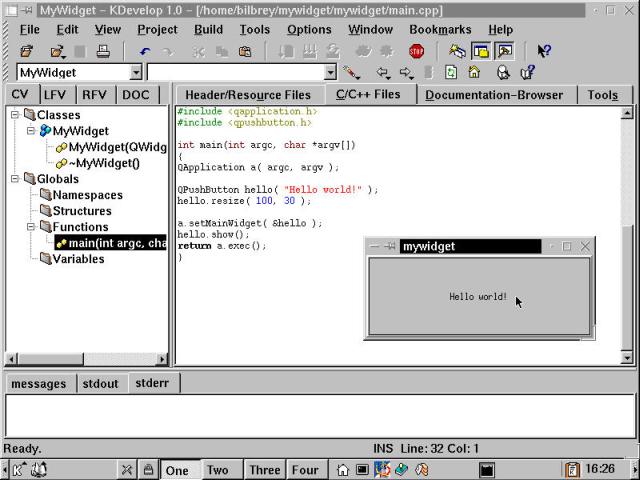
Figure 10-13
The first KDevelop tutorial application: Hello World!
Clearly there is a lot to be learned about coding to KDE, and it isn't all in the KDevelop documentation, although it does provide a good starting point. If you're really interested in programming for the KDE environment, get on the KDE developer mailing lists (found at http://www.kde.org/contact.html): read, ask questions, and learn.
KIllustrator is an archetypal Linux program. It was written because it scratched a developer's itch, in this case Kai-Uwe Sattler. The following is an excerpt from the KIllustrator home page (http://wwwiti.cs.uni-magdeburg.de/~sattler/killustrator.html):
"... I have started this project because I am tired of switching to Windows in order to design illustrations for papers or slides with a modern drawing tool."
Following in the wake of tools like Adobe Illustrator and Corel Draw, KIllustrator provides amateur graphics artists such as ourselves with all the functionality we need. A simple piece of artwork, generated via trial and error over a five-minute span, is shown in Figure 10-14.
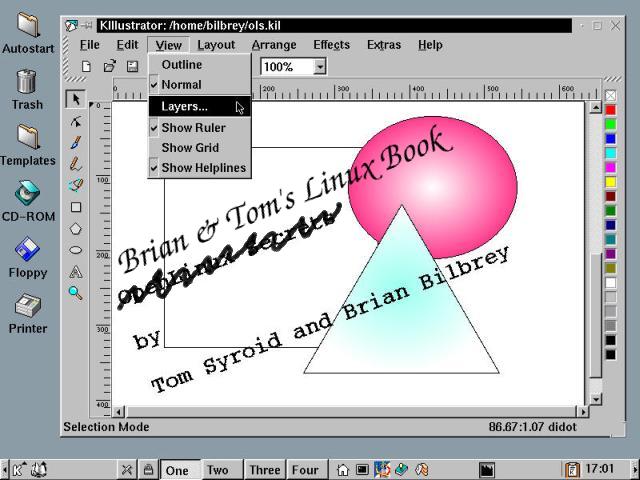
Figure 10-14
KIllustrator, a vector drawing program for the KDE environment.
The File menu contains the usual entries, as well as import and export functions. The export formats are GIF, XPM, EPS, PNG, JPG, and PPM. Importing is limited to KIL (the KIllustrator native format) and FIG (XFig format) files.
The Edit menu offers Undo and Redo functions, in addition to the standard cut, paste, and copy features. There are Duplicate and Delete functions, which operate on selected objects. Duplication creates an offset copy of the selected items, which is configured from the Extras --> Options, Edit tab. Choose Insert to place files of the types GIF, JPG, PNG, XBM, and XPM, and WMF clip art into KIllustrator artwork. The final Edit menu item is Properties, which is useful for modifying the border and fill properties of objects.
The View menu permits toggling between Outline (no fill) and Normal object rendering, as well as Ruler, Grid, and Helplines display (helplines sub-divide the grid). The Layers item launches a dialog box for drawing layer control, shown in Figure 10-15.
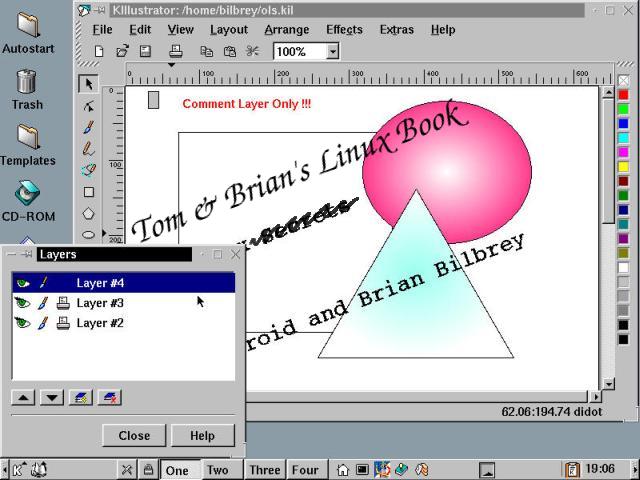
Figure 10-15
The KIllustrator Layers dialog box, printing disabled in Layer #4.
Although the features are sparse in the Layers dialog box, some very useful concepts are found here. Most significant among them is the ability to turn off layers, either visually or for printing, by selecting the icons to the left of each layer. Layers are automatically named when created, and their order may be shifted using the up and down arrow buttons in the dialog box.
The Layout menu contains separate configuration dialog boxes for the Page, Grid, and Helplines, as well as Align to Grid and Align to Helplines toggle selections. The Arrange menu provides tools for object transformation, alignment, and arrangement. Also object grouping, text paths, and an (undocumented) option called "Convert to Curve" are available here.
The Effects menu contains only one item: Blend. Select multiple objects (either by use of a click-and-drag bounding box, or Shift + Click to choose more than one object). Then select Effects --> Blend. The dialog box has a single field: Steps. Enter a number and choose OK. The effect is of the selected objects copies diminishing to a common vanishing point, in a brilliant red. We don't quite know why this is here.
You'll note in the screenshots of KIllustrator that the units shown in the lower right hand corner of the application window are given as didots. Didots are originally an 18th century French unit of length for typographers and printers, being 1/72 of a French royal inch. The references we found indicate that didots were widely used across Europe. Current DIN/ISO proposals are suggesting that all the varying point sizes used in modern typography be replaced by the Quarter, a unit equal to 0.25mm.
The Extras menu contains one selection: Options, opening a small, two-tab dialog box. The options are limited to the general drawing units selection on one tab, with several choices offered: points (pt), millimeters (mm), inches, pica, centimeters (cm), didot (the default), and cicero (which is a unit equal to 12 didots). On a separate Edit tab, offset, step distances, and units can be configured.
The Help menu presents Contents, About KIllustrator, and About KDE. Contents opens the KDE Help browser to a reasonably complete user manual, although we found several features in the user interface that weren't mentioned in the manual. This merely opens the door to experimentation and discovery.
The toolbars are few and simple. The main object creation and manipulation toolbar, at the left edge, contains the following items: Selection, Point Editor, Freehand Line, Polyline (creates a line with editable vertices), Bezier Curve, Rectangle, Polygon, Oval, Text, and Zoom. The Rectangle and Oval tools can be constrained (to square and circle, respectively) by holding down the Ctrl key prior to making a first point selection, and releasing Ctrl after the object is created. Object fill colors are selected from the toolbar to the right.
There are approximately one hundred distinct components (tools, utilities, and applications) that are directly incorporated into the KDE development effort. Additionally, there are hundreds of third-party applications explicitly written for the KDE environment. We've provided an overview of five such applications: the KDE File Manager, KWrite, KMail, KDevelop, and KIllustrator. This chapter covered the following points:
Go to the Table Of Contents