
Email Brian
Brian's Website


Email Tom
Tom's Website
|
Email Brian Brian's Website |
|
Email Tom Tom's Website |
Go to the Table Of Contents
Did you read the Preface? Thanks!
Linux, as a Unix workalike, was designed as a networked operating system from the ground up. While there are plenty of local applications like word processors and other "desktop" software, many of the packages that comprise OpenLinux are either clients of, or servers for, network services.
For some people, the word "server" is frequently associated with "Web" or "Mail," and little else. In fact, there are many different services available under Linux. We have separated these into two chapters according to which side of a network topology they are typically located - inner (providing services to local clients) and outer (providing services to remote clients). In this chapter, we address the network applications that are usually deployed internally, behind a firewall. These include DHCP, Print, and File servers. Within the genre of networked file systems, the most common server applications are Samba (Windows file sharing) and NFS services. Finally, there's NIS, which is a directory service. These are all network daemons that we advise you not to run on a system that is directly connected to the Internet. Usually these services are configured to provide access to private resources - not the sort of thing that you want available to the world.
In Chapter 24, we look at a variety of services commonly deployed on the "outside" of a firewall (or accessible to the world using explicit firewall forwarding rules). These include server applications like BIND, FTP, IRC, INN, Sendmail, and Apache.
DHCP is an acronym for Dynamic Host Configuration Protocol. The idea behind having a DHCP server is to be able to connect a computer to a network, and have that machine request and receive the information necessary to participate on the network automatically. The information minimally includes an IP address, and optionally provides boot volume location, name servers, the subnet router IP, a network domain name, and more.
The DHCP server bundled with OpenLinux is called dhcpd, a product of the Internet Software Consortium. It implements both DHCP and BOOTP (The Internet Bootstrap Protocol). BOOTP clients can be assigned addresses dynamically, or be configured statically in the DHCP configuration file. The major drawback of BOOTP is that it doesn't include a good facility for dynamically recovering addresses that are allocated.
Hard to Find Information
BOOTP's original purpose was to enable diskless clients to be booted from a network server. DHCP includes this functionality.
On the other hand, IP addresses that are handed out via DHCP are called leases and can have a pre-configured and/or maximum time duration for address validity. Optionally, the client software can request leases of specific length.
The configuration file for dhcpd is /etc/dhcpd.conf. For most simple configurations, edit this file directly to create the required functionality. Alternatively, Webmin (discussed in Chapter 13) has a reasonably comprehensive DHCP Server configuration module. To start Webmin, use the KDE menus: K --> System --> Webmin. Login as root, select the Server tab, then choose DHCP server from the resulting browser page. The DHCP Server module is shown in Figure 23-1.
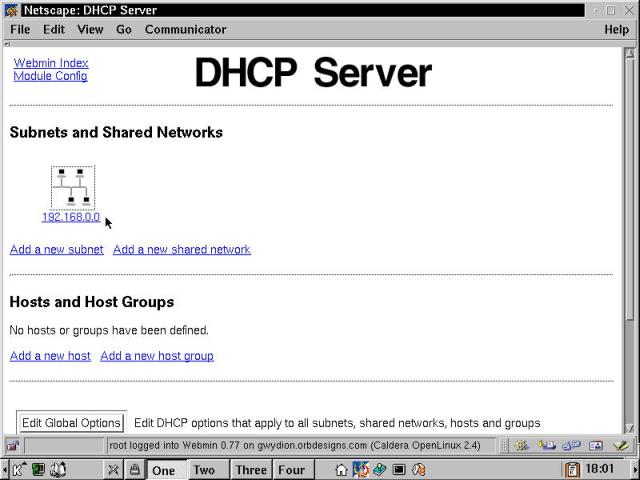
Figure 23-1
DHCP Server configuration using Webmin.
The Webmin DHCP Server page shown already has a subnet configured: 192.168.0.0. There are three major areas of configuration: Global Options (accessed via the button at the bottom of the browser), Subnets and Shared Networks, and Hosts and Host Groups. Additional features of the Webmin module not shown include listing the active IP address leases, and activating a revised DHCP setup by stopping and restarting the daemon.
Hint
As configured, Webmin doesn't list the correct active leases file. It looks in the old location, /etc/dhcpd.leases. Select the Module Config link in the upper left hand corner of the DHCP Server browser page, then change the field called DHCP server lease file to /var/state/dhcp/dhcpd.leases. Choose Save to preserve the configuration and return to the module page.
Let's have a look at some of the most significant and commonly used global options for the dhcpd server. There are too many options to cover them all here; type man dhcp-options at a command prompt to see an exhaustive list (it runs over 650 lines).
default-lease-time is the duration that an assigned IP address remains valid before it is returned to the pool of unallocated addresses. This is the specified length in seconds if the client doesn't request a specific lease duration.max-lease-time defines the duration beyond which leases will not be granted, regardless of client request.option subnet-mask nnn.nnn.nnn.nnn sets the network mask response portion of the DHCP assignment. This is typically 255.255.255.0, which matches all the addresses of an 8-bit subnet. There are 254 valid IP addresses, since 0 identifies the subnet and 255 is the broadcast address.option routers nnn.nnn.nnn.nnn references the default router or gateway address.option domain-name-servers nnn.nnn.nnn.nnn [...] lists one or more DNS servers that the client should point to for name resolution. The specification can also be given as a FQDN (Fully Qualified Domain Name, as in ns1.syroidmanor.com or similar).option domain-name "mydomain.tld" specifies the domain to which the client machines are connecting. For instance, if the domain is "orbdesigns.com," then when a client called mordred joins the subnet via DHCP, the full client hostname becomes mordred.orbdesigns.com.option netbios-name-servers nnn.nnn.nnn.nnn [...] provides WINS server information for those clients that require it.Those are the most-used options, many of which can also appear in specific subnet definitions where they override the global setting. Note that some entries start with the word "option," because they correspond to DHCP options. Those that lack the option prefix either specify non-optional DHCP information, or provide control information to dhcpd (for example, max-lease-time).
The following is an example of the simplest type of subnet declaration:
subnet 192.168.0.0 netmask 255.255.255.0 {
        range 192.168.0.10 192.168.0.100;
        }
This configuration listens on active links, and assigns addresses in the range from 192.168.0.10 to 192.168.0.100. A DHCP server that participates on several subnets should usually have subnet declarations for each. Multiple ranges can be defined; separate each with a semi-colon (separate lines just improve readability).
A shared network is one in which a physical network has more than one Ethernet subnet operating on it. While this is not a recommended configuration due to the increased potential for packet collisions, it is acceptable in low traffic environments, especially as a standby until a new physical network can be configured. The dhcpd.conf manual page contains the following example, which illustrates the definition of two distinct subnets:
       shared-network ISC-BIGGIE {
         shared-network-specific parameters...
         subnet 204.254.239.0 netmask 255.255.255.224 {
           subnet-specific parameters...
           range 204.254.239.10 204.254.239.30;
         }
         subnet 204.254.239.32 netmask 255.255.255.224 {
           subnet-specific parameters...
           range 204.254.239.42 204.254.239.62;
         }
       }
Host declarations provide a method for specifying explicit information to a specific machine when it requests service of the DHCP server. This could be as simple as ensuring that a part-time server box always gets the same IP address (when it is in operation). Alternatively, the declaration might specify a boot file and boot server, IP address, host name, and all the required information for a diskless workstation. We did not work with these features; consult the dhcpd.conf file for configuration details.
Before starting up the DHCP server, confirm that "bootps 67/tcp" and "bootps 67/udp" are both present in /etc/services and enable the DHCP server via COAS. This last is accomplished from the KDE Menu by selecting K --> Settings --> COAS --> System --> Daemons. Check the box in the System Services dialog box next to "DHCP and BOOTP boot server." This enables dhcpd to start automatically during ensuing boot cycles. Starting dhcpd manually from the command line is shown in the next listing:
[root@gwydion /etc]# /usr/sbin/dhcpd
Internet Software Consortium DHCP Server 2.0b1pl29
Copyright 1995, 1996, 1997, 1998, 1999 The Internet Software Consortium.
All rights reserved.

Please contribute if you find this software useful.
For info, please visit http://www.isc.org/dhcp-contrib.html

Listening on LPF/eth0/00:50:56:8c:00:07/192.168.0.0
Sending on   LPF/eth0/00:50:56:8c:00:07/192.168.0.0
Sending on   Socket/fallback/fallback-net
Gross problems in /etc/dhcpd.conf can result in error messages at this point, though we haven't seen any ourselves. Typographical errors in the long strings of numbers required to correctly specify subnets and ranges merely make connecting via clients troublesome. Once the server is running, start up a DHCP client machine on the same subnet. If the machine comes online and recognizes the network properly, the results are written to /var/state/dhcp/dhcpd.leases, as the following example shows:
[root@gwydion /etc]# cat /var/state/dhcp/dhcpd.leases
# All times in this file are in UTC (GMT), not your local timezone.   This is
# not a bug, so please don't ask about it.   There is no portable way to
# store leases in the local timezone, so please don't request this as a
# feature.   If this is inconvenient or confusing to you, we sincerely
# apologize.   Seriously, though - don't ask.
# The format of this file is documented in the dhcpd.leases(5) manual page.

lease 192.168.0.10 {
        starts 4 2000/10/19 00:01:34;
        ends 4 2000/10/19 12:01:34;
        hardware ethernet 00:50:56:83:00:07;
        uid 01:00:50:56:83:00:07;
}
Consult the resources that follow if you're responsible for running more than just a few machines, or for troubleshooting advice. Like all services, there's more to it than meets the eye.
Hint
If you're using DHCP on a network segment, an OpenLinux client should be set up for "Ethernet configured using DHCP" during initial setup, or reconfigured using the COAS Ethernet module. For a Windows client, under the network interface card TCP/IP properties, select "Obtain an IP address automatically." Using MacOS, in the TCP/IP Control Panel, set "Connect via" to Ethernet and configure the connection as "Using DHCP."
More DHCP Resources
Following are some resources for more information on DHCP:Pertinent manual pages installed on OpenLinux eDesktop include dhcpd, dhcpd.conf, dhcp-options, and dhcpd.leases.
The DHCP mini-HOWTO: http://www.linuxdoc.org/HOWTO/mini/DHCP/index.html.
Two good print resources are DHCP: A Guide to Dynamic TCP/IP Network Configuration by Berry Kercheval (Prentice Hall Computer Books) and The DHCP Handbook by Ted Lemon and Ralph E. Droms (Pearson Higher Education). Ted Lemon is also the author of the dhcpd software.
In Chapter 17, we discussed the user side of printing in OpenLinux using lpr to print, lpq to list the printer queue, and lprm to remove pending or active jobs. Now we're going to look at the new, enhanced lpd (printer daemon), a part of the LPRng (Line PRinter, Next Generation) suite.
lpd provides the actual interface to printer devices. Printers are configured in the file /etc/printcap. This file is created during installation if you set up a printer, and it is most easily maintained by using COAS (K --> Settings --> COAS --> Peripherals --> Printer). Alternatively, the file can be edited by hand, but be aware that COAS might not be able to correctly interpret a manually modified printcap file. The following listing is the /etc/printcap from one of our test machines:
[bilbrey@gwydion bilbrey]$ cat /etc/printcap
# /etc/printcap
#
# Please don't edit this file directly unless you know what you are doing!
# Be warned that COAS requires a very strict format!
# Other applications (like WordPerfect) cannot cope with LPRng-extensions
# to the syntax (those are best hidden in a 'lpd-printcap')
#
# The preferred method to modify this file is COAS.

lp:\
        :lp=/dev/lp0:\
        :br#57600:\
        :rm=:\
        :rp=:\
        :sd=/var/spool/lpd/lp:\
        :mx#0:\
        :sh:\
        :if=/var/spool/lpd/lp/printfilter:
Note that each "line" of the printer definition except the last is continued with a backslash. Each printer definition is a single virtual line, with parameters separated by colons. lp is the Linux name of the device; there can be more than one name, with aliases separated by "|", the pipe symbol. It is associated with the device file /dev/lp0 (which corresponds to LPT1 in a DOS/Windows environment). br is the baud rate, a measure of data transfer capability. rm and rp are remote printing options ("remote machine", and "remote printer" respectively), not set since this is a local printer. sd is the printer spool directory where data to be printed is staged, awaiting action from lpd. mx sets the maximum job size in 1,024 byte blocks, mx#0 indicates unlimited file sizes. The sh option suppresses header information (aka the banner page). if defines the location of the print filter, which converts the print stream into the correct sequence of codes for a specific printer selected during configuration. There are many other potential options listed in the manual page; type man printcap for all the gory details.
/etc/lpd.conf contains all of the global definitions that control the operation of lpd. Unlike some minimalist configuration files, lpd.conf is full-featured. Here's a brief excerpt from the file:
# lpd.conf generated from common/vars.c on Thu Feb 17 15:56:53 MST 2000
# Purpose: always print banner, ignore lpr -h option
# ab@
# Purpose: query accounting server when connected
# achk@
# Purpose: accounting at end (see also af, la, ar, as)
# ae=jobend $H $n $P $k $b $t
# Purpose: name of accounting file (see also la, ar)
# af=
  * * *
Each option is listed, with a comment, in alphabetical order. Accompanying version 3.5.3 of LPRng, this file runs to 363 lines. Every option is commented out in the default installation and editing is not needed unless changes are required for your specific implementation. Also, the file is completely documented in the lpd.conf manual page.
To control access to the printer, both locally and over the network, use /etc/lpd.perms. The original LPRng permissions file is chock full of examples and comments to assist in learning about this highly configurable beast. All of the required setup information is displayed by typing man lpd.perms. Shown next is a listing from the bottom (the active part) of the default lpd.perms, well commented. The key to the codes is given at the top of the file, as well as in the manual page.
  * * *
# allow root on server to control jobs
ACCEPT SERVICE=C SERVER REMOTEUSER=root
# allow anyone to get status
ACCEPT SERVICE=S
# reject all others, including lpc commands permitted by user_lpc
REJECT SERVICE=CSU
#
# allow same user on originating host to remove a job
ACCEPT SERVICE=M SAMEHOST SAMEUSER
# allow root on server to remove a job
ACCEPT SERVICE=M SERVER REMOTEUSER=root
REJECT SERVICE=M
# allow all other operations
DEFAULT ACCEPT
This is an acceptable configuration, and works well when inside the firewall. For an Internet-connected computer, we recommend adding the following six lines (including comments):
# accept connections from local host
ACCEPT SERVICE=X HOST=localhost
# reject connections unless from local subnet (modify as necessary)
REJECT SERVICE=X NOT REMOTEIP=192.168.0.0/24
# default reject connections unless previously matched
REJECT SERVICE=X
The previous lines are slightly different than the method of controlling lpd connections as shown in the lpd.perms file and manual page. We've found that the subnet must be specified as shown. The equivalent definition, 192.168.0.0/255.255.255.0, simply fails to work - we're not sure why, since that is the usage in the examples.
Remote printing from another Linux or Unix machine is a simple matter of configuration. The next listing is the meat of an /etc/printcap file for an OpenLinux system that is configured to print to the system we configured previously. The two critical pieces of information for setting up printing to a remote printer are the IP address and the printer name. The machine name can be substituted for the IP address if it is resolvable by a DNS server, or is listed in /etc/hosts on the local system.
lp:\
        :lp=/dev/null:\
        :br#57600:\
        :rm=192.168.0.5:\
        :rp=lp:\
        :sd=/var/spool/lpd/lp:\
        :mx#0:\
        :sh:\
        :if=:
Observe that in this /etc/printcap, lp (the local printer name) points to /dev/null, since there is no local device. The remote machine and printer options come into play, defining the IP and remote printer name, respectively. Also, there is no input filter defined, as that is handled at the remote machine.
Setting up OpenLinux to be a Windows print server is a snap, provided you know the magic incantations... Not really, but there are a couple of interesting features for setting up Samba printing. First, consult Chapter 27, and get Samba up and running properly. Once that's done, edit your /etc/samba.d/smb.conf file (that's the default eDesktop location, your setup might vary) and add a share block similar to the following (customize as necessary):
[lp]
        comment = Canon BJ-2000 on Gwydion
        path = /tmp
        guest ok = Yes
        print ok = Yes
There are two important things to take note of here. First is the printer name. It should match a printer name or alias in your printcap file. We've used lp. Second, the path option does not specify the path to the printer's spool directory down in the /var/spool sub-tree. Instead, the path has to be a location with world write permissions, like /tmp. It's an easy mistake to make, since the smb.conf manual page rather implies the former. Note that after you've completed the required edits, it is not necessary to restart the Samba daemons - the program re-reads the configuration from smb.conf every 60 seconds and updates its share offerings according to changes made. With the printer share in place, connect to the server from a Windows client, and add a remote printer (Start menu --> Settings --> Printers; double-click on Add a Printer). Make sure to use the correct driver (one that matches the remote printer), which needs to be installed locally on the client. A shared printer (lp), located on the remote machine Gwydion, is shown in Figure 23-2. This client in this example is Windows 2000.
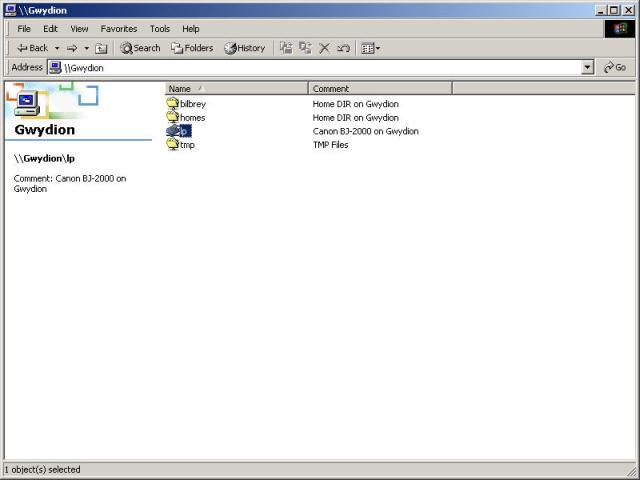
Figure 23-2
A Windows 2000 view of Samba shares including the lp printer.
Linux Print Server Resources
Following are some resources for more information on print servers:
- See Chapter 17 for a discussion of the client programs
lpr,lpq, andlprm.- Useful manual pages available in OpenLinux include lpd, lpd.conf, lpd.perms, and printcap.
- Online resources start with the Linux Documentation Project, and the Printing HOWTO, http://www.linuxdoc.org/HOWTO/Printing-HOWTO/. Then there's the Linux Printing Web site, http://www.linuxprinting.org/, which includes a number of printer compatibility ratings.
Samba was created by Andrew Tridgell to provide a filesystem server for his local network that could communicate using the SMB (Session Message Block) protocol, the same protocol used by Windows filesystems. Since its first faltering steps in 1991, Samba has grown into an extensive suite of robust and flexible Open Source programs available on a wide range of platforms.
Warning
Configuring any system, including OpenLinux, for file and filesystem sharing is a risk-prone business. Each service is designed to make a portion of your system not just ordinarily vulnerable, but easily read and/or writeable by users. Read, understand, and follow all of the security warnings that accompany configuration data. If you didn't see any, then go find some warnings and apply the solutions. We recommend that none of these services be available on an interface that is exposed to the Internet.
Samba uses a pair of daemons, smbd and nmbd, to provide Windows-style file and printer sharing services to a network. As far as clients are concerned, a Samba server looks and acts - for all intents and purposes - just like a Windows NT server. In addition to file and printer services, Samba also provides (either by default or through configuration) the following:
As you can see, Samba is a powerful and flexible product - so much so, it warrants a chapter all unto itself. See Chapter 27 for details on configuring and maintaining a Samba server.
We begin this section with a security issue warning. In mid-August of 2000, vulnerability in the NFS code was discovered. It is being actively exploited. The good news is that the affected service, rpc.statd (which implements the Network Status Monitor protocol) is not included with any OpenLinux version.
NFS stands for Network File System. An implementation of NFS version 2 is included with OpenLinux. Truthfully, this functionality on Linux is slow and not particularly stable. In certain circumstances it can meet specific needs, but even Linux kernel hackers recommend running NFSv3 on FreeBSD before running NFSv2 or v3 on Linux.
The good news is that reference implementations of NFSv4, a standards track draft at the Internet Engineering Task Force, are progressing well. We expect to see a solid, secure, and compatible Linux NFSv4 client and server make an appearance in distributions in the next year or so. In the interim, do not run NFS on Internet-connected boxes. If you trust the users, then it's probably OK to run on a local network inside a firewall, but be careful and protect the machine.
The following system services (daemons) need to be running for OpenLinux to provide NFS capabilities: Auto Mount Daemon, NFS Server, and RPC portmapper. After configuration is completed, make sure to use COAS to enable those daemons.
Let's start by restricting access to the daemon rpc.portmap. Portmapper is a gatekeeper of sorts, handing out connections to allowed hosts. To do so, it makes use of /etc/hosts.allow and /etc/hosts.deny to decide which connecting machines have permission to talk to the NFS server. Add the following line to /etc/hosts.deny:
portmap: ALL # Let nobody in by default. bpb 09202000
Then, in /etc/hosts.allow, specify the IP addresses or range of addresses that the Portmapper can accept. Note that only IP addresses can be used in either file - with older versions of Portmapper, host name lookups caused nasty loops, creating growing cascades of further lookups. In the following line added to /etc/hosts.allow, we give permission only for our local network (modify to suit your implementation):
portmap: 192.168.0.0/24 # Only the local subnet. bpb 09202000
Now that Portmapper is configured, it's time to move on to setting up filesystems for availability. This is configured in the file /etc/exports. Before working with this file, it's best to review the documentation, as there are a number of options available. Type man exports to get the nitty-gritty. Below is an excerpt from the manual page - an example with commentary:
EXAMPLE
       # sample /etc/exports file
       /               master(rw) trusty(rw,no_root_squash)
       /projects       proj*.local.domain(rw)
       /usr            *.local.domain(ro) @trusted(rw)
       /home/joe       pc001(rw,all_squash,anonuid=150,anongid=100)
       /pub            (ro,insecure,all_squash)
       /pub/private    (noaccess)

       The  first  line exports the entire filesystem to machines
       master and trusty.  In addition to write access,  all  uid
       squashing  is  turned  off for host trusty. The second and
       third entry show examples for wildcard hostnames and  net�
       groups  (this  is  the  entry `@trusted'). The fourth line
       shows the entry for the  PC/NFS  client  discussed  above.
       Line  5  exports the public FTP directory to every host in
       the  world,  executing  all  requests  under  the   nobody
       account.  The  insecure  option  in this entry also allows
       clients with NFS implementations that don't use a reserved
       port  for NFS. The last line denies all NFS clients access
       to the private directory.
The OpenLinux User Guide, which comes in the retail package, and is available online at http://www.caldera.com/products/edesktop/usersguide/ states that there is a default NFS configuration installed. Unfortunately, we found no NFS exports defined. For simple export configurations, it's easy to edit the /etc/exports file directly. For more complex setups, or for guidance while getting to know NFS, we suggest using the Webmin interface.
Start Webmin (K --> System --> Webmin), select the System tab, then navigate to NFS Exports. Existing exports can be edited or deleted, and new exports created from this module. Figure 23-3 shows the Webmin interface to edit an Export.
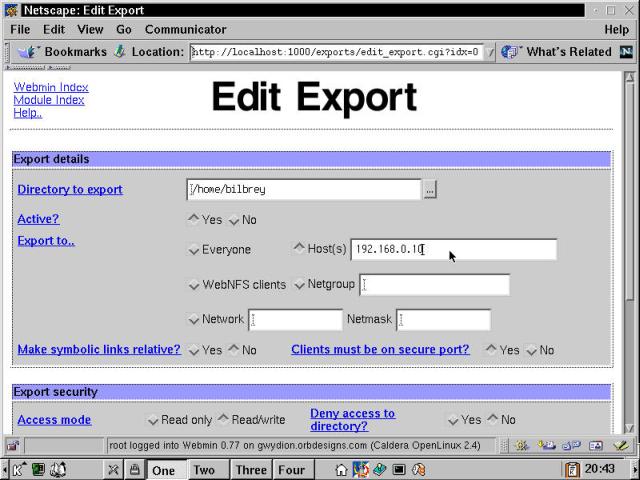
Figure 23-3
Using Webmin to edit NFS Exports.
One big advantage of using Webmin to configure NFS is that is provides context-sensitive help for each option. Simply click the hyperlink next to the appropriate field. After configuring NFS exports using Webmin, we recommend that you look at the /etc/exports file to see the effects of your work. We set up a simple two-line restricted-use exports file on the machine Gwydion (at 192.168.0.5) for client testing:
# export /home/bilbrey to test client machine at 192.168.0.10
/home/bilbrey   192.168.0.10(rw)
Connecting to NFS resources from a Linux client is easy. Mordred is an OpenLinux machine assigned the static IP 192.168.0.10, the permitted host for the previous NFS export.
[bilbrey@mordred bilbrey]$ su
Password: root_password

[root@mordred bilbrey]# ls gHome/

[root@mordred bilbrey]# mount -t nfs gwydion:/home/bilbrey /home/bilbrey/gHome

[root@mordred bilbrey]# ls gHome/
Desktop nsmail  OLS.ch23.zip  OLS.ch27.zip
If an unauthorized host attempts to connect to the share, for instance the Linux machine Gryphon at 192.168.0.9, then:
[root@gryphon bilbrey]# mount -t nfs gwydion:/home/bilbrey /home/bilbrey/gtemp
mount: gwydion:/home/bilbrey failed, reason given by server: Permission denied
Of course, it's not a lot of fun to become the root user every time you want to connect to the network, so we'll setup an entry in /etc/fstab to define the mount, then put the actual mount command in ~/.bashrc-private so the volume is only mounted when the user needs it (and well after the network is up). First, the fstab entry:
# NFS mounts
gwydion:/home/bilbrey /home/bilbrey/gHome nfs rw,exec,user,noauto
After a one-line comment, the second line specifies the NFS volume, the local mount point, defines the type of volume (nfs), then lists a variety of mount options. Here we've specified rw for read/write, exec to permit execution of binaries from the mounted volume, user to allow ordinary mortals (not just the root user) to mount and unmount the volume, and noauto to prevent it from being auto-mounted early in the boot process. Type man nfs, and look at the options available for putting NFS mounts in /etc/fstab; some of them can significantly improve the performance of an NFS connection. Next, with the addition of the following lines in .bashrc-private (your location can vary depending on distribution, this is the right place for eDesktop), the NFS volume is mounted each time bilbrey logs in.:
# .bashrc-private for bilbrey/Mordred 09292000
# NFS mount home volume from Gwydion here
mount /home/bilbrey/gHome
There are several commercial client products available that allow Windows and MacOS-based computers to access NFS volumes. Note, however, that even the NFS-HOWTO (referenced in the next section) says to use Samba for connecting to Linux/Unix machines.
NFS resources
More NFS Resources
Following are some resources for more information on NFS:
- OpenLinux resources include a section on NFS in the Network Administrator's Guide, from the System Documentation menu (behind the "Open Book" icon on the KDE taskbar). Additionally, there are manual pages for nfs, nfsd, exports, and mountd. These are required reading should you decide to work with NFS.
- Online at the Linux Documentation Project, check out the NFS-HOWTO, at http://www.linuxdoc.org/HOWTO/NFS-HOWTO.html.
- In the print arena, you should also pick up copies of NFS Illustrated by Brent Callaghan (Addison Wesley) and Managing NFS and NIS by Hal Stern (O'Reilly and Associates). The latter, while a little long in the tooth (it was written in 1991), remains the main administrator's reference for NFS, and is useful for our next topic as well, NIS.
NIS, or Network Information Service, provides information about users and resources in the same way that DNS does. Put another way, a correctly configured NIS installation permits one machine to be the repository for the host, usernames, groups, passwords, and associated files. That sounds like a lot of work, and in fact it is.
Note
NIS (and NIS+) is not limited to just managing usernames, groups, and passwords (although this is what it is typically implemented for). It can also used to share any form of centrally-maintained database. See the Resources for NIS section to learn more.
Once upon a time, NIS was called Yellow Pages, a service and a protocol written by Sun Microsystems. This had to change when it became known that Yellow Pages is a trademark in the UK of British Telecom PLC. So it was renamed to Network Information Services, but the actual programs carry the original heritage; most of the utilities have names that start with "yp".
If you are running a medium size or larger (say, more than 25 machines) network composed of Unix variant hosts, then NIS can be a real help in easing user maintenance. To offset that, NIS isn't the securest protocol on the block, and it's a real pain to set up right unless you know what you're doing.
Warning
Never, ever use NIS over the Internet.
There are two things that we did learn in researching this, which we pass on as useful pointers should you decide to go forward with NIS. First, all of your machines need to be members of the same domain (that is, an NIS domain - these need not correlate to the DNS domains for the system, though often that is the case). Second, user and group IDs (UID and GID numbers, respectively) must be the same across all systems. This alone can make administering NIS across a heterogeneous *nix network rather tiresome.
Every reference we found for NIS mentions the same requirement, early and often. Planning is the key to getting a successful NIS service launched. Make use of the resources listed in the following section, read them twice carefully, and then venture forth.
NIS Resources
Following are some resources on NIS:
- The list of manual pages for NIS/NYS/YP functionality is long and distinguished: ypserv, domainname, ypcat, ypmatch, ypserv.conf, net�group, makedbm, revnetgroup, ypinit, yppoll, yppush, ypset, ypwhich, ypxfr, and rpc.ypxfrd. These are all required reading prior to an attempt at the summit of Mount NIS. Also, the Network Administrator's Guide (mentioned in the "NFS Resources," previously) has a decent introductory section on NIS.
- The Linux Documentation Project (LinuxDoc), at http://www.linuxdoc.org/ always has the most recent data, including HOWTO and GUIDE documents (follow the links). Additionally, you can search at LinuxDoc on NIS for a good list of Linux-specific links.
- In dead treeware, we recommend the canonical Managing NFS and NIS by Hal Stern (O'Reilly and Associates).
- To set up an NIS server on OpenLinux, you absolutely must read /usr/doc/nis-server-2.0/README.server.
In this chapter, we looked at several network services commonly run only on private, internal networks. Please keep in mind that if you elect to run any of these services on a daily basis, take the time to research and understand the product fully - each one presents a different set of security risks if not implemented correctly, within the bounds of intended functionality.
Go to the Table Of Contents