Generate PDF Documents with Artefact
The Adobe PDF format is probably one of the most widespread electronic document formats. Used daily, it is the basis for the production of exchangeable documents that contain both text and graphics. If you receive a bill, follow a purchase on a web site, download a report, a book or an administrative form, these files will most likely be PDF documents. For programmers that need to provide any such reporting functionality, supporting this format has become a must and the generation of PDF documents is part of their toolkit.
In Pharo, Artefact is an innovative framework that supports the design and generation of PDF documents and is developed by Olivier Auverlot and Guillaume Larcheveque.
1. Overview of Artefact
Artefact is a PDF framework whose design was guided by the goals of efficiency, productivity and scalability. To achieve this, each document is described by a tree of objects. A document is an object containing a collection of other objects, each corresponding to a page. On each page both visible and non-visible items are also objects. These objects then have the possibility to be reused in the same document but also across documents. Objects are elements that can be simple, e.g. a piece of text or an image, but also be complex elements with advanced behavior and a special appearance, e.g. that display data in a table or generate a barcode.
Artefact contains default elements such as paragraphs or tables that allow to quickly generate reports. The strength of these elements is that they are independent of each other. The order in which you position them in the document does not affect their appearance. This is in contrast to many PDF frameworks that exploit the notion of stream in the definition of styles (a piece of blue text will be followed by another piece of blue text in the absence of a directive to use a different style), Artefact considers that every element includes its own style. If an attribute is not defined in the element, Artefact then uses a style sheet that is set at the document level by default.
This autonomy of elements and style management is a strong feature of Artefact. It makes it easy to generate a document and quickly customize it for a particular operation.
1.1. Concepts, Key Aspects and Limits
After more than a year of development, the concepts used in Artefact are considered stable and it is already used in industry. In this section we list its current features and known limitations.
- Artefact has a simple architecture that facilitates scalability and new features.
- It supports the definition of a PDF document and its contents.
- It can specify meta information such as title or author.
- It manages display options when opening a document in a reader that is compatible with this feature.
- It supports compressed PDF document generation.
Each page of a PDF document can have its own particular format and orientation. By default, Artefact supports a set of common formats, e.g. A3, A4, or ebook. It can easily be extended to fit specific needs. Page location is determined not when the page is created but when it is added to a document. Hence each page is independent, which allows one to generate documents with variable architecture.
On each page, Artefact places simple or complex elements. A complex element is generally defined using simple elements or other complex elements. Each element is independent and is positioned relative to the upper left corner of a page.
Artefact provides greyscale management and colors defined by the RGB model (where each color component is represented by one byte). Character fonts are those imposed by the PDF but Artefact does not support true type fonts (TTF) specification. You can insert images into a PDF document but only the JPEG format is currently supported. Artefact does not support the definition of interactive input fields, integrating JavaScript or safety aspects of PDF such as certificates. Of course, these specifications are subject to change as and when the framework changes.
2. Getting Started in 10 Minutes
Say, you already program in Pharo and you want to generate PDF documents. This section will show you how to do so in less than 10 minutes.
First you should load the framework. The good news is that there is no need for native libraries as Artefact is written entirely in Pharo. Whatever your execution platform (Microsoft Windows, Mac OS X, Linux, Android, IOS, etc.), Artefact will be available and usable.
2.1. Installing Artefact
Artefact is hosted on SmalltalkHub. To install Artefact, execute the following expressions:
Gofer new
   smalltalkhubUser: '' project: 'RMoD/Artefact';
   package: 'ConfigurationOfArtefact';
   load.

ConfigurationOfArtefact load
Loading the configuration automatically load projets such as the Unit framework (which supports the definition of different measurement units. By default the configuration loads the stable version that is production ready.
Once loaded, you can browse the main packages and classes.
- The
Artefact-Examplespackage contains many usage examples. - The
Artefact-Corepackage contains the main elements such as documents, pages or style sheets but also electronic documentation that is accessible via the Help Browser. - The PDF objects (text, geometric shapes, images, etc.) offered by the basic framework are in
Artefact-Core-Elements-BasicandArtefact-Core-Elements-Composites. - The fonts are defined in the package
Artefact-Core-Fontsand document formats in the packageArtefact-Core-Formats.
2.2. Executing the First Demo's
The best way to start with Artefact is to have a look at the Artefact-Examples-Demos package and to run each of PDFDemos class methods.
If you want to run all demos, just execute PDFDemos runAllDemos
By default each generation result is written in the default Pharo directory but you can define your own by modifying the demoPath class method, e.g. as follows:
PDFDemos class>>demoPath
   ^ '/Users/pharo/pdf/'
2.3. Finally "Hello World!"
You will now create your first and simplest PDF document, which is a text on a page. To do this, you must define an instance of a PDF document that contains a page where you will position a text component.
PDFDocument new
   exportTo: 'helloworld.pdf' asFileReference writeStream
Once the instance of PDFDocument is created, it is exported using a stream to a file named helloworld.pdf. By default, the produced PDF document is
placed in the directory of Pharo. If you open the file, it is empty. This is normal since you have not yet defined and added any content to the document.
Let us enrich the previous example and add a page to the document.
PDFDocument new
   add: PDFPage new;
   exportTo: 'helloworld.pdf' asFileReference writeStream
Now if you open the file the result is different since the document contains an empty page. Let us add a first text component to our page.
PDFDocument new add:
   (PDFPage new add:
      (PDFTextElement new text: 'Hello World!'; from: 10mm @ 10mm));
   exportTo: 'helloworld.pdf' asFileReference writeStream
To place the text on the page we create a component of type PDFTextElement. We add it to the page and define its position using the message from:.
Note that we can specify dimensions using several
units such as millimeters (mm), centineters (cm) or inches (inch). These coordinates are defined
from the upper left corner of the page.
Artefact uses a set of defaults to get compact code when creating elements that are part of a document. More specifically, style parameters are set to what are considered the most common values. In this example the page format is set to A4, and its orientation to portrait. Also, text is by default written in black using the Helvetica font.
This first example introduced some basic concepts and shows how simple it is to produce a PDF document with Pharo. The following sections go deeper in Artefact and show how to define more complex documents.
3. Document Definition
Artefact represents PDF documents as objects that are instance of the class PDFDocument. They play the role of containers for receiving pages. A PDFDocument
also supports advanced options such as the document size, management of compression, the opening in the PDF reader and the definition of meta information.
The order in which pages are added to the PDFDocument object define the organization of data within the document, not the order in which the pages are
created. This mode of operation allows you to produce documents whose contents can be dynamically generated and organized at a later time.
3.1. Page Addition
To add pages to a document, the message add: is used. It appends a page after those already present in the document. When generating the PDF file, Artefact
traverses the list of pages starting from the earliest added to the last. The following script defines a document with a single blank page.
PDFDocument new
   add: PDFPage new;
   exportTo: 'EmptyPage.pdf' asFileReference writeStream
3.2. Document Properties
A PDFDocument can be configured with a specific format, orientation, compression and display mode, as we show next.
3.2.1. Document Format and Orientation
By default, a document is generated in the A4 format but other formats are available. The Package Artefact-Core-Formats contains a list of
predefined formats covering many needs. Examples are: A3 (PDFA3Format), letter size (PDFLetterFormat) and a format suitable for e-readers
(PDFEbookFormat). If you need a particular format, you can define it. A format is simply defined by the value returned by the message defaultSize.
A PDFDocument accepts the message format: to specify the format of all pages of the document. For each page, this value will be the default if not
redefined otherwise. Each page can specify a different format. The following example creates a document using the A3 format:
PDFDocument new
   format: PDFA3Format new;
   add: PDFPage new;
   exportTo: 'A3.pdf' asFileReference writeStream
The abstract superclass of all formats (PDFFormat) is responsible for defining the page orientation. There are two alternatives: portrait or landscape. Page
orientation is set by sending one of the two messages to the format object: setPortrait and setLandscape.
The following example generates a document whose pages are in A3 format and landscape orientation.
PDFDocument new
   format: PDFA3Format new setLandscape;
   add: PDFPage new;
   exportTo: 'A3landscape.pdf' asFileReference writeStream
Note that setting the default landscape mode for a document does not exclude the possibility for a particular page to be oriented in portrait mode. Artefact fully supports pages of different sizes and different orientations within a single document.
3.2.2. Compression
The PDF format allows you to compress the data, which is a good thing as a PDF document can contain large amounts of data. To to minimize the weight of
generated documents Artefact defaults to compressing the data. If you need to disable this option, you should send the uncompressed message to the document.
The following example generates an uncompressed PDF document:
PDFDocument new
   uncompressed;
   add: PDFPage new;
   exportTo: 'uncompressed.pdf' asFileReference writeStream
Another message, named compressed, sets the compression.
3.2.3. Controling Document Opening
Adobe Acrobat reader supports various display modes when opening a PDF document. The selected mode is defined directly into the PDF document. Note that if the PDF reader that is used to look at the document is not compatible with these options, they will be ignored.
Display mode properties are divided in two categories: those determining the size of the pages and those related to the page organization on the screen. The
former are set using the messages fullPage, fullWidth, real and zoom:, and the latter using singlepage, twoPages and continuousPages.
These messages should be sent to an PDFDocument instance.
With fullPage, each page of the document occupies the entire display space. With fullWidth, the display is optimized to the page width. With real,
the display meets the dimensions specified in the PDF document.
The following example creates a document that will occupy all available display space:
pdfdoc := PDFDocument new fullPage.
With the message zoom:, you can define a zoming ratio, expressed in percentages. The following example defines that the document should be opened with zoom of 400 percent.
pdfdoc := PDFDocument new zoom: 400.
You can also choose to display a single page (singlePage), pages two by two (twoPages) or one after the other (continousPages) as in the following example:
pdfdoc := PDFDocument new continousPages.Theses messages can be combined as shown in the following example:
pdfdoc := PDFDocument new zoom: 200; continuousPages.3.3. Setting Meta Information
Each PDF document contains a set of information about its origins. These data are not to be overlooked, especially if your document is intended to contribute to an EDM (Electronic Document Management) system or is part of an editorial workflow. With this information it is possible to search among a set of PDF documents and select, for example, those written by a particular author or those for which certain keywords have been specified.
Artefact implements this information by using an instance of PDFMetaData.
To each instance of PDFDocument, an instance of PDFMetaData is associated and is accessible using the message metaData.
By default, the producer is set to 'Artefact'. You can specify the document title, subject or a short summary, the name of the author, a list of keywords
and the document creator.
The following example generates a new document and its meta data information:
pdfdoc := PDFDocument new.

pdfdoc metaData
   title: 'Document title';
   subject: 'subject of the document';
   author: 'The Pasta Team';
   keywords: 'cool rock best';
   creator: 'Pharo'.
4. Pages, Formats and Models
Pages are the support for writing and drawing in your PDF documents. A page defines a page size, orientation and position within a PDF document. A page can be built from a model that provides an overlay on which the page contents are deposited.
4.1. Page Creation
A page is represented by an instance of the class PDFPage.
Creating is a page is simply done by sending the message new to the class.
page := PDFPage new.
Sending the message add: to a document with a page as argument
will append the page to the document.
   pdfdoc := PDFDocument new.
   page := PDFPage new.
   pdfdoc add: page.
By default, a page takes the dimensions and orientation of its document.
If your PDF document is A4 landscape, all added pages will use these settings.
However, Artefact can assign specific dimensions and orientation to
each page, allowing one document to have a mix of pages with different characteristics. To allow this, each instance of PDFPage understands the message
format:, which takes an instance of PDFFormat as argument.
The following example creates a two-page document. The first uses the default format of the document, the second is in A4 landscape.
   pdfdoc := PDFDocument new.
   page1 := PDFPage new.
   page2 := PDFPage new format: (PDFA3Format new setLandscape).
   pdfdoc add: page1; add: page2.
4.2. Templates
A template is an instance of class PDFTemplate, which inherits from the class PDFPage.
It is a page with predefined contents that will act as the background page on which you will draw or add your components.
For example, it can be composed of a header for a letter, a header and a footer for a report, or a delimited surface.
The package Artefact-Examples-Demos-Templates offers two example of template to create CD or DVD sleeve pages. The following code snippet produces a A4 page
on which the outlines of a CD sleeve are drawn.
   pdfdoc := PDFDocument new.
   cover := PDFCompactDiscTemplate new.
A template is defined using the message drawTemplate which adds the Artefact elements to the page. This builds the page background. For example, the code
of the CD template is below. (As it is relatively straightforward we do not explain the code here.)
PDFCompactDiscTemplate>>drawTemplate
   self add: ((PDFRectElement
      from: 10 mm @ 10 mm
      dimension: 240 mm @ 120 mm)
      dotted: self dotted
   ).
   self add: ((PDFLineElement
      from: 130mm @ 10mm
      to: 130mm @ 130mm)
      dotted: self dotted
   ).
5. Elements
The contents of pages is defined using reusable components called elements. Artefact has basic elements that perform simple operations such as drawing a line, but also complex elements that can, for example, display data in a table or generate a barcode. Of course, it is possible to identify and define new components.
More specifically, a PDFElement is a reusable component that represents a text, an image, a geometric shape or even a complex graph or table. There are two
kinds of PDFElement:
- Simple elements inherit from
PDFBasic(a primitive operation in the pdf specification). - Composite elements inherit from
PDFComposite(a wrapper around multiplePDFElementswhether they are basic or composite).
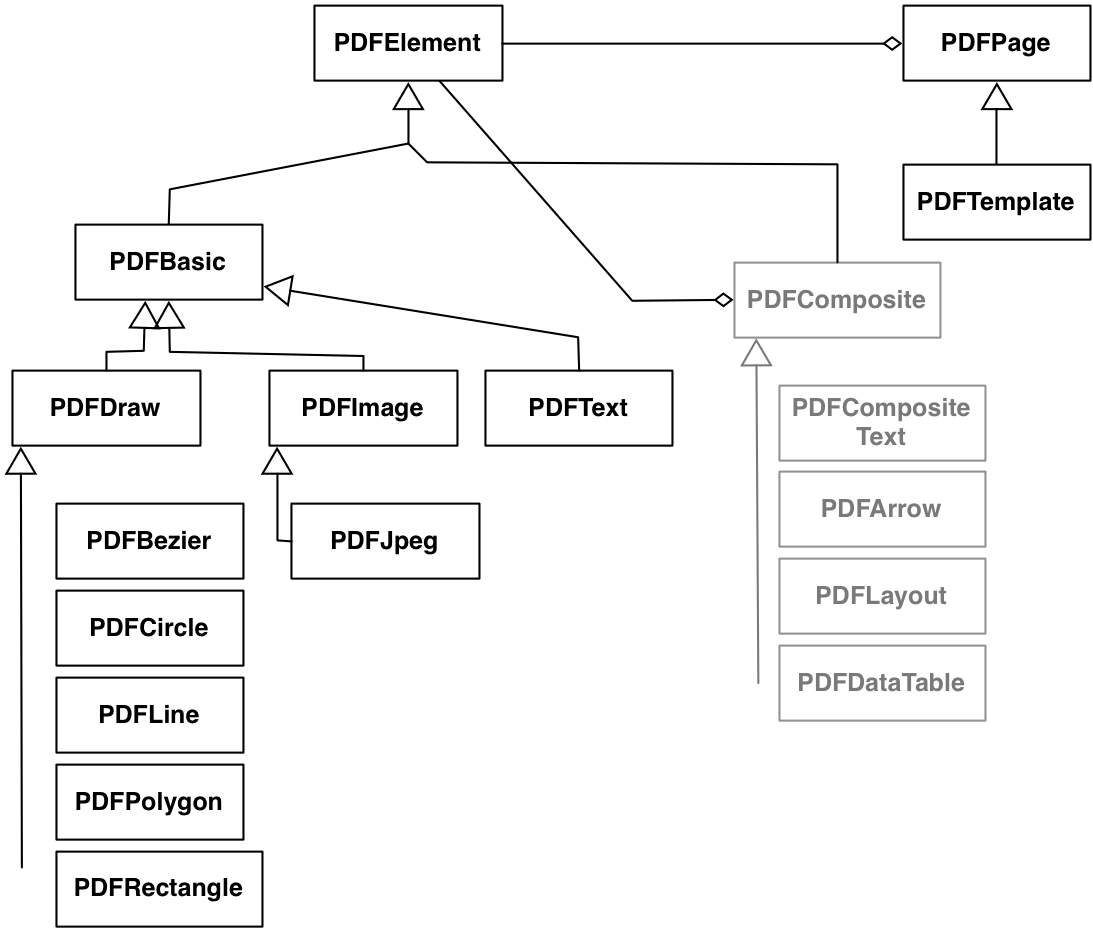
Simple elements are as follows, and their hierarchy is shown in Figure 0.1:
PDFBezierCurveElementPDFCircleElementPDFLineElementPDFPolygonElementPDFRectElementPDFJpegElementPDFTextElement
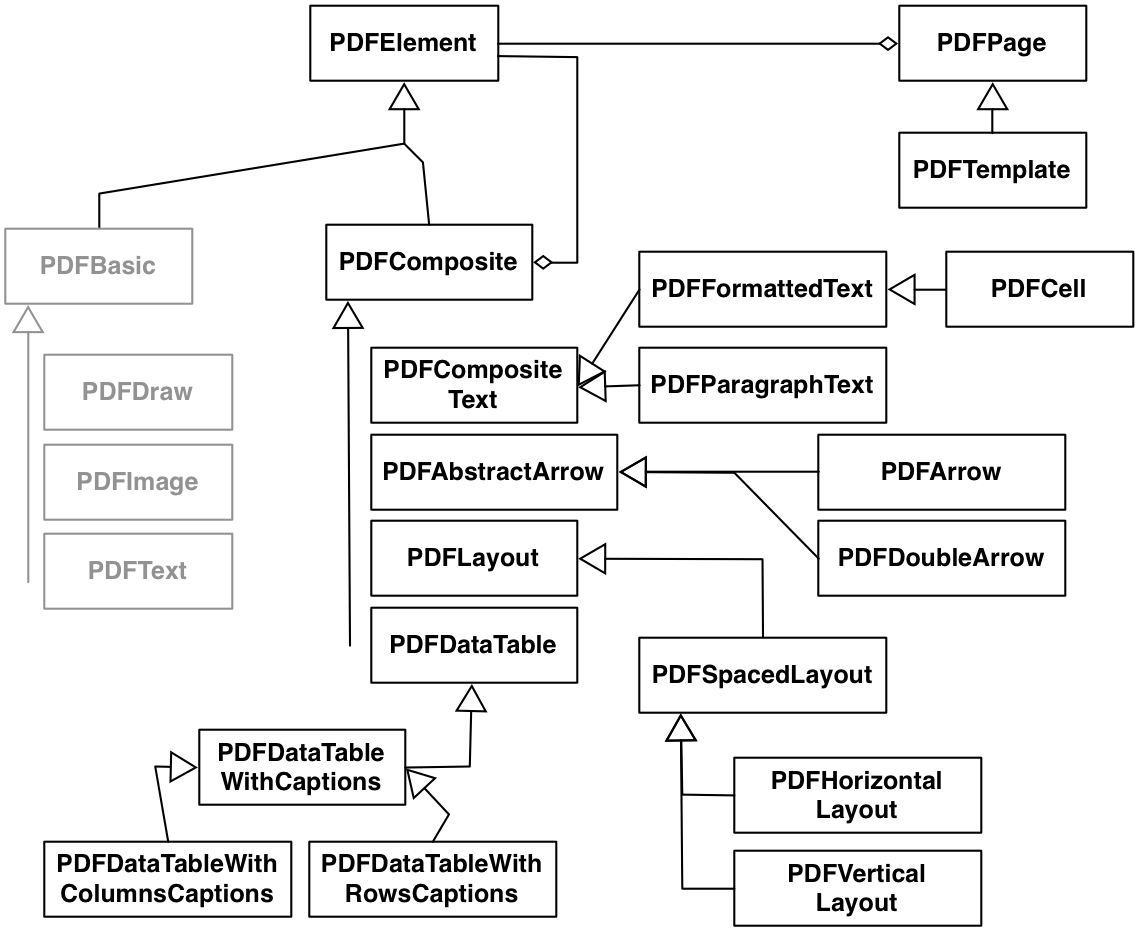
Composite elements are as follows, and their hierarchy is shown in Figure 0.2:
PDFFormattedTextElementPDFParagraphElementPDFArrowElementPDFDoubleArrowElementPDFCellElementPDFDataTableElementPDFDataTableWithColumnsCaptionElementPDFDataTableWithRowsCaptionElement
Each PDFElement has a set of properties that define its appearance (text color, font, dots, etc).
These properties are grouped in a stylesheet owned by each element. Every element controls its own appearance and doesn't
affect other elements. This is in contrast to many PDF frameworks that use a flow logic. This behavior allows you to move an element around or even use the same element in
multiple pages or documents.
5.1. Composing and Placement
Artefact's elements have a generic behavior that manages their location on a page as well as their dimensions. The Artefact coordinate system is used to place components. Values can be expressed in several units such as mm, cm or inch. The origin of the coordinate system is the top left of a page.
5.1.1. Element Positioning
Sending the message from: to the class of an element instantiates it and sets its position.
The following example creates a PDFTextElement and places it at 15 mm from the left border and 30 mm from the top
PDFTextElement from: 15 mm @ 30 mmIn addition, Artefact offers other constructors that fix the position and size of the element, and we present them next.
5.1.2. Element Size
Artefact offers two ways to set the size of an element: either through the from:to: message or through from:dimension:.
The message from:to: takes as arguments the start and the end position.
For example, the following code draws a rectangle whose origin is 15mm from the left and 30mm from the top and its end is at 90 mm from the left border and 80mm
from the top of the page:
PDFRectElement from: 15 mm @ 30 mm to: 90 mm @ 80 mm
The message from:dimension:, takes as arguments the start position and the size of the component. For example, the following code sets the size of the
component to be 50 by 40 millimeters.
PDFRectElement from: 15mm @ 30 mm dimension: 50mm @ 40mm
The messages width and height return the width and height of the component.
5.2. Simple Elements
The package Artefact-Core-Elements-Basic contains elementary components. There are grouped in three categories: text, images, and geometric forms.
5.3. Text and Images
To write text on a page, use instances of PDFTextElement.
The method text: sets the text to be displayed. The class method from:text: supports positioning and text definition.
PDFTextElement from: 15mm @ 30mm text: 'hello!'
Using the PDFJpegElement class, images in JPEG format can also be
inserted in a document, using the fromStream: and
from:dimension:fromStream: class messages. The messages width: and height: set the size of the image while respecting its original aspect ratio.
The following example generates a PDF document with one page. This page contains one image placed at two different locations. In the first case, the image is 80mm in width and 30mm in height. In the second case, the width is 80mm and the height is automatically computed keeping the original image ratio.
| pdf page |
pdf := PDFDocument new.
page := PDFPage new.
page add: (
   PDFJpegElement
      from: 10 mm @ 10 mm
      dimension: 80 mm @ 30 mm
      fromStream: (FileStream fileNamed: '/home/enterprise/image.jpg')).
page add: ((
   PDFJpegElement
      fromStream: (FileStream fileNamed: '/home/enterprise/image.jpg'))
      from: 10 mm @ 50 mm; width: 80 mm).
pdf add: page;
pdf exportTo: (FileStream forceNewFileNamed: '/home/enterprise/image.pdf')
5.3.1. Geometric Shapes
Artefact has the following components for geometric shapes:
The class PDFLineElement draws a line using from:to:.
PDFLineElement from: 15mm @ 30mm to: 90mm@170mm
The class message from:angle:length: draws a line with the given start position, angle and length.
PDFLineElement from: 10mm @ 20mm angle: 70 length: 50mm
The class PDFRectElement represents a rectangle. Two messages are relevant: from: dimension: and from: to: . The two following examples are equivalent:
PDFRectElement from: 10 mm@10mm dimension: 100 mm @ 30 mm. PDFRectElement from: 10mm@10mm to: 110mm@40mm
The class PDFPolygonElement draws polygons. To define a polygon, we set the start point and a series of points using the message from:points:.
PDFPolygonElement
   from: 10mm@10mm
   points: { 30mm@30mm . 15mm@40mm . 5mm@20mm }
Circles are defined with the class PDFCircleElement and using the message center:radius:.
PDFCircleElement center: 100mm@100mm radius: 50mm
Bezier curves are represented by the class PDFBezierCurveElement and defined using the message from:points.
PDFBezierCurveElement
   from: 10mm@50mm
   points: { 0mm@0mm. 100mm@20mm. 150mm@0mm. 50mm@50mm }
5.4. Composite Elements
Artefact comes with a rich set of high-level components, grouped in the package Artefact-Core-Elements-Composites.
These components are the result of the assembly of single components and other high-level components. They are used to create layouts and complex contents with
minimal coding and a high degree of reuse.
These components can be used in several different applications and materials.
They are divided in three areas: management of text, drawing arrows and reporting.
5.4.1. Advanced Text
So far you have used the class PDFTextElement to place text on a page.
This component is limited in terms of functionality since it only handles the position on the page. In addition to this, Artefact offers three high-level
components that support advanced features: PDFFormattedTextElement, PDFCellElement
and PDFParagrapElement.
The component PDFFormattedTextElement is similar to PDFTextElement but includes managing the alignment (left, center, right). A PDFCellElement is
a PDFFormattedTextElement with a border. Finally, a PDFParagraphElement
allows the insertion of a paragraph of text and automatically manages the breaks at the end of lines.
5.4.2. Drawing Arrows
Arrows are very useful for generating sketches and diagrams.
The component PDFArrowElement draws an arrow with a tip at its end.
The component PDFDoubleArrowElement draws a tip at both extremities.
PDFArrowElement from: 10mm@10mm to: 100mm@30mm

PDFDoubleArrowElement from: 10mm@80mm to: 100mm@150mm
5.4.3. Report Creation
Components inheriting from PDFDatatable are the perfect illustration of the power and comfort provided by the composite elements of Artefact. With these
data tables, you can quickly generate reports and customize them to your needs.
With the class PDFDataTableElement you define a report with specific dimensions on the page and showing a given data set.
The data is organized in a tabular manner: a report contains a number of rows, each representing a line of the report.
PDFDataTableElement new
   data: #(
      #('Smith' 'Peter' 43)
      #('Jones' 'Mickael' 25)
      #('washington' 'robert' 30) );
   from: 10mm @ 20mm;
   dimension: 150mm @ 60mm
The subclass PDFDataTableWithColumnsCaptionElement extends the table behavior to support captions. The message captions: takes an array as argument,
which contains the title of each column of your report.
It is important to note that the number of column headings should be the same as the number of columns and each line must have the same number of columns.
PDFDataTableWithColumnsCaptionElement new
   captions: #('Name' 'Surname' 'Age');
   data: #(
      #('Smith' 'Peter' 43)
      #('Jones' 'Mickael' 25)
      #('washington' 'robert' 30)
   );
   from: 10 mm @ 20 mm;
   dimension: 150 mm @ 60 mm
Finally Artefact also provides a
PDFDataTableWithRowsCaptionElement subclass, which is a variant of
PDFDataTableWithColumnsCaptionElement. Its behavior is different since the caption is used to give a title to each line.
In this case, the table given as argument to the caption: message must have a number of elements equal to the number of rows.
Lastly, PDFDataTableElement offers a callback mechanism defined by the message customizationBlock:. The associated block is activated for the drawing of each cell.
It takes four parameters that are the cell being drawn, the vertical and horizontal position of the cell in the table and the data presented in the cell.
Using a block of code, it is then possible to change the appearance of the table or to trigger special treatment.
The following example shows a use of the customizationBlock: message. The block replaces the age of a person by the text 'Older than 30' if the person
is older than thirty. Note that the block only considers the third cell of each line and excludes the title of each column.
(PDFDataTableWithColumnsCaptionElement new
   captions: #('Name' 'Surname' 'Age');
   data: #(
      #('Smith' 'Peter' 43)
      #('Jones' 'Mickael' 25)
      #('washington' 'robert' 30)
   );
   from: 10 mm @ 20 mm;
   dimension: 150 mm @ 60 mm;
   customizationBlock: [ :cell :x :y :data |
      (x = 3 and: [ y > 1 ]) ifTrue: [
         (data > 30) ifTrue: [ cell text: 'Older than 30' ]
      ]
   ])
Composite elements bring a lot of flexibility to PDF document creation. Obviously, the default ones do not cover all needs and you will most likely need to create your own components. We suggest to study the existing ones to see how to proceed.
6. Stylesheets for Newbies
A PDFStyleSheet is a dictionary that contains rendering properties, e.g. the color or the font for pieces of text. Following the same logic for pages and
elements, a stylesheet can be reused across different elements or documents. When documents are created, they are automatically given a default stylesheet
that then applies to their elements. Consequently, you don't have to specify every rendering property for the elements of a document.
Following the hierarchy logic, a stylesheet defined at a lower level of a document will override properties set at a higher level. For example, if you define a textColor in the document stylesheet, every piece of text will be written in that color except for elements where textColor is defined in their own stylesheet.
Artefact also includes a dictionary of styles that allows every PDFElement to be given a specific, named style. For example the code below is given the #title style.
PDFTextElement from: 10mm@15mm text: 'My title' style: #title
At any upper level (document, page, etc), you can define the named style using the message >, e.g. as follows:
myDocument stylesheet > #title
   at: #font
   put: PDFCourierFont size: 32 pt
The message > gives access to the style attribute of PDFStyleSheet. Here we specify the #title attribute of the document.
6.1. Stylesheet Elements
Defining a stylesheet allows one to specify specific presentation attributes for a set of elements. These attributes can also be set directly for an element. We show here the different attributes and how to set them for an element.
6.1.1. Fonts
Artefact supports integrated PDF fonts through different subclasses of PDFFont: PDFCourierFont, PDFHelveticaFont, PDFSymbolFont, PDFTimesFont and PDFZapfdingbatsFont.
These fonts are available in any PDF viewer. A PDFFont instance supports the basic styles bold and italic.
As said above, fonts can be set directly for a piece of text, which is shown below:
PDFTextElement
   from: 10mm@15mm
   text: 'My title'
   font: ((PDFTimesFont size: 24 pt) bold).
The class PDFFont offers two extremely useful messages when creating a document: getStringWidth: and getIdealFontSizeForTheString:width:.
With the message getStringWidth: you get the width of a string calculated based on the attributes of the font used.
For example, the following example returns the width of the string 'hello' in Courier measuring 20 points:
(PDFCourierFont size: 20 pt) getStringWidth: 'hello'
The message getIdealFontSizeForTheString:width: returns the optimal size for the used font based on the desired width.
The following example determines the required size for a Courier font to display the 'Hello' text if the width should be 15 cm:
(PDFCourierFont new)
   getIdealFontSizeForTheString: 'hello' width: 15 cm
6.1.2. Dots
All geometric shapes can use a dotted style. It is defined by a PDFDotted object that specifies the length of each line segment and the space between them, as shown below:
((PDFArrowElement from: 125 mm @ 40 mm to:  100 mm @ 80 mm)
   dotted: (PDFDotted new length: 2 mm; space: 3 mm)).
6.1.3. Colors and Shades of Gray
Colors and shades of gray are represented by the class PDFColor. To define a color, Artefact uses the traditional RGB schema where the ratio of each color
is expressed using a value from 0 to 255. A deep black corresponds to the triple (0,0,0), the color red to (255,0,0), the color green to (0,255,0), blue to
(0,0,255) and white to (255,255,255). Grayscales are expressed with a single value ranging from 0 to 255. A value of 0 corresponds to white, while the value of
255 is equivalent to black.
To specify the color or grayscale used, the messages drawColor:, fillColor:, and textColor: are used. They respectively manage the drawing color,
fill color and text color.
For example, the following code draws a rectangle whose border will be blue and will have a red fill:
PDFRectElement new
   from: 10 mm @ 10 mm;
   dimension: 100 mm @ 30 mm;
   fillColor: (PDFColor r: 255 g: 0 b: 0);
   drawColor: (PDFColor r: 0 g: 0 b: 255).
The code below produces a gray piece of text:
PDFTextElement new
   textColor: (PDFColor greyLevel: 128);
   from: 10 mm @ 50 mm;
   text: 'A text in blue';
6.1.4. Drawing Thickness
The thickness of a line, a segment, or a border, is controlled by the message thickness:, as shown below:
   (PDFRectElement from: 10 mm @ 10 mm dimension: 50 mm @ 50 mm)
      thickness:  2 mm
6.1.5. Alignment
Text alignment is managed using the PDFAlignment class. Text can be aligned left, center or right.
Messages are left, center and right. The following example creates a right-aligned text:
(PDFFormattedTextElement from: 0 mm @ 0 mm dimension: 100 mm @ 10 mm)
   alignment: (PDFAlignment right);
   text: 'At right!'
6.2. Abstracting a Style
A document is associated to a default stylesheet whose properties are applied to any element that does not specify its own properties.
For example, if you create a PDFTextElement without setting a font and text color, the color of text and the fonts set in the document will be used.
The default stylesheet is always filled up by Artefact with sensible defaults. That's why you did not have to specify values of style in the previous examples.
You can access the stylesheet using the message styleSheet.
To change the values of the default style, you simply change the properties of the stylesheet, for example as follows:
myDocument := PDFDocument new.
myDocument styleSheet
   textColor: (PDFColor r: 0 g: 100 b: 200);
   font: (PDFHelveticaFont size: 32pt) italic.
Artefact styles form a tree. Each sub style points to its parent and the root of styles is the default style attached to the document. This way properties can be customized and default behavior can be reused when needed.
6.2.1. Stylesheet Application
Often you want to apply a style to a set of elements but not to all the elements of a document. As said above, Artefact allows you to define a named style and apply it to the elements that should follow this custom style.
For example, that you want to use a certain font and style for some text element or quotes, you can define a style named #quote as follows:
myDocument := PDFDocument new.
myDocument styleSheet > #quote
   textColor: (PDFColor r: 0 g: 50 b: 200);
   font: (PDFCourierFont size: 8pt) italic.
This style is defined here as the sub-document style and it will be applied to all elements of that use the #quote style.
In the following example we assign the #quote style to a piece of text using the message style:.
(PDFTextElement from: 5cm @ 5cm)
   text: 'my Quote with the quote style'; style: #quote
In the above example, we only have one level of styles. However, Artefact supports an infinite levels of styles. This behavior is essential for composite elements where the nesting of the elements implies the nesting of their styles.
For example, below we create a data table with a title for each column.
(PDFDataTableWithColumnsCaptionElement
   from: 10 mm @ 20 mm dimension: 190 mm @ 60 mm)
      captions: #('Name' 'Surname' 'email');
      data: #(
         #('Smith' 'Peter' '[email protected]')
         #('Jones' 'Mickael' '[email protected]')
         #('washington' 'robert' '[email protected]'));
      style: #dataTableWithColoredCaption;
      yourself).
PDFDataTableWithColumnsCaptionElement is a composite element. This element uses as styles of its sub-elements #cell and #caption, respectively for
captions and cells. By using the specialisation based on style nesting, it is then possible a to use a style uniquely for this table, in this case it will be #dataTableWithColoredCaption
To define this style, the second expression below = access the caption style of the dataTableWithColoredCaption style, and then customizes it.
pdfdoc := PDFDocument new.
pdfdoc styleSheet > #dataTableWithColoredCaption > #caption
   fillColor: (PDFColor r: 158 g: 158 b: 79);
   drawColor: (PDFColor r: 158 g: 158 b: 79).
pdfdoc styleSheet > #dataTableWithColoredCaption margin: 4 pt.
pdfdoc styleSheet > #dataTableWithColoredCaption > #cell
      alignment: PDFAlignment right.
Here we see that we can change a nested element attribute: we change the alignment of a cell in the table using a sequence of > messages.
Style management brings a lot of flexibility for the production of a document. It separates the presentation appearance from
the component definition. This distinction between structure and presentation allows users to easily create their own components
just as customizable as those provided with Artefact.
7. Create your own PDF Composite Elements
The spirit of Artefact is to reduce the complexity of pdf generation. When you have to create a document, a good
idea is to avoid wasting time reinventing the wheel. When you create a composite element, if your component is based around a string, inherit
from PDFCompositeText. Otherwise, your component should be a subclass of PDFComposite.
In this tutorial we will create a clock, which is basically a circle and two arrows. These elements will be drawn depending on the provided time and properties (size, colors, thickness).
7.1. Clock Creation
First create the class of your element and generate accessors for its variable time that will contain the time to display.
PDFComposite subclass: #PDFClockElement
   instanceVariableNames: 'time'
   classVariableNames: ''
   category: 'Artefact-Tutorial'
The two relevant methods for Artefact are defaultStyle and getSubElementsWith:styleSheet:. The first one must return a collection of PDFElements
(basic or composites). The second one must return a symbol that associates the elements with a style definition.
However it's not necessary to define this style in your document, Artefact will use the default style instead.
Define the default style:
PDFClockElement>>defaultStyle
   ^ #clock
Then define the method that will draw the clock. As a first approximation, this method just returns a circle:
PDFClockElement>>getSubElementsWith: aGenerator styleSheet: aStyleSheet
   ^ { PDFCircleElement from: self from to: self to }
The circle will be drawn depending on this composite position and size. We are using from: to: for the circle instead of center:radius: because
it's easier for us to create a clock using the boundary box of the circle.
To complete the clock, we add the hands using two PDFArrowElements and a filled little circle in the middle:
PDFClockElement>>getSubElementsWith: aGenerator styleSheet: aStyleSheet
   | hourAngle minuteAngle |
   hourAngle := Float pi / 2 - (time hour12 * 2 * Float pi / 12).
   minuteAngle := Float pi / 2 - (time minute * 2 * Float pi / 60).
   ^ {
      (PDFCircleElement from: self from to: self to).
      (PDFCircleElement
             center: self center radius: self dimension x * 0.05).
      (PDFArrowElement
             from: self center angle: hourAngle length: dimension x * 0.25).
      (PDFArrowElement
             from: self center angle: minuteAngle length: dimension x * 0.45)
   }
Don't be afraid about the two angle calculus, it's just to convert hours and minutes to radian angles.
At this time, your PDFClockElement is already usable and fully integrated into Artefact. We can insert it into a PDF document and export it:
PDFDocument new
   add: (PDFPage new add: ((
      PDFClockElement
         from: 2 cm @ 2 cm
         to: 10 cm @ 10 cm) time: Time current));
   exportTo: 'clockTutorialStep1.pdf' asFileReference writeStream
7.2. Make the Clock Personalizable
Your clock is already personnalizable independently of other elements because you previously defined its style as #clock. This is shown below:
| doc |
doc := PDFDocument new.
doc add: (PDFPage new add:
   ((PDFClockElement from: 2 cm @ 2 cm to: 10 cm @ 10 cm)
      time: Time current)).
doc styleSheet > #clock
   drawColor: (PDFColor r:180 g: 24 b:24);
   fillColor: (PDFColor r:230 g: 230 b:10).
doc exportTo: 'clockTutorialStep2.pdf' asFileReference writeStream
At this time, you don't have defined specific styles for sub elements of your clock. Consequently, you will not be able to personalize each element with different styles (so you cannot have hands of differents colors for example). To increase personalization possibilities, you should define specific styles for sub elements you reuse, as follows:
PDFClockElement>>getSubElementsWith: aGenerator styleSheet: aStyleSheet
   | hourAngle minuteAngle |
   hourAngle := Float pi / 2 - (time hour12 * 2 * Float pi / 12).
   minuteAngle := Float pi / 2 - (time minute * 2 * Float pi / 60).
   ^ {
      (PDFCircleElement from: self from to: self to).
      (PDFCircleElement
         center: self center radius: self dimension min * 0.05).
      ((PDFArrowElement
         from: self center angle: hourAngle
         length: dimension min * 0.25) style: #hourHand).
      ((PDFArrowElement
         from: self center angle: minuteAngle
         length: dimension min * 0.45) style: #minuteHand)
   }
As you can see, we just send the message style: to each subelement that we want to define a specific style.
Now, we can personalize each hand as follows:
| doc |
doc := PDFDocument new.
doc add: (PDFPage new add: ((PDFClockElement
   from: 2 cm @ 2 cm to: 10 cm @ 10 cm) time: Time current)).
doc styleSheet > #clock
   drawColor: (PDFColor r:180 g: 24 b:24);
   fillColor: (PDFColor r:230 g: 230 b:10).
doc styleSheet > #clock > #hourHand
   drawColor: (PDFColor r:0 g: 45 b:200).
doc styleSheet > #clock > #minuteHand
   drawColor: (PDFColor r:0 g: 200 b:45).
doc exportTo: 'clockTutorialStep4.pdf' asFileReference writeStream
This gives the clock hands have different colors. Moreover, like for any element in Artefact, you can specify a style for a given instance of a
PDFClockElement, allowing you to reuse and adapt each clock:
| doc |
doc := PDFDocument new.
doc add: (
   PDFPage new
      add: (
         (PDFClockElement from: 2 cm @ 2 cm to: 10 cm @ 10 cm)
            time: Time current);
      add: (
         (PDFClockElement from: 12 cm @ 2 cm to: 20 cm @ 10 cm)
            time: Time current;
            style: #apocalypseClock)).
doc styleSheet > #clock
   drawColor: (PDFColor r: 180 g: 24 b: 24);
   fillColor: (PDFColor r: 230 g: 230 b: 10).
doc styleSheet > #clock > #hourHand
   drawColor: (PDFColor r: 0 g: 45 b: 200).
doc styleSheet > #clock > #minuteHand
   drawColor: (PDFColor r: 0 g: 200 b: 45).
doc styleSheet > #apocalypseClock
   fillColor: (PDFColor r: 244 g: 221 b: 25);
   thickness: 2 mm;
   roundCap: true.
doc styleSheet > #apocalypseClock > #minuteHand
   drawColor: (PDFColor r: 240 g: 6 b: 7);
   thickness: 1 mm.
doc exportTo: 'clockTutorialStep5.pdf' asFileReference writeStream
8. Conclusion
We presented the key aspects of Artefact, a powerful framework to generate PDF documents. It is based on innovative design aspects: it features an object-oriented design where each element defines its own attributes. This supports much stronger possibilities for reuse than traditional stream-based approaches. With Artefact you can freely compose, customize and reuse your PDF elements.