Chapter 8. Submitting Your App To Android Market
| If you know HTML, CSS, and JavaScript, you already have the tools you need to develop Android applications. This hands-on book shows you how to use these open source web standards to design and build apps that can be adapted for any Android device -- without having to use Java. Buy the print book or ebook or purchase it in iBooks. |

Finally, the moment you’ve been waiting for: submitting your completed app to the Android Market. The process is actually pretty straightforward: you just need to prepare a "release" version of the app and upload it.
Preparing a Release Version of Your App
You need to do a few things to get the app ready for distribution:
Remove any debugging or logging code
Version the app
Compile the app
Sign the compiled app with a private key
Removing Debug Code
There’s no reason to have debugging or logging code slowing down your app while it’s running on a user’s phone. If you have added any such code (see the section called “The JavaScript Console”) to your HTML, CSS, or JavaScript files, now’s the time to take it out.
You should also open up the AndroidManifest.xml file in the KiloGap folder, search for "debuggable" and set it to false. When you’re done, it should look something like this:
...
<application
    android:icon="@drawable/icon"
    android:label="@string/app_name"
	android:debuggable="false">
...
Note
While you have the manifest file open, you might as well check to make sure the android:icon and android:label are specified as shown in the previous listing. PhoneGap normally takes care of this for you, but I think it’s worth double checking because you won’t be able to upload your app if these values are not set.
Versioning Your App
Near the top of your AndroidManfiest.xml file, you should see values set for the version name and version code for your app:
...
<manifest
    xmlns:android="http://schemas.android.com/apk/res/android"
    package="com.jonathanstark.kilo"
    android:versionName="1.0.0"
    android:versionCode="1">
...
Since this is probably your first app, these values are fine as is. Once you’ve published your app and later want to release an update, you’ll update these values appropriately. The Android system doesn’t check or enforce this version information, but it’s a critical piece of data for your long term app strategy.
The version name is the value that will be shown to the user. It’s a string, so you can put whatever you want here, but the common practice is to use a <major>.<minor>.<point> format (such as 1.0.0).
The version code is expected to be a positive integer value. It need not correspond to the version name in any way. In fact, it probably won’t—you should just increment it by 1 every time you release an update, regardless of whether the release is a major upgrade, or a minor bug fix.
Signing Your App
Android requires that all apps be digitally signed by the developer. The process for doing so is easy but a little cryptic:
Launch the Terminal application and navigate into the KiloGap directory:
cd ~/Desktop/KiloGapCompile the app in release mode:
ant releaseYou’ll see a page or so of output scroll by, ending with "BUILD SUCCESSFUL". An unsigned binary named
Kilo-unsigned.apkwill now be sitting in the~/Desktop/KiloGap/bin/directory (Figure 8.1, “The ant release command creates an unsigned binary named Kilo-unsigned.apk in the ~/Desktop/KiloGap/bin/ directory.”).Figure 8.1. The
ant releasecommand creates an unsigned binary namedKilo-unsigned.apkin the~/Desktop/KiloGap/bin/directory.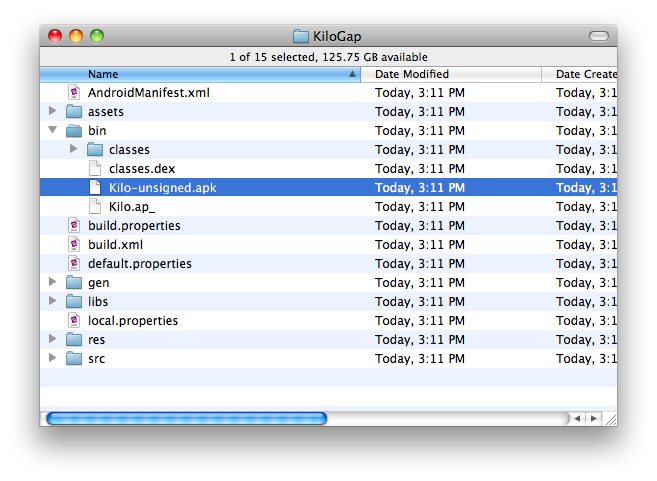
Create private key:
keytool -genkey -v -keystorekeystore-aliasalias-keyalg RSA -validitydaysThis command is interactive and will ask you a bunch of questions. Mine looks like this:
JSC-MBP:KiloGap jstark$
keytool -genkey -v -keystore myAndroidKey.keystore \ -alias myAndroidKeyAlias -keyalg RSA -validity 10000Enter keystore password: Re-enter new password: What is your first and last name? [Unknown]:Jonathan StarkWhat is the name of your organizational unit? [Unknown]: What is the name of your organization? [Unknown]:Jonathan Stark ConsultingWhat is the name of your City or Locality? [Unknown]:ProvidenceWhat is the name of your State or Province? [Unknown]:RIWhat is the two-letter country code for this unit? [Unknown]:USIs CN=Jonathan Stark, OU=Unknown, O=Jonathan Stark Consulting, L=Providence, ST=RI, C=US correct? [no]:yesGenerating 1,024 bit RSA key pair and self-signed certificate (SHA1withRSA) with a validity of 10,000 days for: CN=Jonathan Stark, OU=Unknown, O=Jonathan Stark Consulting, L=Providence, ST=RI, C=US Enter key password for <myAndroidKeyAlias> (RETURN if same as keystore password): [Storing myAndroidKey.keystore]When the process completes, you should see
myAndroidKey.keystorecreated in the~/Desktop/KiloGapdirectory (Figure 8.2, “The keytool command will generate a keystore file named myAndroidKey.keystore in the KiloGap directory”). If you’d like to use this keystore for other apps in the future, you might want to move the keystore file to a more central location.Figure 8.2. The keytool command will generate a keystore file named
myAndroidKey.keystorein the KiloGap directory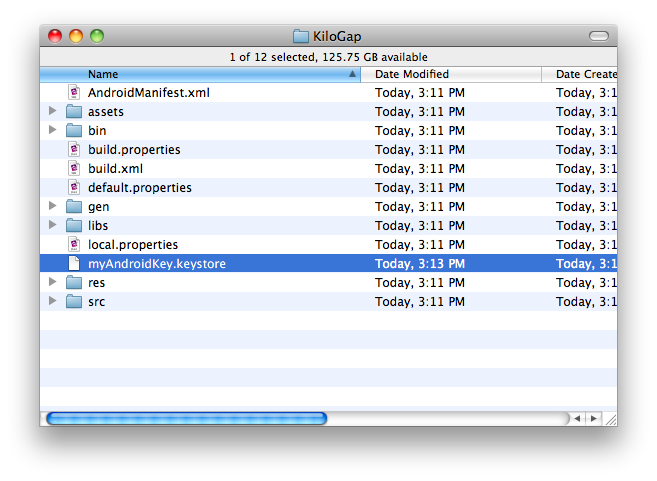
Warning
Do not lose this password. If you forget your keystore password you won’t be able to update your app once it’s published.
Note
You can use this keystore to sign any other apps you create, so you can skip this step in the future.
Sign your app with the key you just created:
jarsigner -verbose -keystore myAndroidKey.keystore ./bin/Kilo-unsigned.apk myAndroidKeyAliasWhen you run this command, you’ll be asked for your keystore password.
Align the apk file:
zipalign -v 4 ./bin/Kilo-unsigned.apk ./bin/Kilo.apkYou’ll see a page or so of output scroll by, ending with "Verification succesful". A signed binary named
Kilo.apkwill now be sitting in the~/Desktop/KiloGap/bin/directory (Figure 8.3, “Once you run the jarsigner and zipalign commands, your final app will be generated in the ~/Desktop/KiloGap/bin/ directory.”). This.apkfile is your completed app!Figure 8.3. Once you run the
jarsignerandzipaligncommands, your final app will be generated in the~/Desktop/KiloGap/bin/directory.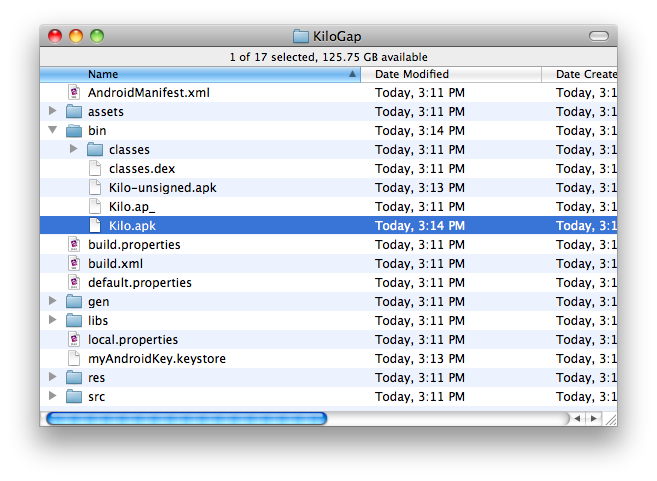
Uploading Your App to the Android Market
All that is left to do is upload our signed binary to the Android Market.
Note
You need to be a registered Android Developer in order to upload your app. If have not already registered, you can do so at http://market.android.com/publish/signup. The process if quick and easy - you just fill out a bit of profile info (name, email, phone, etc...), pay a $25 registration fee (using Google Checkout), and agree to the Android Market Developer Distribution Agreement.
Launch your web browser, navigate to http://market.android.com/publish/ and sign in with your Google Account.
If you aren’t forwarded automatically after logging in, navigate to http://market.android.com/publish/Home and click the "Upload Application" button (Figure 8.4, “Navigate to the Android Market upload page to submit your app.”).
Figure 8.4. Navigate to the Android Market upload page to submit your app.
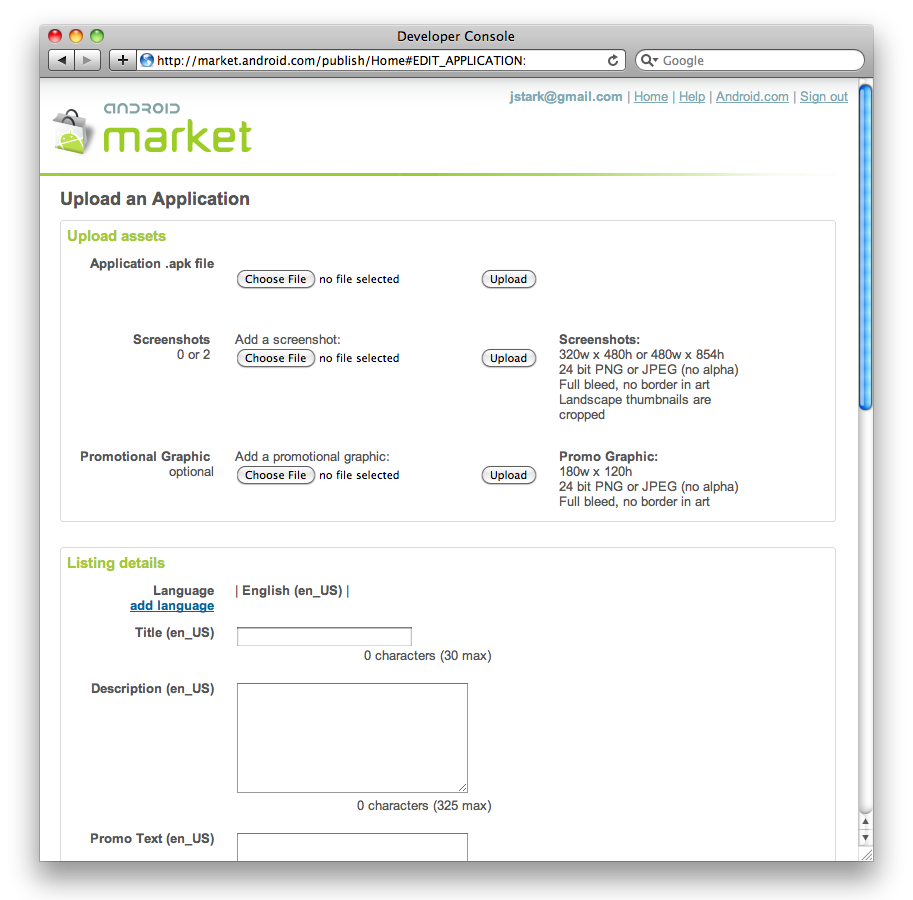
Click the "Choose File" button next to "Application .apk file", browse to
Kilo.apkon your hard drive, and click the the "Upload" button.You can optionally upload a couple of screenshots to be displayed on the Market page for your app.
Enter a title for your app in the Listing Details section (30 characters max).
Enter a description for your app (325 characters max).
Select a type and category for your app.
Specify a price for your app.
Indicate your copy protection and location preferences in the Publishing Options section.
Enter your website, email, and phone number in the Contact Information section.
Agree to the terms in the Consent section.
Click the Publish button.
Congrats! Your app will be available in the Android Market almost immediately.
Distributing Your App Directly
One very attractive feature of the Android platform is that developers can skip the Android Market completely and distribute apps directly to users. This is a great option in many situations. For example, a corporate IT department might want to distribute a private app to employees. Or maybe you want to run a private beta of your app before uploading it to the Android Market.
Whatever the case, direct distribution couldn’t be easier: upload your signed .apk binary to your web server and provide your users with a link to it. Users click the link—say, from an email message or a web page—and the app is downloaded and installed. Simple.
Note
You can also use QR Codes to distribute links to your app. A QR Codes is a two-dimensional barcode that can store up to 4,296 alphanumeric characters of arbitrary text, and be read by the camera on an Android phone. When a user encounters your QR Code, she can take a picture of it with Google Goggles (or another QR Code reader app), and she’ll be provided with a link to your app. You can learn more about by visiting the "Google Chart Tools" page devoted to QR Codes (http://code.google.com/apis/chart/docs/gallery/qr_codes.html), and create your own for free using Google’s "Live Chart Playground" (http://code.google.com/apis/chart/docs/chart_playground.html).
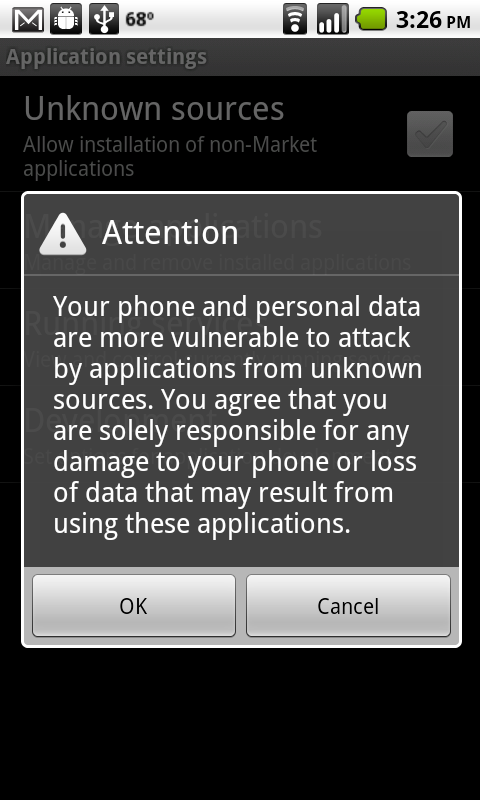
The only caveat is that users have to first allow installation of non-Market applications by navigating to Settings→Applications and ticking the box next to Unknown Sources (Figure 8.5, “Users can opt to download applications from sources other than the Android Market.”). If the user has not first enabled unknown sources, they will still be allowed to download the app, but will be alerted that the install is blocked (Figure 8.6, “If the user attempts to install an app from an unknown source without having checked the appropriate setting, he will be prompted to change the setting or cancel the installation process.”). The alert dialog will allow them to navigate directly to the relevant setting, or cancel the installation. When the user first activates the checkbox, they’ll see a confirmation dialog that warns them about the implications of their choice (Figure 8.7, “When the user first activates the Unknown Sources checkbox, they’ll be presented with a confirmation dialog that warns them about the implications.”).
Figure 8.5. Users can opt to download applications from sources other than the Android Market.
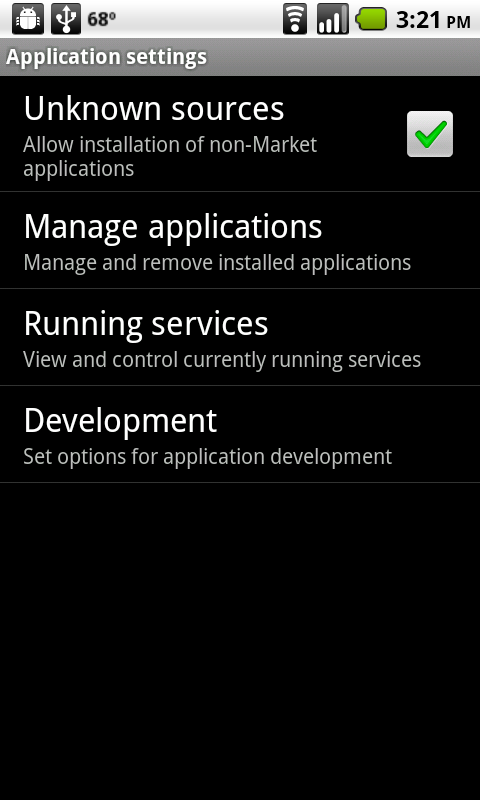 |
Figure 8.6. If the user attempts to install an app from an unknown source without having checked the appropriate setting, he will be prompted to change the setting or cancel the installation process.
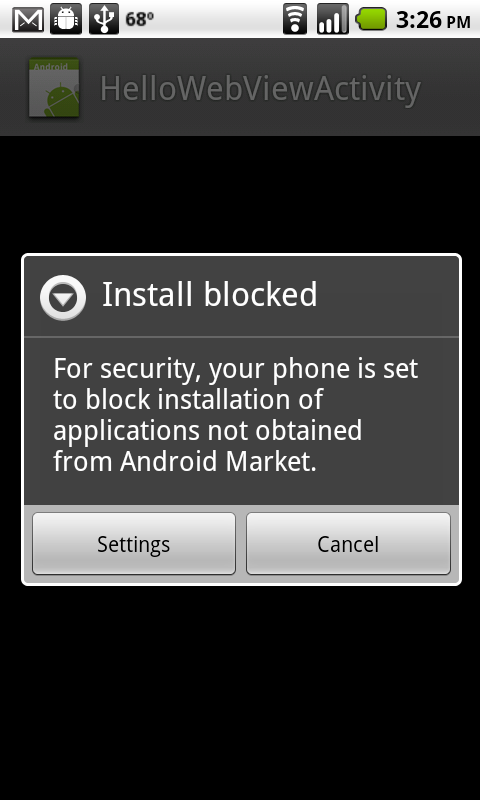 |
Figure 8.7. When the user first activates the Unknown Sources checkbox, they’ll be presented with a confirmation dialog that warns them about the implications.
 |
Further Reading
If you’d like to dig deeper into the mechanics of the Android SDK, the best place to start is the excellent online documentation available at http://developer.android.com/. Here are some other resources that I find useful and refer to often:
Android Discuss mailing list: http://groups.google.com/group/android-discuss
Android Developers mailing list: http://groups.google.com/group/android-developers
jQTouch mailing list: http://groups.google.com/group/jqtouch
PhoneGap mailing list: http://groups.google.com/group/phonegap
Android reference for WebView: http://developer.android.com/reference/android/webkit/WebView.html
Android reference for WebChromeClient: http://developer.android.com/reference/android/webkit/WebChromeClient.html
Android reference for WebViewClient: http://developer.android.com/reference/android/webkit/WebViewClient.html
Android reference for WebSettings: http://developer.android.com/reference/android/webkit/WebSettings.html
Note
The Android references in the list above are only interesting if you want to start digging around in the PhoneGap source code, or maybe write your own native HTML app wrapper. WebView is the primary class and it’s used to display HTML; By default, it doesn’t support JavaScript, browser widgets (e.g location bar, back/forward buttons, etc.), or error handling.
The other three classes extend the WebView in various ways. WebChromeClient adds support for Javascript dialogs, favicons, titles, and progress indicators. WebViewClient adds support for some useful event listeners like onFormResubmission(), onPageStarted(), and onPageFinished(). Finally, WebSettings gives you access to WebView settings state with methods such as getDatabaseEnabled() and setUserAgentString().
Again, you won’t needs to worry about these unless you want to get into the Java code under the hood.
Now get out there and make some great Android apps!