5.3. Adding Scripts to the UI
Once you are comfortable with how JavaScript works in the context of the user interface layer and are familiar with some of the primary DOM methods used to manipulate the various elements and attributes, you can add your own scripts to your application. Though you can use other techniques to get scripts into the UI, one of the most common methods is to use Mozilla's event model, which is described in the next few sections.
5.3.1. Handling Events from a XUL Element
Events are input messages that pass information from the user interface to the application code. Capturing this information, or event handling, is how you usually tell scripts when to start and stop.
When the user clicks a XUL button, for instance, the button "listens" for the click event, and may also handle that event. If the button itself does not handle the event (e.g., by supplying executable JavaScript in an event handler attribute), then the event "bubbles," or travels further up into the hierarchy of elements above the button. The event handlers in Example 5-3 use simple inline JavaScript to show that the given event (e.g., the window loading in the first example, the button getting clicked in the second, and so on) was fired and handled.
As in HTML, predefined event handlers are available as attributes on a XUL element. These attributes are entry points where you can hook in your JavaScript code, as these examples show. Note that event handler attributes are technically a shortcut, for which the alternative is to register event listeners explicitly to specified elements. The value of these on[event] event handler attributes is the inline JavaScript that should be executed when that event is triggered. Example 5-5 shows some basic button activation events.
While the window and button events in Example 5-5 carry out some inline script, there is a variation with the onchange handler attached to the menulist element. onchange contains a JavaScript function call whose definition may live in the XUL document itself or in an external file that is included by using the src attribute on a script element:
<script type="application/x-javascript" src="chrome://mypackage/content/myfile.js" />
A large basic set of event handler attributes is available for use on XUL elements (and HTML elements). Appendix C has a full listing of these events along with explanations. The following subset shows the potential for script interaction when the UI uses event handlers:
onabort
onblur
onerror
onfocus
onchange
onclick
oncontextmenu
ondestroy
onload
onpaint
onkeydown
onkeypress
onkeyup
onunload
onmousemove
onmouseout
onmouseover
onmouseup
onmousedown
onrest
onresize
onscroll
onselect
onsubmit
Some of these event handlers work only on particular elements, such as window, which listens for the load event, the paint event, and other special events.
To see all event handler attributes on a particular element, you can execute the short script in Example 5-6, which uses the for in loop in JavaScript to iterate over the members of an object -- in this case, a XUL element.
The function you added in Example 5-4 is also an example of event handler code in an application's interface.
5.3.2. Events and the Mozilla Event Model
The event model in Mozilla is the general framework for how events work and move around in the user interface. As you've already seen, events tend to rise up through the DOM hierarchy -- a natural process referred to as event propagation or event bubbling. The next two sections describe event propagation and its complement, event capturing.
5.3.2.1. Event propagation and event bubbling
This availability of events in nodes above the element of origin is known as event propagation or event bubbling. Event bubbling means you can handle events anywhere above the event-raising element in the hierarchy. When events are handled by elements that did not initiate those events, you must determine which element below actually raised the event. For example, if an event handler in a menu element handles an event raised by one of the menu items, then the menu should be able to identify the raising element and take the appropriate action, as shown in Example 5-7. In this example, a JavaScript function determines which menuitem was selected and responds appropriately.
The event handler in the parent node menu finds out which child menuitem was actually clicked by using event.target and takes action accordingly. Let's walk through another possible scenario. If a user of an application selects an item from a menu list, you could get the node of that item by using event.target. Your script could then abstract that item's value or other information, if necessary.
5.3.2.1.1. Trapping events
When an event is raised, it is typically handled by any node interested in it as it continues its way up the DOM hierarchy. In some cases, you may want to handle an event and then prevent it from bubbling further up, which is where the DOM Event method stopPropagation( ) comes in handy.
Example 5-8 demonstrates how event bubbling can be arrested very simply. When the XUL document in Example 5-8 loads, an event listener is registered with a row in the tree. The event listener handles the event by executing the function stopEvent( ). This function calls an event object method, stopPropagation, which keeps the event from bubbling further up into the DOM. Note that the tree itself has an onclick event handler that should display a message when clicked. However, the stopEvent( ) method has stopped propagation, so after the data in the table is updated, the event phase is effectively ended. In this case, the function was used to trap the event and handle it only there.
5.3.2.2. Capturing events
Event capturing is the complement of event bubbling. The DOM provides the addEventListener method for creating event listeners on nodes that do not otherwise supply them. When you register an event listener on an ancestor of the event target (i.e., any node above the event-raising element in the node hierarchy), you can use event capturing to handle the event in the ancestor before it is heard in the target itself or any intervening nodes.
To take advantage of event capturing (or event bubbling with elements that do not already have event listeners), you must add an event listener to the element that wants to capture events occurring below it. Any XUL element may use the DOM addEventListener method to register itself to capture events. The syntax for using this method in XUL is shown here:
XULelement = document.getElementById("id of XULelement");
XULelement.addEventListener("event name", "event handler code",
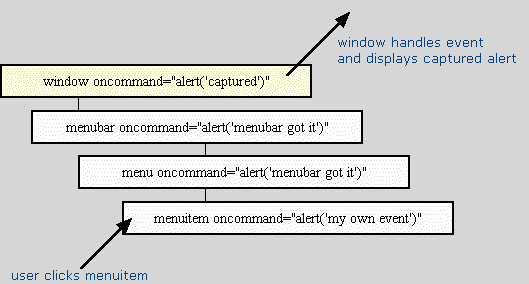
useCapture bool);The event handler code argument can be inline code or the name of a function. The useCapture parameter specifies whether the event listener wants to use event capturing or be registered to listen for events that bubble up the hierarchy normally. In Figure 5-3, the alert dialog invoked by the menuitem itself is not displayed, since the root window element used event capture to handle the event itself.
An onload event handler for a XUL window can also register a box element to capture all click events that are raised from its child elements:
var bbox = document.getElementById("bigbox");
if (bbox) {
  bbox.addEventListener("click", "alert('captured')", true);
}
...
<box id="bigbox">
  <menu label="File">
    <menupopup>
      <menuitem label="New" onclick="alert('not captured')" />
      ...
    <menupopup>
  </menu>
</box>
5.3.3. Changing an Element's CSS Style Using JavaScript
Much of what makes the Mozilla UI both flexible and programmable is its ability to dynamically alter the CSS style rules for elements at runtime. For example, if you have a button, you can toggle its visibility by using a simple combination of JavaScript and CSS. Given a basic set of buttons like this:
<button id="somebutton" class="testButton" label="foo" />
<spacer flex="1" />
<button id="ctlbutton"
  class="testButton"
  label="make disappear"
  oncommand="disappear( );" />
as well as a stylesheet import statement at the top of the XUL like this:
<?xml-stylesheet href="test.css" type="text/css"?>
and a simple CSS file in your chrome/xfly/content directory called test.css that contains the following style rule:
#somebutton[hidden="true"]{ display: none; }
.testButton{
  border            : 1px outset #cccccc;
  background-color  : #cccccc;
  padding           : 4px;
  margin            : 50px;
}
You can call setAttribute in your script to hide the button at runtime.
<script>
  function disappear( ){
  return document.getElementById('somebutton').setAttribute('hidden', true);
  }
</script>
The previous code snippet makes a visible button disappear by setting its hidden attribute to true. Adding a few more lines, you can toggle the visibility of the button, also making it appear if it is hidden:
<script>
 function disappear( ){
   const defaultLabel  = "make disappear";
   const newLabel      = "make reappear";
   var button          = document.getElementById('somebutton');
   var ctlButton       = document.getElementById('ctlbutton');
   if(!button.getAttribute('hidden')) {
     button.setAttribute('hidden', true);
     ctlButton.setAttribute('label', newLabel);
   } else  {
     button.removeAttribute('hidden');
     ctlButton.setAttribute('label', defaultLabel);
   }
  return;
 }
</script>
Another useful application of this functionality is to collapse elements such as toolbars, boxes, and iframes in your application.
The setAttribute method can also be used to update the element's class attribute with which style rules are so often associated. toolbarbutton-1 and button-toolbar are two different classes of button. You can change a button from a toolbarbutton-1 -- the large button used in the browser -- to a standard toolbar button using the following DOM code:
// get the Back button in the browser
b1 = document.getElementById("back-button");\
b1.setAttribute("class", "button-toolbar");
This dynamically demotes the Back button to an ordinary toolbar button. Code such as this assumes, of course, that you know the classes that are used to style the various widgets in the interface.
You can also set the style attribute directly using the DOM:
el = document.getElementById("some-element");
el.setAttribute("style", "background-color:darkblue;");
Be aware, however, that when you set the style attribute in this way, you are overwriting whatever style properties may already have been defined in the style attribute. If the document referenced in the snippet above by the ID some-element has a style attribute in which the font size is set to 18pc, for example, that information is erased when the style attribute is manipulated in this way.
5.3.4. Creating Elements Dynamically
Using the createElement method in XUL lets you accomplish things similar to document.write in HTML, with which you can create new pages and parts of a web page. In Example 5-9, createElement is used to generate a menu dynamically.
The JavaScript function generate( ) in Example 5-9 gets the menupopup as the parent element for the new elements, creates five menuitems in an array called menuitems, and stores five string ID names for those menuitems.
The variable l is the length of the array. The variable newElement is a placeholder for elements created by using the createElement method inside of the for loop. generate( ) assigns newElement on each iteration of the loop and creates a new menuitem each time, providing a way to dynamically generate a list of menu choices based on input data or user feedback. Try this example and experiment with different sources of data, such as a menu of different auto manufacturers, different styles on group of boxes that come from user selection, or tabular data in a tree.
5.3.5. Sharing Data Between Documents
As the scale of your application development increases and your applications grow new windows and components, you may become interested in passing data around and ensuring that the data remains in scope. Misunderstanding that scope often leads to problems when beginning Mozilla applications.
5.3.5.1. Scope in Mozilla
The general rule is that all scripts pulled in by the base XUL document and scripts included in overlays of this document are in the same scope. Therefore, any global variables you declare in any of these scripts can be used by any other scripts in the same scope. The decision to put a class structure or more sophisticated design in place is up to you.
The relationship of a parent and child window indicates the importance of storing data in language constructs that can be passed around. This code shows a common way for a parent to pass data to a window it spawns:
var obj = new Object ( );
obj.res = "";
window.openDialog("chrome://xfly/content/foo.xul", 'foo_main',
"chrome,resizable,scrollbars,dialog=yes,close,modal=yes",
obj);
5.3.5.2. Using the window.arguments array
The previous code snippet creates a new JavaScript object, obj, and assigns the value of an empty string to that object's res property. The object is then passed by reference to the new window as the last parameter of the openDialog( ) method so it can be manipulated in the scope of the child window:
function onOk( ) {
  window.arguments[0].res  = "ok";
  return;
}
function onCancel( ) {
  window.arguments[0].res  = "cancel";
  return;
}
In that child window, the object is available as an indexed item in the special window.arguments array. This array holds a list of the arguments passed to a window when it is created. window.arguments[0] is a reference to the first argument in the openDialog( ) parameter list that is not a part of the input parameters for that method, window.arguments[1] is the second argument, and so on. Using window.arguments is the most common way to pass objects and other data around between documents.
When the user clicks a button in the displayed dialog (i.e., the OK or Cancel button), one of the functions sets a value to the res property of the passed-in object. The object is in the scope of the newly created window. When control is passed back to the script that launched the window, the return value can be checked:
if (obj.res != "ok") {
  dump("User has cancelled the dialog");
  return;
}
In this case, a simple dump statement prints the result, but you can also test the result in your application code and fork accordingly.