12.5. Certificate Authorities and Digital Signatures
Instead of changing the Universal XPConnect privileges (see Section 12.3 earlier in this chapter), you could create signed remote applications that can be granted access to users' computers. A signed application means that the application has a digital signature, which verifies that a file or group of files was created by the person or organization from which you download and that they are trustworthy. In essence, if you trust the person or organization signing the files, then you trust the files themselves.
Digital signatures originate from a certificate authority (CA), an organization that claims responsibility for any digital signature it creates. CAs act as gatekeepers by allowing only people who the organization trusts to create digital signatures. Large CAs like Verisign, whose certificates come preinstalled in many web browsers, enforce validity through large fees. For example, if you can afford $600, then you are an organization with whom the CA would be glad to associate. That $600 then also buys your application respectability with user's web browsers. You can see the CAs that come with the Mozilla browser by going to Privacy & Security > Certificates in your preferences panel and then by selecting the Manage Certificates option. Of the different types of CAs -- there's a type for SSL connections, for example, and another one for S/MIME -- the Netscape Object Signing certificate is what matters for signed applications.
Fortunately, to get your remote applications signed by a CA, you don't have to pay for a Verisign Netscape Object Signing CA because other options are available. You can use the MozDev CA, for example, and even create your own. The next section tells you how use Mozilla tools to become your own certificate authority so you can sign your own applications and those of other Mozilla developers. The Section 12.6 section later in this chapter uses the MozDev CA to discuss both avenues.
12.5.1. Mozilla Network Security Services (NSS)
The Mozilla Network Security Services tools, which are described in detail at http://www.mozilla.org/projects/security/pki/nss/, allow you to become your own Netscape Object Signing CA. By becoming your own Netscape Signing CA, you can distribute signing certificates to Mozilla application developers. You can obtain the tools via a simplified distribution of NSS for Windows and Linux at http://certs.mozdev.org. These tools allow you to become a CA and to package signed remote Mozilla applications. Finally, the commands for CertUtil work the same way on Windows, Linux, and any other OS on which you run CertUtil.
12.5.2. CA Certificates, Signing Certificates, and the Certificate Chain
A certificate represents an organization in a official digital form. It provides fields for the organization's name, contact information, date of issue, and an expiration date. There are also two keys: a private and a public key.
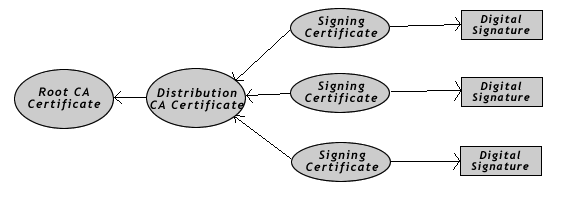
To become a CA, you need to create two certificates for yourself: a "root certificate" and a "distribution certificate." Once you set up these certificates, you can issue signing certificates, which create digital signatures. Figure 12-4 shows the chain of relationships between certificates.
The distribution certificate is based on the root certificate's public key. You can then create signing certificates from the distribution certificate, using its public key that it handles automatically by NSS. Finally, the digital signatures derived from the signing certificate can sign applications using NSS.
12.5.3. Setting Up a Certificate Authority
Using the CertUtil tool that comes with NSS, you need to create a root certificate and a distribution certificate for yourself to become a CA. The CertUtil tool is located in the NSS installation's bin directory and can be run from anywhere in a console window. In the next few sections, we walk through the steps necessary to accomplish this process.
12.5.3.1. Creating a certificate database
Mozilla comes with a prefilled certificate database that contains information about certificates from Verisign and other CAs (found in the file cert7.db in the user profile directory), which you can modify. However, starting with a blank database is better because it avoids the possibility of corruption.
At the prompt, create a new database by using the -N and -d options for CertUtil:
C:\NSS\bin>certutil -N -d .
Enter a password for the database. You need to reenter this password every time you issue or change certificates. CertUtil creates the files cert7.db, key3.db, and secmod.db in the same directory as CertUtil.
12.5.3.2. Creating the root CA certificate
The root certificate is the foundation for the certificate chain and should not be shared with anyone outside your organization. You may want to consider storing the database or exported certificate on a floppy disk for safe keeping. If it gets lost or stolen, you need to make a new one and all your users will need to use new certificates and resign their applications.
Once you create cert7.db, CertUtil can process the Root CA Certificate into it, using the following and substituting the name of your CA for mozdev.org:
C:\NSS\bin>certutil -S -s "CN=mozdev.org, O=mozdev.org" -n "mozdev.org"
-t ",,C" -x -d . -1 -2 -5
Enter a password at the prompt and proceed by making the menu choices shown in Example 12-9.
The mozdev.org Root CA Certificate resides in cert7.db. You can export it to a file for safekeeping as follows:
C:\NSS\bin>certutil -L -d . -n "mozdev.org" -a -o mozdev.cacert
This code will yield an ASCII representation of the certificate.
12.5.3.3. Creating a distribution CA certificate
Next you must create a distribution certificate. This certificate will be installed into the user's Mozilla web browser so Mozilla can verify related signed remote Mozilla applications. Start the certificate by typing the following code at the prompt and substituting the name of your CA for "mozdev.org":
C:\NSS\bin>certutil -S -n "certs.mozdev.org"
-s "CN=certs.mozdev.org, O=certs.mozdev.org" -c "mozdev.org" -v 96
-t ",,C" -d . -1 -2 -5
Enter a password at the prompt and make the menu choices shown in Example 12-10.
Note the differences between this process and that used to create the root certificate. The distribution certificate is not self-signed, so to create it, you must reference the mozdev.org Root CA Certificate in the initial command. Also, the -v 96 option indicates that the certificate is good for 96 months.
Once you've created the distribution certificate, export it using the following command (for which "certs.mozdev.org" is the name of your CA):
C:\NSS\bin>certutil -L -d . -n "certs.mozdev.org" -a -o certs_mozdev.cacert
Keep track of the resulting file because you will need to upload it to your web site later so browsers can install it.
12.5.4. Issuing Signing Certificates
Once you create the two root and distribution certificates for your organization, you are a certificate authority, much like VeriSign. You decide who gets the privilege of a signing certificate and issue them accordingly. Signing certificates should not be reused for different people. When you want to give out a signing certificate, you should create a new one by using CertUtil and make a copy of the exported certificate for yourself to keep and catalog.
To create a signing certificate, use the following command and substitute the name of your CA for "mozdev.org":
C:\NSS\bin>certutil -S -n "certs.mozdev.org/signing"
-s "CN=certs.mozdev.org/signing, O=certs.mozdev.org" -c "certs.mozdev.org" -v 96 -t ",,C" -d . -1 -2 -5
Enter a password at the prompt and make the menu choices shown in Example 12-11.
In Example 12-11, the certs.mozdev.org/signing certificate references the certs.mozdev.org CA certificate. The Digital Signature option is also set so a signed remote Mozilla application can be compiled from the certificate.
Export the signing certificate with the following command:
C:\NSS\bin>certutil -L -d . -n "certs.mozdev.org/signing" -a
-o eric.cacert
You can send the resulting file to the person who requested the Signing Certificate. That person can then use it to create signed remote applications, as described later in this chapter in the Section 12.6.3.1 section.
12.5.5. Distributing Distribution Certificates
The distribution certificate (certs_mozdev.cacert in Example 12-10) must be installed into a user's Mozilla web browser before she can use signed applications that come from certificates you've distributed. It's best to state clearly on the web site hosting these signed remote Mozilla applications that the distribution certificate is needed. If you distribute many different signing certificates, and they are used by all signed remote Mozilla applications, then all applications can use that same distribution certificate (as they do with Verisign's and other certificate authorities).
To allow users to install the distribution certificate, create a link to the certificate file on your web page:
<a href="certs_mozdev.cacert">Install the MozDev CA Certificate</a>
Also make sure that your web server uses the MIME type application/x-x509-ca-cert for .cacert files.
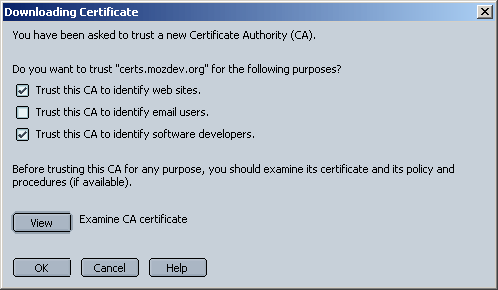
If the web server is set up correctly, the user will get a dialog box that looks like Figure 12-5. Tell the user to select the options for "web sites" and "software developers."
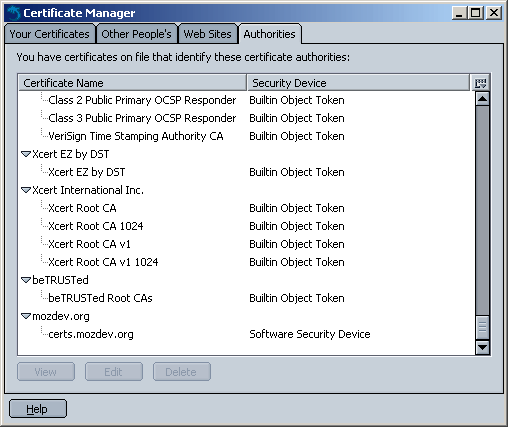
After the certificate is installed, it will appear in the Certificate Manager, as shown in Figure 12-6. The Certificate Manager can be accessed via the global Mozilla preferences (Edit > Preferences > Privacy & Security > Certificates). Mozilla is then ready to run signed remote Mozilla applications bearing signatures from your certificate authority.


