Hudson’s security configuration can span a wide spectrum: from a simple Hudson instance running on a local network with no configured security, to an instance of Hudson supporting thousands of developers and thousands of projects with a security model providing isolation and access-control supporting a highly secured environment. Whether you support a local team of developers accessing an unsecured Hudson instance or a distributed enterprise team involving internal and external collaborators such as vendors and consultants, Hudson’s security supports almost any conceivable use-case for authorization and access control.
This chapter provides an overview of the approaches to authentication and authorization in Hudson. After reading this chapter you will be able to take a Hudson instance and secure it allowing only authorized users to administer, access, and alter Hudson build jobs.
Out of the box Hudson has no security enabled. To enable security, check Enable security in the global configuration of Hudson as displayed in Figure 3.2, “Configuring Global Hudson Configuration”. Once you have enabled security you will be able to set up your desired security settings with the options visible in Figure 4.1, “Overview of the available security settings” and documented in this chapter.
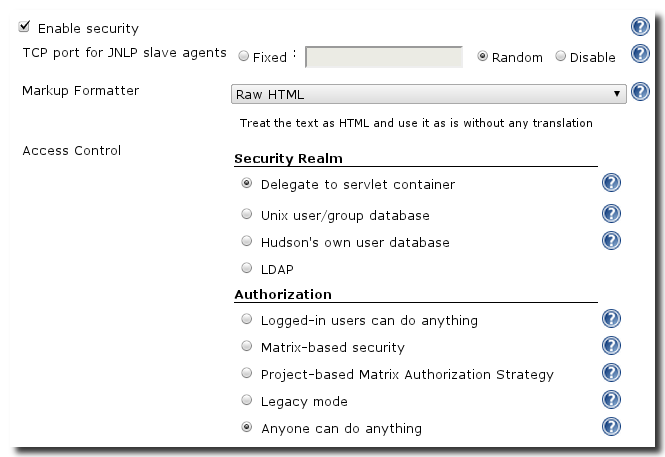
The port configuration should be set to Disable for Hudson deployments without any slave nodes. With slave nodes you can set the port to the default Random port. Hudson will randomly choose a port avoid port collisions with other services. When running Hudson cluster within a firewall-secured environment, you can choose a fixed port and then ensure that the port is open on the respective servers.
Raw HTML is the default setting that causes Hudson to render any input data from text fields as HTML in the user interface. This allows for added links and more, but also has the potential for cross site scripting XSS attacks. Currently plugins that implement other markup are planned, but not yet available for Hudson.
With security enabled, Hudson supports the following authentication security realms out of the box. Further options are available as plugins.
- Delegate to servlet container
- Unix user/group database
- Hudson’s own user database
- LDAP (Lightweight Directory Access Protocol
Access-control schemes available are:
- Logged-in users can do anything
- Matrix-based security
- Project-based Matrix Authorizations Strategy
- Anyone can do anything
These security options can be seen in Figure 4.1, “Overview of the available security settings” and are documented in detail below.
The configuration of the security realm allows you to define where user names and passwords are stored and administered. Depending on your deployment it can be useful to tie into already existing systems or run a separate realm for Hudson.
The default setting for a Hudson instance is no security. If you are running Hudson from a servlet container you may have access to management consoles that allow you to maintain and administer users and groups. Hudson can be configured to both delegate authorization to a servlet container and use these users and groups for access-control.
This feature can be especially useful if other application are already using the servlet container authorization and you want to achieve a single-sign on for all applications running on this server or cluster of servers or you simply prefer to manage your users from the application server user interface.
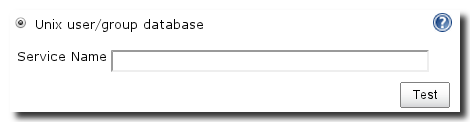
If you select this option, Hudson will consult the Unix user/group
database on the machine it is running on. To do so it will use
Pluggable
Authentication Modules (PAM). The user running Hudson has to be able
to access PAM and be a member of the shadow group. As visible in
Figure 4.2, “Unix security configuration” the setup allows for the definition of a service
name and test via provided button.
Tip
If you get a stack trace about not being able to find the file libpam.so you may need to create a symbolic link using the command line shown below.
sudo ln -s /lib/x86_64-linux-gnu/libpam.so.0 /lib/x86_64-linux-gnu/libpam.so
On most Unix systems, the users and groups are stored in /etc/passwd
and /etc/group, but your results may vary depending on the Unix/Linux
version and the security setup of your specific machine. With this
setup user and group administration is entirely separate from your
Hudson install. Use the your preferred administration tool on the
command line or a graphical user interface.
A consequence of using this security realm is that the Hudson instance and access details are tied to the specific server Hudson is running on. This means that the user and group setup should be backed up in addition to the Hudson data itself and security information can not be easily migrated unless some sort of single sign-on (SSO) is used across all servers.
This approach is ideal for simple installations of Hudson on a single machine, or when you have integrated PAM with a single sign-on solution such as LDAP.
A convenient method to control access to Hudson without external dependencies is to use the internal user database of Hudson itself. To activate this feature select Hudson’s own user database as displayed in Figure 4.3, “Security settings for using the Hudson internal database”

The option "Allow user to sign up" activates the Sign Up screen as displayed in Figure 4.4, “Sign up screen for new users”, which also displays a captcha that is displayed when the option "Enable captcha on sign up" is activated. The option "Notify user of Hudson account creation" will trigger an email to be sent to the new user, when a new account is created either by signup by the user or an administrator.
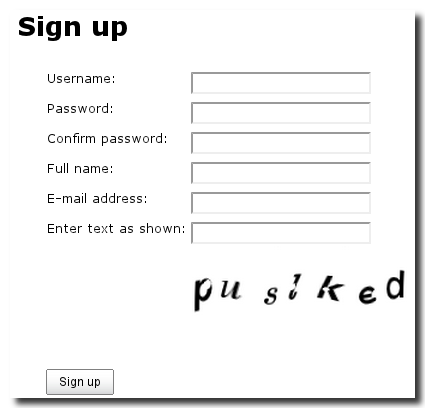
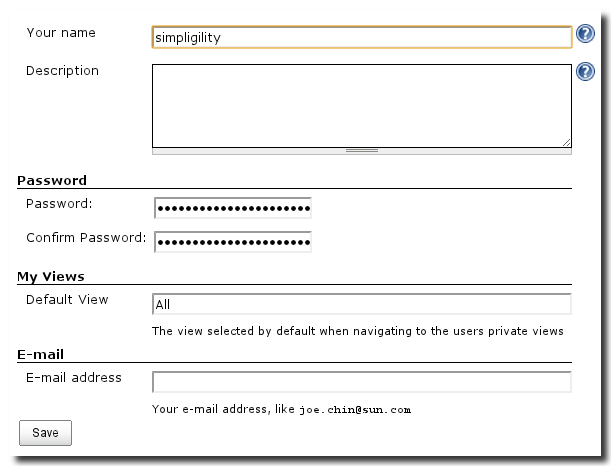
By providing all details in the sign up form a user can create an account to access Hudson. Once a user is signed up and logged in they can use then click on their user name in the top left corner and then on the Configure option in the left hand menu to access their user configuration screen. A user’s configuration screen gives users the ability to reset and change passwords as well as update contact information such as name, description, and email.
To manage users click on Manage Users in the global Manage Hudson screen displayed in Figure 3.1, “Managing Hudson”. In this management section the administrator has the option to create and manage users. The Create User link in the left-hand navigation menu presents the Sign Up screen from Figure 4.4, “Sign up screen for new users” without the captcha to the administrator allowing account creation to be controlled by an administrator rather than a self-serve signup. In addition this screen shows a list of users already registered with Hudson and allows the administrator to delete users and edit them via the user configuration screen from Figure 4.5, “User configuration”.
If you have an LDAP server, Hudson can be configured to use this server to authenticate users. The administration interface in Figure 4.6, “Security settings for LDAP” allows you to provide all the necessary details for Hudson to connect to your LDAP server. You will be able to connect to most common LDAP servers. If you want to configure security with Microsoft Active Directory you should also have a look at the specific plugin for Active Directory.
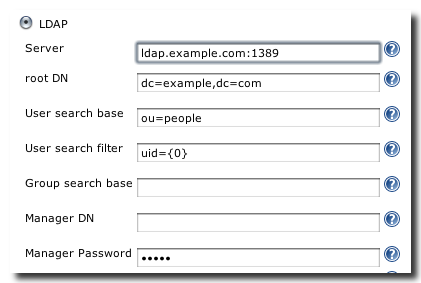
- Server
- The server connection string is typically composed of a protocol of ldap:// or ldaps://, a server name and a colon followed by a port. The default ldap protocol and port 389 can be omitted, so the simplest server would be the server name or IP number only. Further valid examples are e.g. directory.example.com:1389 or ldaps://directory.example.com:1636. The default port for ldaps is 636.
- root DN
- Specify the root DN for you want to use for authentication. Typically this would be a value like dc=example,dc=com
- User search base and User search filter
- The user search base and use search filter fields allow you to define a sub-tree to look for user records within the root DN. E.g the search base could be ou=people or ou=developers and the search with their email address. If you need to further define your search user name in the search.
- Group search base
- Define the query to locate the list of groups for a user in this query that is typically just empty to search in the root DN or for the user name replacement.
- Manager DN and Manager Password
- The Manager DN and password are required for Hudson to connect to your LDAP server to query for the user details. The DN is only necessary if you server does not support anonymous bind and typically looks something like this CN=MyUser,CN=Users,DC=mydomain,DC=com.
Beyond the standard settings LDAP configuration can require further tweaks documented in the following section.
In general all the LDAP queries are space sensitive and their content is specific to your LDAP server configuration which can differ widely depending on your specific organization’s LDAP configuration.
If log-in attempts result in "Administrative Limit Exceeded" or similar error message, any LDAP query but often specifically the LDAP query to determine the group membership triggers it. A general tip in this situation is to try setting the "Group search base" and other settings as specific as possible for your LDAP structure, to reduce the scope of the query.
If the error persists, you may need to edit the WEB-INF/security/LDAPBindSecurityRealm.groovy file that is included in in your LDAP for group membership, such as groupSearchFilter =
In general Hudson will prefix any LDAP group with the ROLE_ prefix. This has to be taken into account when configuring access rights in a matrix based security realm. For example, the LDAP group developers (cn=developers) would be used as ROLE_DEVELOPERS. In Hudson, Group names are translated to all uppercase and non-alpha characters such as hyphen, space and comma are not supported.
Hudson’s LDAP integration currently does not support indirect group memberships.
Once you’ve selected a security realm for authorization you’ll know how users and groups are created and what has to be done for a user to be able to log in to Hudson. As a next step you need to decide on your Hudson instance’s approach to access-control. Access control settings determine what a user can do and see once they are logged in.
This authorization strategy grants read access to Hudson to anonymous users, but restricts administrative access to users with a valid account. Once the user is logged-in they have full access rights to everything including project deletion and other critical functionality. You should be certain to have a good backup strategy in place for critical data and that your users are capable of using Hudson in an administrative function before you opt to use this authorization strategy.
For more fine grained control over what specific users or groups of users can do, you can configure Hudson to use Matrix-based security as visible in a minimal configuration in Figure 4.7, “Matrix based security”.

Using the input field for User/group you can create new rows in the security matrix. The matrix provides sections to configure access rights for the following permissions categories:
- Overall - permissions which govern global activities such as administration rights
- Slave - permissions relating to the management of Hudson slave instances
- Job - job permissions whether a user can create, manage, edit, and delete jobs
- Run - permissions about specific build jobs
- View - permissions about build job views
- SCM - permissions related to source code management systems
A typical minimal configuration would be to grant all rights to an administrative user or group and only read access for Overall and Jobs to anonymous users.
By adding further groups or individual users you can e.g. grant full administrative access rights to other trusted users without sharing the main admin account.
Tip
A safe administrative use would be to grant full rights to a group of admin users without granting any Delete rights.
Taking the concept of matrix based authorization as described in Section 4.5.2, “Matrix-based security” a step further is Project-based Matrix Authorization Strategy. The global configuration possible as displayed in Figure 4.8, “Project-based Matrix Authorization Strategy” works the same as matrix-based security.

In addition you can enable project-based security in each project configuration individually for each project. Enabling the option Enable project-based security will display a matrix of access rights as visible in Figure 4.9, “Project specific authorization”. It will allow you to add users and groups just like for the global configuration and assign rights as desired.
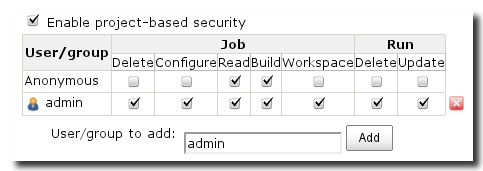
Using groups accessing a group of projects you could e.g. enable administrative rights for a limited number of projects to a specific user or user group.
This option is something of a free for all - an uncontrolled Hudson instance with no access-control rules defined.
Setting your authorization strategy to the option "Anyone can do anything" effectively turns off security. In a scenario where everybody able to access Hudson e .g. in a trusted intranet this setting is recommended as an alternative to completely disabled security. The advantage for the users is that while they do not need to log-in to use Hudson and everyone has access it is possible to log-in and customize Hudson by creating custom views and take advantage of other personalization options.
Warning
Older versions of Hudson have a legacy mode authorization that provides backwards compatibility for users of early Hudson version, that have not migrated to the replacement of matrix authorization. It relied on hard coded values and should not be used anymore. With the 2.2.0 release of Hudson this mode is removed.
A common and useful setup is a combination of using Hudson’s internal user database with matrix-based authorization. It allows for a secure setup of a publicly available Hudson instance without the need for any further security components beyond Hudson itself and can therefore be managed via the Hudson user interface without any additional requirements beyond browser access.
- Enable security in the global Hudson configuration
- Activate the security realm for Hudson’s own user database and allow users to sign up
- Set the authorization to "Anyone can do anything" and save the configuration
-
Sign up a new user e.g. with the name
admin - Log-in in as the new user
- Change the authorization to matrix-based security
- Add the new user to the matrix
- Grant all right to the new user as he will the be the administrator user
- Save the configuration
Following these steps you will have secured Hudson and the new user will be the only user with access to Hudson. If you want anonymous users to have read access you could add these rights in the matrix.
For further users you can create additional matrix rows and distribute rights as desired.
When configuring security or when relying on external security realms, you can end up in situations where you do not have any access to Hudson in the user interface. Reasons could be a forgotten admin password, offline LDAP server, broken Unix authorization after server upgrade and so on. To be able to fix your setup you can edit the file config.xml in your HUDSON_HOME and set
<useSecurity>false</useSecurity>
With this setting you will have full access to Hudson and be able to troubleshoot your configuration or change to a new security realm and/or authorization.