To configure Hudson, click on the Manage Hudson link in the left-hand navigation menu, which will display the screen shown in Figure 3.1, “Managing Hudson”. This chapter will focus on the Configure System section.
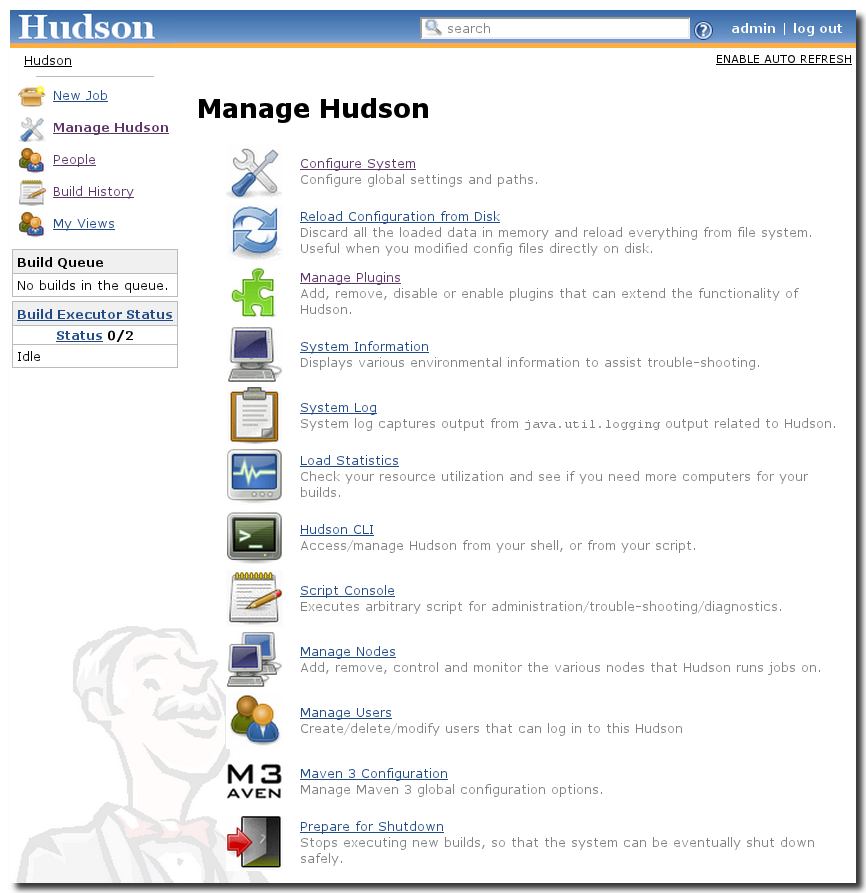
Depending on the plugins installed and activated on your Hudson system, different sections will be available in the system configuration section. These will either be explained below or with a plugin-specific section. For example the source code management-related global configurations for the different SCM systems is available in Chapter 9, Working with Source Control.
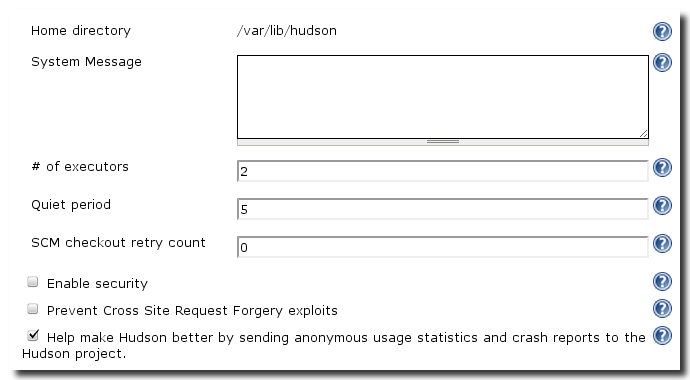
The first section in the Configure System screen contains options that allow you to configure global Hudson configuration attributes. This section is shown in Figure 3.2, “Configuring Global Hudson Configuration”.
- Home Directory
-
This parameter displays the absolute installation path of the
currently running Hudson system. It is not a runtime configurable
parameter. It is set by the server on start-up. By default it will be
the value of the HUDSON_HOME environment variable or the
.hudsonfolder in the home directory of the operating system user running Hudson. The value is displayed here to allow the administrator to verify the correct setting. - System Message
- This message is displayed by Hudson in the main screen above the list of projects. It can be used as a welcome message or to e.g. broadcast upcoming maintenance to users of the Hudson instance via the user interface. It supports plain text as well as HTML snippets for formatting and enriching the message with dynamic content.
- # of Executors
- This parameter controls the number of concurrent builds Hudson is configured to run. Optimal values in terms of performance will depend on the number of CPUs, IO performance and other hardware characteristics of the server running Hudson as well as the type of builds configured to run. A good starting point for experimentation is the number of CPUs.
- Quiet period
- A Quiet Period as specified in this configuration causes Hudson to wait the specified number of seconds before a triggered build is started. If your Hudson project is constantly "flapping" (switching between failure and success frequently), you may want to set the Quiet period to achieve more build stability. Another scenario this can be helpful is when large commits to your source control system are typically carried out in multiple smaller commits within a short time frame, so that the committer has a chance to get everything in without a build kicking off straight after the first commit causing a build failure. Setting this number to a large amount can generally reduce the number of builds running for this project, which will reduce the overall load for your Hudson server.
- SCM checkout retry count
- The SCM checkout retry count determines the number of attempts Hudson makes to check out any updates when polling the SCM system for changes and finds the system to be unavailable.
- Enable Security
- The Enable Security check box switches on the security system that will require user-name and password for any access to run builds or change configurations of Hudson and build projects. A large number of configuration options and security providers can be used and more information can be found in Chapter 4, Securing Hudson
- Prevent Cross Site Request Forgery exploits
- This feature will enable improved security against Cross Site Request Forgery exploits and is recommended to be turned on when your Hudson instance is available to the public Internet. On the other hand it can be necessary to have this feature disabled, when your Hudson web interface is embedded in a dashboard type interface that also contains web content from other domains or even only internal server names or sub networks. In general it will not be necessary to enable this feature on an internal network, where only trusted parties have access to Hudson.
- Help make Hudson better…
By selecting this feature to be enabled you agree for anonymous usage statistics about your Hudson installation to be created and securely sent to the Hudson development team and made available to the user community. The data sent consists of
- the Hudson version you are using
- operating system, JVM and number of executors for your master Hudson and any slaves being used
- the name and version of all activated plugins
- the number of each project type configured to run
- HTTP information as provided by your Hudson instance
The global properties configuration allows the definition of key-value pairs that are exposed to all running builds as environment variables. Simply select the check box Environment Variables and add the desired name and value for the property in the interface displayed in Figure 3.3, “Configuring global properties”.
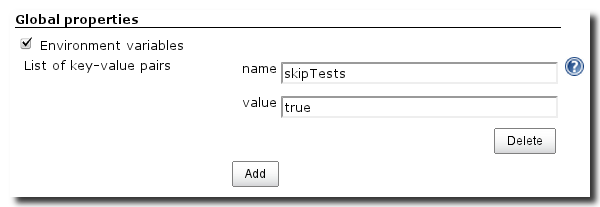
Depending on the build system used they can be picked up with
variables are populated by Hudson automatically. These include
job-related ones like JOB_NAME, BUILD_TAG or BUILD_NUMBER,
Hudson node-related ones like NODE_NAME or more global ones like
JAVA_HOME. A comprehensive list is available at env-vars.html on
your Hudson server
e.g. http://localhost:8080/env-vars.html
as linked from the in-line help for the properties configuration.
Hudson can support one or more JDK installations used for running your builds. Setting up multiple JDK installs allows the configuration of different projects being built by different Java versions in separate jobs. You can use this to ensure e.g. that builds as well as test suites run fine on an older Java version to ensure compatibility. Another application would be to run with JDK versions supplied by different vendors.
The most common configuration of a JDK is to point to the already
installed instance as used for running Hudson itself. This can be
achieved simply by supplying a name like Open JDK 6 in the Name
input field and the absolute path in the JAVA_HOME input field in the
screen as shown in Figure 3.4, “Configuring JDK Installations”.
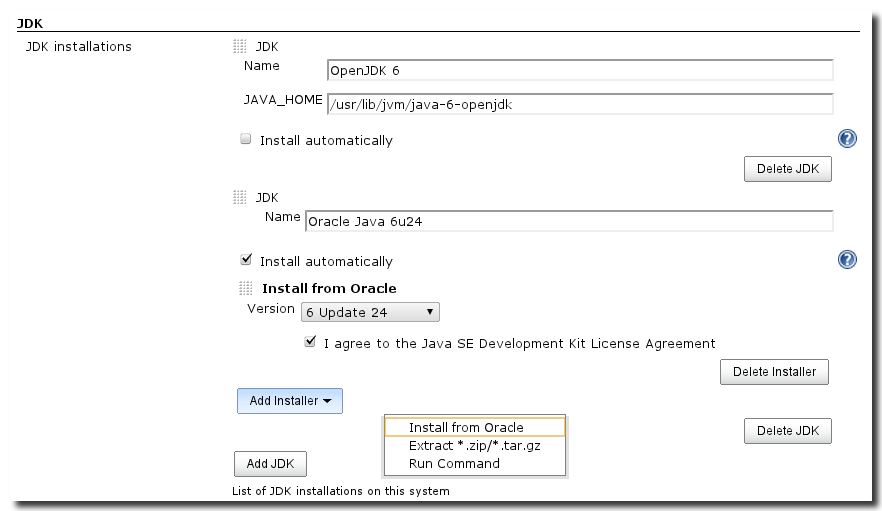
Furthermore it is possible to configure a JDK to be installed
automatically by specifying a name as before and then selecting the
Install Automatically check box. This exposes a drop-down labelled Add
installer which lets you choose from the options Install from Oracle,
Extract *.zip/*.tar.gz and Run Command as visible in Figure 3.4, “Configuring JDK Installations”.
Warning
The automatic installation from Oracle is currently disabled, while Oracle implements a web service for JDK installation.
All the automatic install configurations cause Hudson to wait for the first build, which is configured to use a named instance of the JDK to initiate the JDK installation. The JDK will be installed into a folder in the tools directory in Hudson home using the tool name specified as the folder name.
The option Install from Oracle brings up a drop-down to choose the version as well as a check box that needs to be clicked to the Java SE license agreement.
If you select to use Extract *.zip/*.tar.gz as shown in
Figure 3.5, “Extract *zip/*.tar.gz archive Installer Configuration” you will be able to configure a
Label, the Download URL for binary archive and the Subdirectory of
extracted archive.

If you specify a label, only Hudson nodes with the same label will use this installer. By using different labels it is possible for example to get the same tool installed on different nodes with different operating systems from different automatic install setups. The download URL specifies the full URL from which the JDK will be downloaded. The actual download is run off the Hudson master, so that any Hudson nodes that need the JDK installed do not need to have access to the URL location. After successful download the JDK will be installed in the specified sub directory in the tools folder of the Hudson home directory.
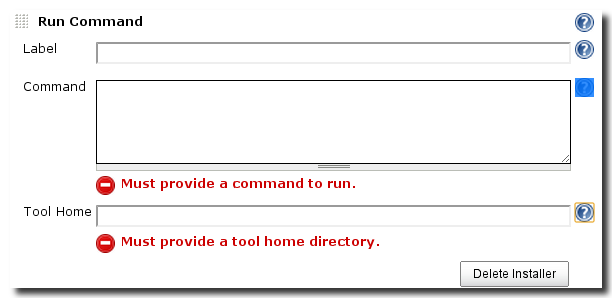
The last automatic installation option is the Run a command option displayed in Figure 3.6, “Run Command Installer Configuration”. The Label options works the same as for the archive extraction based install. The Command input allows you to specify the shell command to execute on the node for the install. Typically this is some package management invocation. The resulting tool directory has to be specified in the Tool Home input box.
Once more than one JDK is configured in the global settings, each
project configuration has an additional drop-down, which allows the
selection of the JDK to be used to build the project and is visible in
Figure 3.5, “Extract *zip/*.tar.gz archive Installer Configuration”
In a similar fashion to the JDK install Apache Ant can be installed in
multiple versions to be available for your Hudson configured
builds. The default configuration is to supply a name like
Apache Ant 1.8.2 for the Ant installation and a value in the ANT_HOME input
that is defined by the absolute path to the folder containing your
pre-existing local Apache Ant install e.g. /opt/apache-ant-1.8.2
Using a pre-installed Ant requires manual install or the use of your operating system package management system, a provisioning system or as part of a virtual machine image management. To avoid this need Hudson can install a required Apache Ant version automatically when needed.
The simplest way to achieve this is to select the Install automatically check box and select Install from Apache and choose the desired version from the drop-down.
Similar to the JDK installation from Oracle it is possible to use Install from Apache to get Ant installed into a sub-directory of the tools folder in Hudson home. The options to install from an archive or by running a command are available as well and work in the same way as for JDK installs. A use case for an install from a file would be a custom Ant distribution with libraries for in-house tasks and maybe Ant contrib included as documented in detail in Chapter 8, Working with Apache Ant Builds
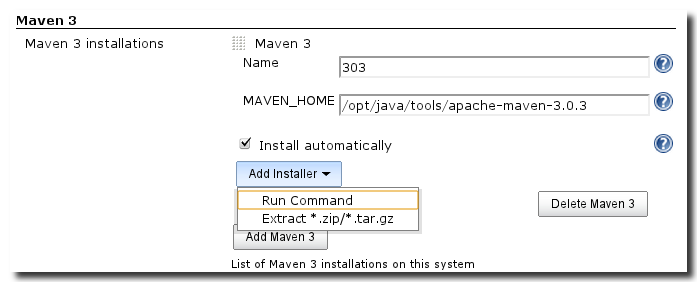
One of the main uses cases for Hudson is building projects with Apache Maven. As explained in more detail in Chapter 7, Working with Apache Maven Builds the preferred way to build Maven projects is the Maven 3 integration. It comes with a bundled Maven 3 install so you do not actually need to install Maven 3 at all to get started. However if you want, you can install additional Maven 3 installs with the user interface displayed in Figure 3.7, “Configuring Maven 3 Installations”.
The legacy Maven project type and Maven plugin use a separate installer as displayed in Figure 3.8, “Configuring Maven Installations”. In addition to the same features as the Maven 3 installer it can be configured to download a Maven version from the Apache web site when required.
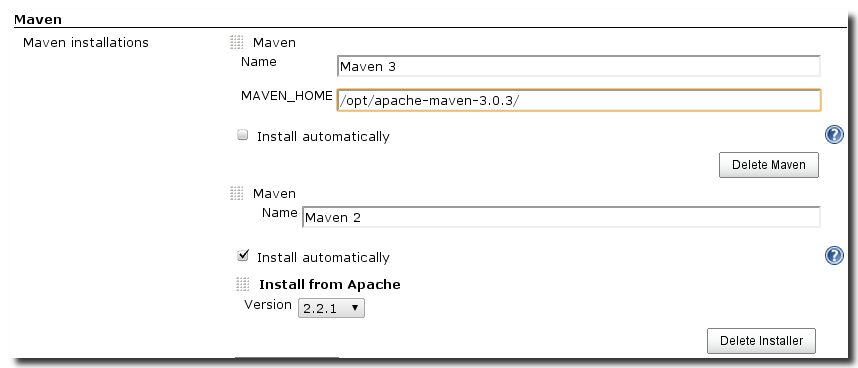
Both the Maven 3 and the Maven installation work in a similar way to the JDK and Ant installation options:
- Use an existing installation
- Specify a Name and add the path to your Maven install in the MAVEN_HOME input control.
- Automatically install from Apache
- Select the Install automatically check box and Install from Apache in the drop-down and choose the Maven version, you wish to install. This option is only available for the Maven installation.
- Automatically install from an archive file
-
Select the Install automatically check box and
Extract *zip/*.tar.gzand configure the installation as documented in Section 3.3, “Configuring JDK Installations” - Automatically install via a command
- Select the Install automatically check box and Run Command and configure the installation as documented in Section 3.3, “Configuring JDK Installations”.
In general we recommend that you run your build using the latest Maven 3.0 release. With multiple Maven installations configured a drop down in the project build step configuration will allow you to choose the desired Maven version. Chapter 7, Working with Apache Maven Builds provides an in-depth documentation for using Maven with Hudson.
The Maven 3 integration allows for a set of default values to be defined that are used when a new build step for invoking Maven 3 is added. These values can be defined in the section Maven 3 Builder Defaults in the global Hudson configuration here. The individual fields and their purpose and usage are documented in Section 7.3, “Details of Configuring Maven 3 Build Options”.
Hudson allows for the ability to configure shell builds. If you have a
build that requires the execution of shell scripts Hudson will by
default execute+/bin/sh+. For more complex builds scripts running on
different *nix environments, this can cause problems. /bin/sh often
symlinks to a concrete shell like bash, ash, zsh or ksh. This setup of
a specific shell will change from operating system to operating system
as well as from user to user. If your scripts depend on a specific
shell you should therefore specify your default shell in this input to
e.g. /bin/bash. In a similar way you can add the path to a cygwin
install of e.g. bash on your Windows server to run unix scripts as
part of your build.

Notification of build results and email-based notification specifically is a core feature of a continuous integration server. This configuration section as displayed in Configuring Email Notification allows you to configure the SMTP-related settings to connect to the server and send the emails.
Tip
In general it can be advantageous to configure all email recipients in Hudson as mailing list addresses. Combined with a mailing list management system available to your potential recipients e.g. development and QA team members, this setup allows users to join any mailing list and therefore notifications for specific jobs without any configuration changes on Hudson.
Configuring Email Notification. 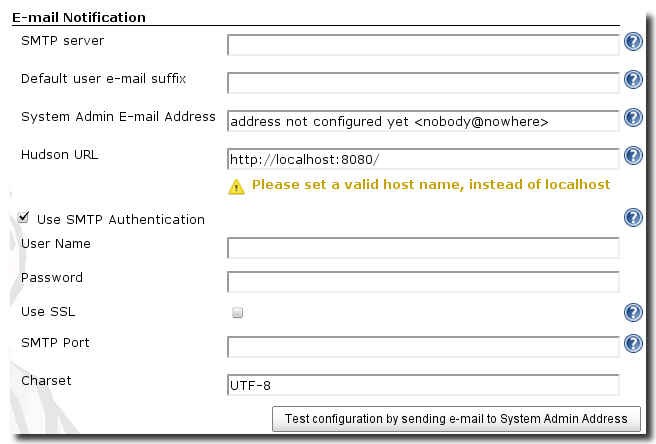
The following options can be configured:
- SMTP Server
-
The SMTP server configuration is typically the IP number of the mail
server or a fully qualified name including the domain e.g.
smtp.example.com. If the mail server is reachable by host name or some alias e.g.hermesfrom the Hudson server you can use it as the SMTP server configuration. - Default user e-mail suffix
-
This suffix is appended to the Hudson user names used to log in to
Hudson and the result can be used for e-mail notification. E.g. if
the Hudson instance runs for
example.comyou could supply the suffix of@example.com. A Hudson user with user namejane.doewould then receive email notifications at the email[email protected]. This can be especially useful with security setups using an identity management system like LDAP for Hudson access as well as email address setup as documented in Chapter 4, Securing Hudson. - System Admin E-Mail Address
- This is the email address used as the email sender in any E-mail notification sent by the server. When configuring this email you should either ensure that emails sent back as a reply are monitored by somebody or bounced by the server with some meaningful error message.
- Hudson URL
- The Hudson URL value will be used in the email notifications sent out to provide links to build results and so on. Provide a URL that will be valid for the audience of your notifications. If all recipients will be on an intranet or VPN you can use a non-public URL or IP number.
In addition to basic SMTP configuration parameters, you can click the Advanced Options button for further configuration that allows you to send email via servers that require authentication. Most SMTP servers will require at least user name and password to be accessed.
- Use SMTP Authentication
- Clicking on the check box will reveal User Name and Password input fields. Depending on the server configuration your user name will be just the log-in name or the full email address or either.
- Use SSL
- Select this check box if your SMTP server supports connecting with SSL activated.
- SMTP Port
- This configuration allows you to specify a custom port for the communication with mail server. If the field is left empty the default ports are used. These are 25 for SMTP and 465 for SSL secured SMTP. It is a common practice to configure a different port, so be sure to check with the administrator of the mail server what port you should be using.
- Charset
- The Charset configuration determines the character set used for the composed e-mail message.
- Test configuration
- Pressing this button will execute the current configuration for sending emails. Depending on your configuration and network setup you should receive an email after a short while.
In order to use GMail to send your emails you will need to configure
the SMTP server to smtp.gmail.com. In addition you will have to
have a Gmail account and provide the GMail e-mail address, or any
other email address configured to be accepted in your Gmail account,
as the User Name and configure the Password.
One of the common problems for build server notification emails not being received are spam filter settings on the server and/or client side of the recipient. Most spam filter systems will allow you to access a list of filtered message and configure a white list of senders. Adding the System Admin E-mail Address to the white list will ensure that your build notifications reach you.
The Maven 3 integration of Hudson provides you with the ability to manage custom Maven configuration files directly through the Hudson user interface. You can manage:
- Maven Settings Configuration
- Maven Toolchains Configuration
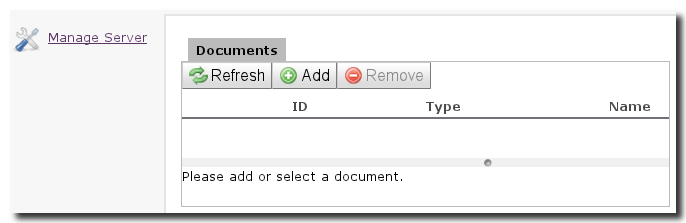
To open the Maven 3 Configuration page, click on Manage Server in the left-hand Hudson menu, and then select the Maven 3 Configuration item shown in Figure 3.1, “Managing Hudson”.
Once you select the Maven 3 Configuration option, you will see the page shown in Figure 3.9, “The Maven 3 Configuration Page”. If you have already configured Maven Settings or Maven Toolchains configuration documents they will appear in the list of documents shown on this page. If you have not configured any Maven configuration documents, you will see the empty configuration screen shown in Figure 3.9, “The Maven 3 Configuration Page”.
To create a new Maven 3 Configuration document, click on the Add button. This will create a new configuration document and display a form that will allow you to name the document, describe the document, select a document type, and supply configuration content for a configuration document.
To remove an existing document, select the document from the list of documents shown and click on the Remove button. This will load a confirmation dialogue. If the action is confirmed, the document will be permanently removed from your Hudson instance.
Click the Refresh button in the interface to reload the Hudson configuration and display any configuration documents which may have been altered since you first loaded this page.
To create a new Maven 3 Setting configuration file which can be referenced by a Hudson Maven 3 build step, click on the Add button as shown in Figure 3.9, “The Maven 3 Configuration Page”. Clicking on Add will display a form containing the ID, Type, Name, Description, and Attribute fields as shown in Figure 3.10, “Managing Maven 3 Settings in Hudson”. Select SETTINGS for the Type field.
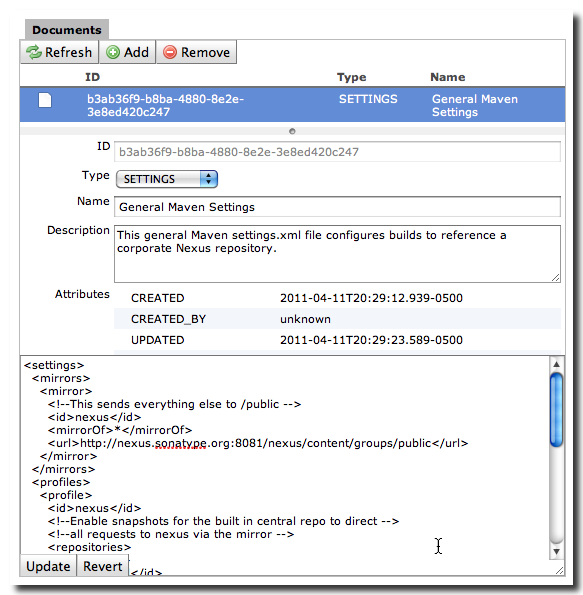
The sample Maven 3 Settings configuration shown in
Figure 3.10, “Managing Maven 3 Settings in Hudson” define a General Maven 3 Settings file
which configures all Maven 3 builds to read artifacts from a corporate
Nexus repository. This sample XML was copied from
the
Maven 3 Settings example in the Sonatype Nexus book and customized to
reference a hypothetical server running on nexus.sonatype.org:8081.
Usage of the Maven 3 Settings configuration file in a Hudson job as well as Maven toolchains is documented in Section 7.3, “Details of Configuring Maven 3 Build Options”.
Running a Hudson server or grid with many projects can make the list of configured jobs very long and therefore make it difficult for users and administrators to gather the information they need at a glance and find their way to the job they are interested in. To provide this needed ease of access Hudson supports the addition of globally visible as well as user specific views to the main page displayed in Figure 2.1, “Hudson Application Window”.
To add a new view simply click the + button beside the default list called All on top of the job list. If this button is not visible you do not have the access right to create views. Creating a view this way will make it globally visible to any user.
Logging in as a specific user shows the My Views option in the left hand navigation menu. When you select this option the bread crumb navigation will contain your user name and the My Views option. Pressing the + button on the main job list now will create a personal view only visible to the current user when logged in.
Each view can be given a description by clicking the edit description on the right side above the job list.
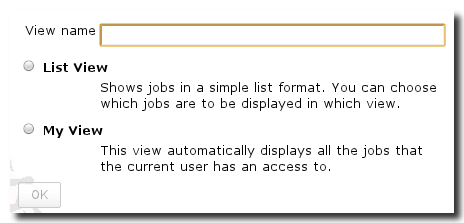
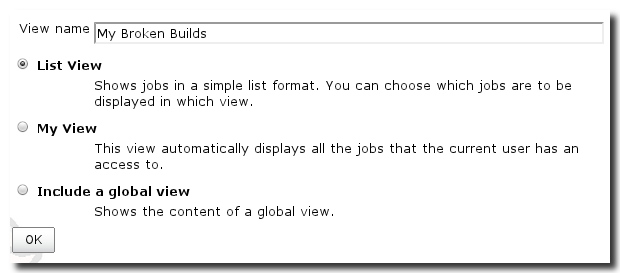
When adding a new global view as displayed in Figure 3.11, “Adding a New Global View” you have to provide a name and then select what type of view you want to add. You can either add a My View, which will display all jobs the current users has access to or you can add a List View, which is a highly configurable list of job types. The different configuration options are documented below.
After you have created the view you can configure the main filter properties displayed in Figure 3.12, “Main Properties for Adding a New View”, configure, add and delete job filters as displayed in Figure 3.13, “Configuring View Filters” and add and delete columns for the list view as displayed in Figure 3.23, “Configuring View Columns”.
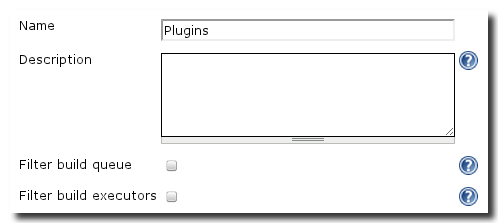
Besides the name provided at creation you can add a description that will be displayed above the list of jobs and below the title of the view. It can use HTML for e.g. hyperlinks to other related resources. The Filter build queue option causes Hudson to only show jobs from the view in the build queue. The Filter build executors option causes Hudson to only show build executors that could execute shows from this view.
The Job Filters configuration below as visible in Figure 3.13, “Configuring View Filters” shows the Status Filter, a list of all jobs and allows the configuration of a regular expression for inclusion of jobs on the list view. The regular expression is applied to the job name.

The Status Filter has the option to use all selected jobs or only
enabled or disabled builds from the list below or the result of the
regular expression configured. The Jobs list itself
is an alphabetically sorted list of all jobs configured with a
check box for each job that you potentially want to include in the
view. As an alternative to manually selecting jobs from the list
you can configure a regular expression to match on the job names.
With a good naming convention for the jobs this can be a good way
to build the list. An example could be naming all release build
jobs x-y-z-release or naming all plugin builds Plugin-x and then
using a regular expression like .*-release or Plugin-.* to select
them.
In order to have access to more powerful configuration options for your list views you have to install the View Job Filters plugin. It will hook into the Job Filters section creating the Add Job Filter button and providing the filters documented in the following.
The filters will be applied in the order in the configuration screen. Each filter has a Match Type drop down selector that allows you to include matched or unmatched jobs as well as exclude matched and unmatched jobs from further filtering.
A myriad of combinations is possible allowing you to implement easy access to all your builds for all your users catered to their varying needs
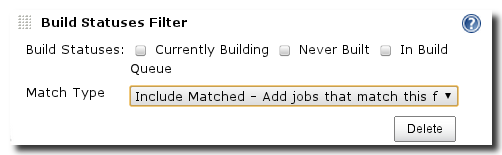
With the Build Statuses filter displayed in Figure 3.14, “Configuring the Build Status View Filter” you can include or exclude builds that are currently building, that have never been built or that are currently in the build queue.
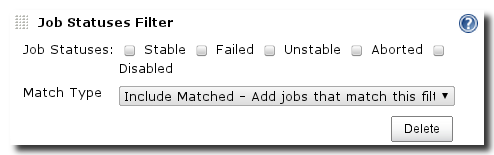
The Job Statuses filter in Figure 3.15, “Configuring the Job Status View Filter” allows you to combine Stable, Failed, Unstable, Aborted and Disabled statuses to create a filter for including or excluding jobs from your view.
Similarly the Job Type filter in Figure 3.16, “Configuring the Job Type View Filter” can be used to include or exclude based on the job being a free-style project, a Maven2/3 project, a multi-configuration project or a monitor of an external job.

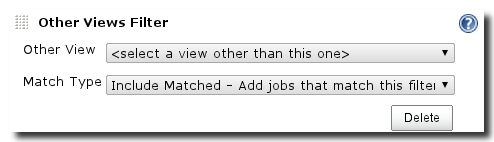
The Other Views filter in Figure 3.17, “Configuring the Other Views Filter” has a selector for the other view which can be used for including or excluding jobs to the current view being configured. This allows you to easily create negations of other views e.g. all non release builds, or all non plugin builds or simply create a finer grained view of a different view. E.g. you could easily create a view of all plugin builds that are currently with the job status Failed using a combination of the Other Views and the Job Statuses filter. Another good use case for this filter is to use multiple Other Views filters to aggregate the content of a number of other views.
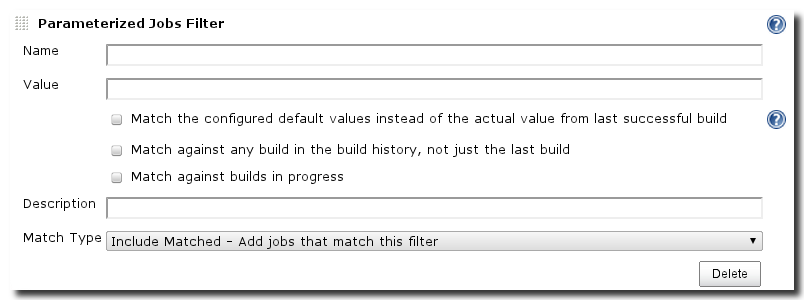
The Parameterized Jobs Filter in Figure 3.18, “Configuring the Parameterized Jobs View Filter” can be used to define a Name and Value that will match against the build parameters.
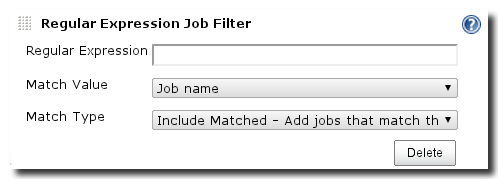
The Regular Expression Job Filter displayed in Figure 3.19, “Configuring the Regular Expression Job View Filter” can be used to run a pattern matching against Hudson job name, job description, job SCM configuration, email recipients or Maven configuration.
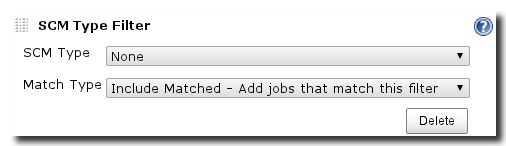
The SCM Type filter allows you too filter based on the SCM used for your builds.
The Unclassified Jobs view filter can be used to show all jobs that do not show up in any other view.

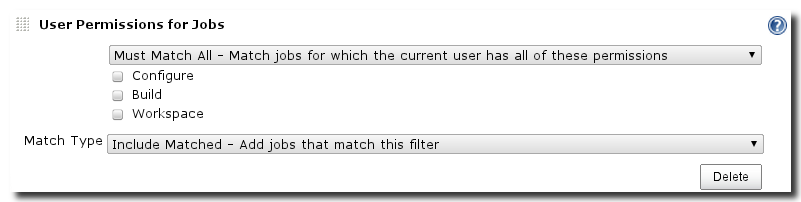
The User Permissions view filter can be used to only show jobs with a specific permission for the currently logged in user. A drop down allows you to define the matching used and the permissions are displayed below as check-boxes.
The All Jobs filter for simply adding all jobs and then using further filters to reduce the matches ending up in the view list.
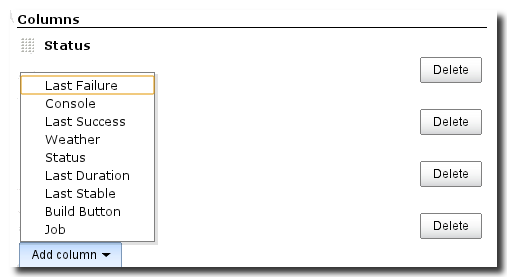
The section below the Job Filters allows you to configure the columns used in the list view. Add and delete columns with the provided buttons as displayed in Figure 3.23, “Configuring View Columns”. To change the order of columns you can drag the title and drop them in the desired position.
When you are logged into Hudson as a user you can also create a different view type called My View. It automatically contains all projects you currently have access to.
Hudson exposes various RSS feeds that you can subscribe to in your favourite RSS feed reader. The server needs to be reachable via http by your RSS reader for this feature to be usable.
Various pages in the web interface feature RSS buttons in the bottom left corner as visible in Figure 2.1, “Hudson Application Window”.
Build notifications are available on the default Hudson page. You can
receive a feed of all builds at /rssAll, a feed of failed
builds at /rssFailed and a feed for latest builds at /rssLatest.