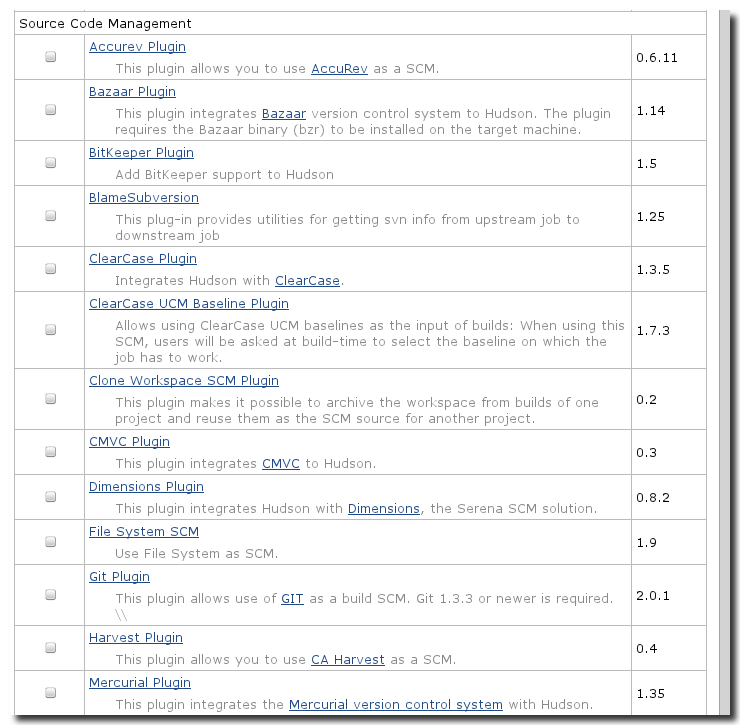
One of the most important parts of the Hudson project configuration are the settings that connect your Hudson project to source control. Any software development project should be managed in a source control management system, many of which are open source software and have large user communities. Hudson has support for all common SCM systems as well as many of the less popular ones. Most likely you will find support for your SCM already installed or available as a plugin for installation in the Source Code Management section of available plugins in the plugin management as displayed in Figure 9.1, “The beginning of the list of Source Code Management plugins”. Read more about available plugins and their management in Section 5.2, “Available Plugins” in Chapter 5, Managing Hudson Plugins.
By default Hudson has support for Git, Subversion and CVS pre-installed. This chapter will document usage of the respective Hudson plugins as well as the plugin supporting the popular open source SCM system Mercurial.
Each of these plugins can be configured in the global Hudson configuration setting in its specific section added by the plugin.
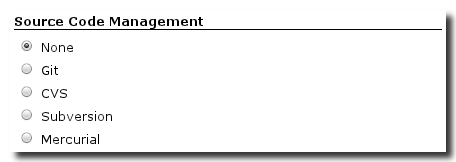
After the global settings for the desired source management system are configured, you can configure the project-specific settings. Simply load the project’s configuration page and scroll down to the Source Code Management section. In this section, you must then select one of the radio buttons for the source code management system you are using as visible in Figure 9.2, “Selecting an SCM in the project configuration”
After this selection you will be able to configure the parameters specific to the selected SCM and the current project.
The Subversion Plugin for Hudson and therefore support for the popular Subversion SCM system is part of the default install of Hudson. It is therefore not necessary to perform any further plugin installation to use Subversion for your project.
In order to use Subversion successfully, you need to set up the global configuration in the Hudson Server configuration screen displayed in Figure 9.3, “Global Subversion Configuration”.
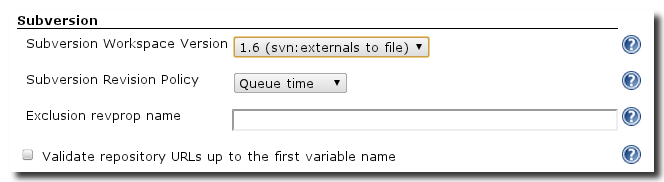
The following parameters need to be configured as desired:
- Subversion Workspace Version
- Subversion uses different formats for storing data in a checked out location. Ideally you should have the same Subversion version installed on the SCM server as well as on the Hudson server and specify that version here. If your Hudson project tasks only require read access to the Subversion repository it is safe to use a higher version on the Hudson server and specify it here. However if you are automating a release process or any other tasks that will write to the Subversion repository e.g. by creating tags or branches or editing files and checking them in, you should make sure to use the same format on the Hudson server as on the Subversion server since mismatches can produce problems in the Subversion repository and potentially break expected behaviour. An important issue related to this setup is that you can not support different Subversion servers with different versions accessed from one Hudson instance. It is advisable to update the Subversion servers and Hudson installed clients before proceeding.
- Subversion Revision Policy
-
The default revision policy is
Queue time, which will cause a build to be run off the revision present in the repository when the job is added to the Hudson build queue. TheBuild timepolicy one the other hand will use the revision in the repository found when the build actually starts . TheHead revisionpolicy will use the HEAD revision in the repository. Finally these settings are overridden if a revision is specified in the subversion URL or as a revision parameter in a parameterized build. - Exclusion revprop name
- This parameter can be used to cause the plugin to exclude revisions with the specified revision property from triggering new builds. This is useful for builds that cause a commit so that this commit done by Hudson will not in turn trigger the execution of another build. The commits carried out by Hudson as part of the build have to be configured to use the same property.
- Validate repository URLs up to the first variable name
-
With this setting activated subversion URLs will only be validated
up to the first variable. A variable in a URL would be preceded by a
$character.
Selecting Subversion under the Source Code Management section will display the configuration options shown in Figure 9.4, “Configuring project-specific Subversion settings”. Clicking on the Advanced button will reveal the advanced configuration parameters shown in Figure 9.5, “Configuring advanced project-specific Subversion settings”.
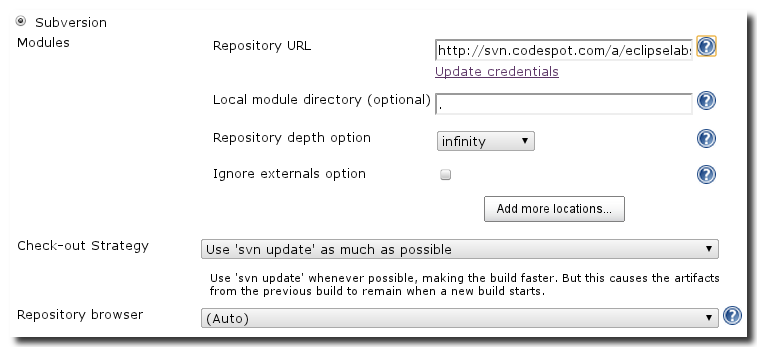
The following parameters can be configured:
- Modules
-
Hudson can check out one or more Subversion modules from a Subversion
repository. To configure a repository location, supply a Subversion
URL in the Repository URL text field. This field supports Subversion
repository URLs including revisions specified with
@numberas well as subversion keywords for revisions and dates. The link Update credentials navigates you to the SVN authentication screen documented below.
If you are checking out more than one Subversion module, you can also supply a Local module directory that Hudson will check out the specified module to. If you leave the Local module directory blank, Hudson will check out the specific module to the root of the project’s workspace.
The Repository depth option allows you to specify the depth for the checkout of this module, with the default being+infinity+, which means that all nested directories of the repository will be checked out. This is useful to limit the size and scope of your checkout.
You can add a new module with the Add more locations button and remove it with the Delete button.
- Check-out Strategy
- The Check-out Strategy option determines the subversion commands issues prior to starting a build.
The default value of Use svn update as much as possible will cause the least load on the Subversion server by only issuing an update command on top of the existing checkout in the project workspace.
The option Use svn update as much as possible, with svn revert before update will do minor cleanup of the workspace by reverting any local modifications.
The option Emulate clean checkout by first deleting unversioned/ignored files, then svn update provides a good compromise between performance and thoroughness, since it closely resembles a clean checkout without the performance and load implications for the Subversion server as well as Hudson.
Finally the option Always check out a fresh copy will delete the workspace content and perform a fresh checkout for each build. Choosing this option should be considered carefully since it can put a significant load on the Subversion and Hudson servers.
- Repository Browser
- Hudson supplies valuable information about a build and about the SCM activity and changes that contribute to a specific build. When Hudson displays information about a Subversion commit or a file that has been modified, it can be configured to link to a Repository browser, which provides a rich web view of the source code repository. Hudson supports the repository browsers CollabNet, Sventon 2.x, ViewSVN, FishEye, WebSVN and Sventon 1.x as options in the the drop-down. The (Auto) option will attempt to automatically detect the used browser.
You can navigate to the Subversion Authentication screen by clicking the Update credentials link, which will display as visible in Figure 9.6, “Configuring subversion authentication Subversion settings”.
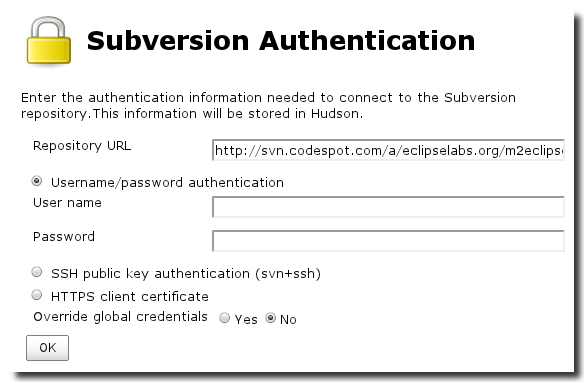
The subversion plugin can be configured to use authentication with:
- User name/password authentication
- Provide the user name and password in the supplied input fields.
- SSH public key authentication (svn+ssh)
- The Private Key control allows you to upload a key file for which you can provide the User name in the respective input field. If you key is encrypted with a password you need to add it in the Pass phrase input.
- HTTPS client certificate
- For HTTPS based authentication you can upload a Public Key Cryptography 12 (PKCS12) file and provide a password in the provided controls.
By default the above configuration will override any global configuration. This behaviour can be deactivated by selecting no in the Override global credentials option.
Beyond these basic configuration options the Subversion plugin supports advanced options to provide more parameters to your Subversion commands used for the build.
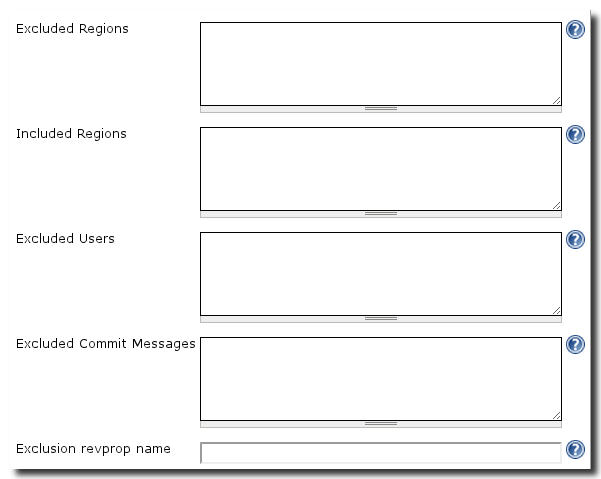
- Excluded Regions, Included Regions
- These fields provide you with the option to either specifically include or exclude files and directories to determine if a build should be triggered. If Included Regions is set, Hudson will only trigger a build if a matching file has been altered. If Excluded Regions is set, Hudson will not trigger a build if a file matching an excluded pattern is matched. These options are useful if you are only interested in a subset of files and directories contained in a Subversion module to trigger a build on Hudson. An example would be if documentation files contained in the repository should not trigger a new build.
Both parameters support usage of regular expression patterns to specify the desired files as well as multiple lines to configure larger sets of files and directories to match.
- Excluded Users
- If this field is populated and Hudson is configured to poll subversion as a build trigger, Hudson will not trigger builds for commits from the specified users. This can be used to avoid builds to be triggered by commits done by Hudson or other systems that commit changes that should not trigger a build.
- Excluded Commit Messages
- Similar to the option Exclude users this field contains a regular expression and will cause Hudson not to trigger a build for commits with a matching commit message.
- Exclusion revprop name
- A Subversion revision can be associated with a property. If Hudson encounters a revision with the specified property, it will not trigger a build from an SCM commit, similar to the behaviour for the options Excluded Users or Excluded Commit Messages
In order to build a project controlled in subversion you only need to configure the repository URL in the project configuration using an URL available for anonymous read access to the repository.
The subversion plugin exports the following environment variables for your usage in build scripts and others:
- SVN_REVISION
- The repository revision.
- SVN_URL
- The URL used to access the repository.
If multiple modules are defined these environment variables get and
index appended in to their names and all revisions and URLs of the
modules will be exported as SVN_REVISION_1, SVN_REVISION_2,
SVN_REVISION_n and SVN_URL_1, SVN_URL_2, SVN_URL_n.
Git is the most successful, modern distributed version control system and has gained wide acceptance in the open source community and beyond. and repository hosting services available from multiple suppliers for commercial and open source usage.
The Hudson Git Plugin and therefore support for Git is available in default Hudson installs from version 2.1 onwards. If it is not installed in your Hudson instance, simply find the plugin in the Source Code Management section of the available plugins and install it like any other plugins as documented in Chapter 5, Managing Hudson Plugins.
The global configuration for using Git is set up in the Git section of the Hudson Server configuration screen as displayed in Figure 9.7, “Configuring Git Installations”.
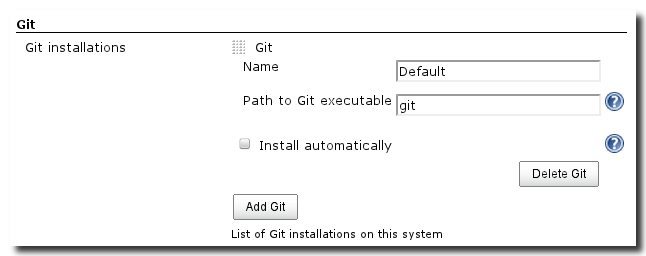
- Name
- A name for your Git installation can be specified to distinguish between multiple installs.
- Path to git executable
-
If the git command is available on the operating system PATH or the
PATH for the user running Hudson, you can simply specify
git. Otherwise an absolute path can be used as well.
In addition to using an already installed git, the Git plugin
facilitates the tool installer from Hudson that allows Run Command and
Extract from *.zip/*.tar.gz based installs similar to the JDK
installs documented in details in Section 3.3, “Configuring JDK Installations”. The Ant
and the Maven plugins installers described in
Section 3.4, “Configuring Ant Installations” and Section 3.5, “Configuring Maven Installations” use the same
installers and you can find more hints of its usage there.
A further global configuration for git can be done in the Git plugin section displayed in Figure 9.8, “Configuring Git user name and email values”. Specifying Global Config user.name Value and Global Config user.email Value values will cause the plugin to issue git config commands setting these options for each project that is configured to use git. The specific project configuration allows you to override these setting for each project individually.

Once you have configured Git in the global Hudson configuration you can configure project-specific Git settings. Selecting Git under the Source Code Management section of your project configuration will display the configuration options shown in Figure 9.9, “Basic Git source control information”.
The section shown in Figure 9.9, “Basic Git source control information” contains the following options for the basic configuration of git in your project configuration:
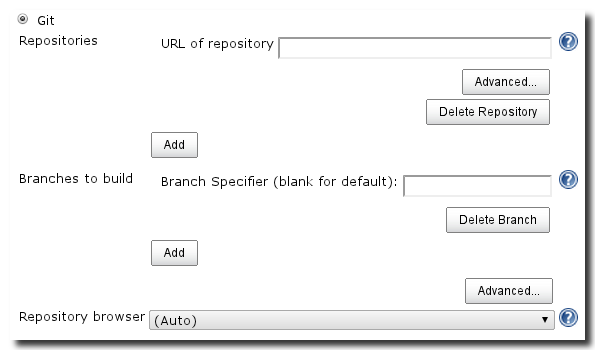
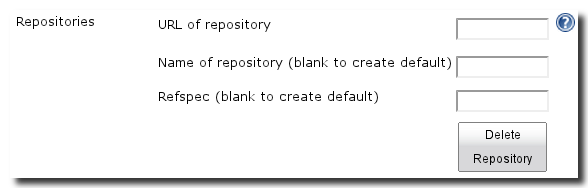
- Repositories
-
Specifying one or more repositories to access for your project can
be considered the main configuration of the git details for your
project. The minimum configuration is to provide a valid value for
URL of repository. The typical protocols
http://,ssh://andgit://are all supported. Advanced configuration as displayed in Figure 9.10, “Configuring repository specific Git configuration” allows you to provide a name of the repository as well as a refspec. Providing multiple repositories only makes sense when they are clones or instances off the same repository, since they will be used for merging together the content prior to the build. - Branches to build
- In this section you can specify one or more branches that should be built. The default of an empty branch specifier causes the git plugin to track all branches and build the latest changed branch.
A common configuration would be to specify the main branch in the
repository e.g. master. This would ensure that the build is only
triggered for changes committed to master. If you want to have other
branches built as well it is advisable to create separate Hudson
projects for the different branches.
The advanced usage of this feature would be to specify multiple branches. These branches would be used for a merge prior to a build and could be configured to push the merge result back to the remote repository after a successful build.
- Repository browser
- The default Auto option will cause the plugin to attempt to detect a web-based user interface to access the git repository. Selecting one of the supported repository browsers gitweb, redmineweb and githubweb lets you provide a base URL to the repository browser. With the browser URL specified the changes view of each build will have added links to the repository.
In many use cases you will be able to configure everything necessary with regards to git using the basic configuration options documented above. For more complex cases the plugin provides various advanced parameters as displayed in Figure 9.11, “Configuring advanced Git configuration”, which become accessible by pressing the Advanced button and documented below.ex
- Excluded Regions
- This configuration allows you to specifically exclude files and directories to determine if a build should be triggered. If set, Hudson will not trigger a build if only files and directories matching the patterns have been changed. This option is useful if you are only interested in a subset of files and directories contained in a Git repository to trigger a build on Hudson. An example would be if documentation files contained in the repository should not trigger a new build. The configuration supports usage of regular expression patterns to specify the desired files as well as multiple lines to configure larger sets of files and directories to match.
- Excluded Users
- If this field is populated and Hudson is configured to poll git as a build trigger, Hudson will not trigger builds for commits from the specified users. This can be used to avoid builds to be triggered by commits done by Hudson or other systems that commit changes that should not trigger a build.
- Checkout/merge to local branch (optional)
- Supplying a value here causes git to create a local branch to checkout to. All the branches specified in the configuration above would be merged into that local branch.
- Local subdirectory for repo (optional)
- You can specify the name of the subdirectory to checkout a git project to. If you omit this subdirectory, the git repository will be checked out into the workspace directory.
- Config user.name Value
-
This option allows you to cause git to set the
user.nameproperty prior to checkout and build. It overrides the global git configuration of the same property - Config user.email Value
-
This option allows you to cause git to set the
user.emailproperty prior to checkout and build. It overrides the global git configuration of the same property - Merge options
- When you activate the option Merge before build the configuration parameters displayed in Figure 9.12, “Configuring Git merge options” become accessible. This powerful option can be used to specify a repository to merge from in Name of repository . The content of the repository will be merged to the branch specified in Branch to merge to and if the operation succeeds the build will proceed. The merge can then be pushed back to the remote repository by configuring a Git publisher post build action as documented in Section 9.2.3, “Configuring the post-build action Git Publisher”

- Prune remote branches before build
- Selecting this option will cause the build to run the command git remote prune before each build . This is especially useful if remote branches are created and removed regularly allowing the local checkout in Hudson to stay in sync and only build the branches that also exist remotely.
- Skip internal tag
- Selecting this option will cause Hudson to omit the tagging of the local repository after each checkout, which performed by default.
- Clean after checkout
- This option causes git to remove all untracked files after each checkout and prior to the build.
- Recursively update submodules
- With this option selected and a new enough Git version installed submodules will be updated as part of the update prior to building.
- Use commit author in changelog
-
Selecting this option changes the display of the changelog to show
the commits
author, rather than the defaultcommitter. - Wipe out workspace before build
- This option will cause a complete wipe of the workspace prior to each build. Use caution when activating this option since it can have a significant impact on data transfer and time for the checkout and therefore build. For Maven projects it potentially wipes the local repository as well causing further increases in build time. The other options for keeping the workspace cleaned documented above are more advisable to be used in most cases.
- Choosing strategy
- This drop down will have only a Default option available with a default Hudson install. It determines which revision of the specified repositories and branches to build. For one branch and one repository HEAD will be built. For multiple branches and repositories a more refined strategy is used selecting revisions that have not yet been built and are on the specified branches. Other plugins can implement a different choosing strategy e.g. the Gerrit Plugin enables a Gerrit change set based strategy effectively allowing verified, pre-tested commits.
- Git executable
- This drop-down allows you to select a specific git executable used for all operations on this project’s build. Configuration of the executables is documented in Section 9.2.1, “Global Git Configuration”.
The git plugin adds the post build action Git Publisher as displayed in Figure 9.13, “Configuring Git Publisher options” to the project-specific configuration. It can be used to push merges done prior to the build back out to a remote repository after a build.
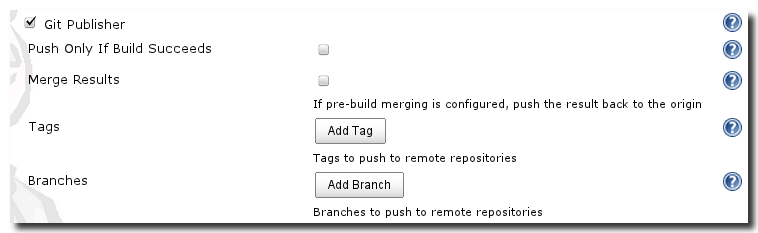
- Push Only If Build Succeeds
- Selecting this option will cause Hudson to skip publishing any changes via push if the build failed.
- Merge Results
- With this option activated Hudson will push any merge results done prior to the build back to the remote origin.
- Tags
- The Add Tag button allows you to configure one or more tags to push to and potentially create.
- Branches
- The Add Branch button allows you to configure one or more branch and remote combinations to push to.
When configuring the Git Publisher you can specify Tags in fields displayed in Figure 9.14, “Configuring Tags for Git Publisher”.
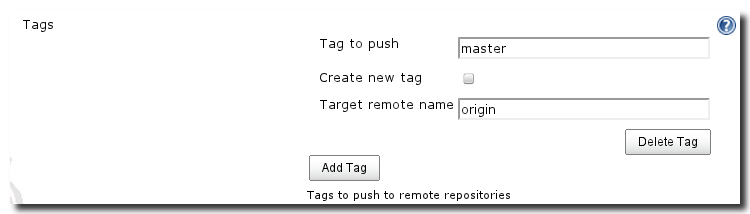
- Tag to push
- This input allows you to provide the name for the tag to use. It supports the expansion of environment variables as part of the tag e.g. Hudson-Build-123. Read Section 3.2, “Global Properties Configuration” for more information about defining properties and available predefined ones.
- Create new tag
- This check box determines if the tag to push to as provided above should be created as a new tag or be used as an existing tag.
- Target remote name
- The name of the remote to push the tag to. The name needs to be configured as a repository in the SCM section for this project. Configuring branches to push to is done in the user interface displayed in Figure 9.15, “Configuring Branches for Git Publisher”.
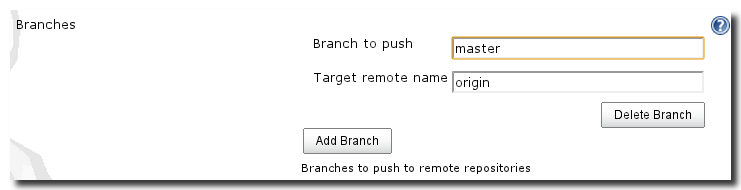
- Branch to push
- This parameter specifies the branch the changes get push to after the build completes.
- Target remote name
- The Target remote name specifies the remote repository to which a push will be done and needs to be one of the names configured as a repository in the SCM section
In order to build a project controlled in git you need to have a git installation configured in the global configuration.
In terms of project specific configuration you only need to specify the public URL of the repository. We recommend to specify the branch to build as well since the default setup without a branch specified will examine all branches in the repository and build the latest changed branch. In a normal project this might adversely affect the stability of the build and potentially cause a confusing history for the project. We suggest to set up separate projects for each branch you want to track and build on Hudson.
The recommended basic usage with the git plugin is to configure the
project branch for the build e.g. master, which will be
automatically configured if the field is left blank. Alternative you
can specify a different branch name or use **. This option causes
all branches to be monitored for changes and the branch with the last
changes will be built.
This will cause your project build history to be comprised of builds from all the different branches individually in the order of changes received and potentially even omit builds if changes hit multiple branches between builds.
However together with configuring Merge Options it allows for a
automated merge from whichever branch to have the latest changes to
the target branch e.g. master and proceed with the build after the
merge.
Now you can activate the Git Publisher post-build action Push Only If Build Succeeds and Merge Results to have the remote repository updated with the successful merge results.
This approach can be configured with specific branches rather than the default empty specification of branches to have better control of the source branches to merge from. It can also be combined with multiple repositories to pull changes in from.
Mercurial, also known as hg, is a successful, modern distributed version control system and has gained wide acceptance in the open source community and beyond used for large projects like OpenJDK and Netbeans and repository hosting services available from multiple suppliers for commercial and open source usage.
The Hudson Mercurial Plugin and therefore support for Mercurial needs to be installed on your Hudson instance. Simply find the plugin in the Source Code Management section of the available plugins and install it like any other plugins as documented in Chapter 5, Managing Hudson Plugins.
To configure Mercurial, find the Mercurial section in the Hudson Server configuration screen as displayed in Figure 9.16, “Configuring Mercurial Installations”, press the Add and configure the parameters for your Mercurial install. If Mercurial is already installed on your Hudson server and the hg is available on the path, you do not need to configure a Mercurial installation. The plugin will pick up the installed version.
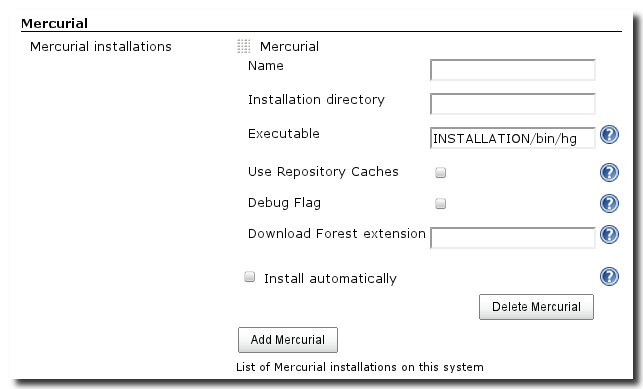
- Name
- The Name will be displayed in the drop down to select your Mercurial install in the project configuration. Use a name that includes the version to be able to identify the Mercurial install you desire to use in the project configuration, especially when using multiple installs.
- Installation directory
- Specify the absolute path to the Mercurial installation .
- Executable
-
This is the path to the actual
hgexecutable. The field is pre-filled withINSTALLATION/bin/hg, which is the correct value if you use a manual install of hg. If you are using binary package as provided by your operating system package management system the correct value is likely justhg, since the command would be on thePATH. Another common option is the absolute path of the executable e.g./usr/bin/hg. - Use Repository Caches
- Enabling this option triggers the Mercurial plugin to establish a repository cache on the Hudson master that will be used by the slave nodes as well. This considerably improves performance and reduces load on the Mercurial server.
- Debug Flag
- As the name suggest activating this option, triggers debug output of any Mercurial command execution. This is especially useful for trouble shooting your configuration.
- Download Forest extension
- Using one of the suggested values in the on-line help for this option you can get the forest extension to work with multiple repositories installed automatically. This is especially useful if you can not easily install the extension with the same mechanism you installed Mercurial itself e.g. if no native package for the extension is available.
In addition, the Mercurial plugin facilitates the tool installer from
Hudson that allows Run Command and Extract from *.zip/*.tar.gz based
installs similar to the JDK installs documented in details in
Section 3.3, “Configuring JDK Installations”. The Ant and the Maven plugins installers
described in Section 3.4, “Configuring Ant Installations” and Section 3.5, “Configuring Maven Installations”
use the same installers and you can find more hints of its usage
there.
Selecting Mercurial under the Source Code Management section will display the configuration options shown in Figure 9.17, “Configuring Mercurial Source Control Information”.
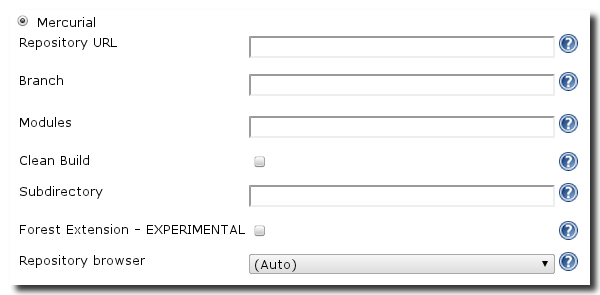
The section show in Figure 9.17, “Configuring Mercurial Source Control Information” contains the following options:
- Mercurial Version
- This drop down lets you choose from the configured Mercurial installations. In most cases the Default will be fine.
- Repository URL
- Specify the URL of the project to build.
- Branch
-
By default a branch named
defaultwill be checked out for the project build. This input allows you to specify and therefore build any other branch. - Advanced - Modules
- The advanced setting Modules allows you to specify a folder and its contents, known as module, within the repository to be the exclusive source for changes triggering a build.
- Advanced - Clean Build
- Activating the Clean Build option causes Mercurial to remove any untracked files prior to the build.
- Advanced - Subdirectory
- By default the repository is checked out into the workspace. Supplying a value in the Subdirectory option will cause the repository to be checked out into a subdirectory in the workspace.
- Advanced - Forest Extension
- This experimental features triggers the activation of the Mercurial forest extension, which will treat the workspace as the root of a forest.
- Repository Browser
- The default Auto option will cause the plugin to attempt to detect a web-based user interface to access the Mercurial repository. Selecting one of the supported repository browsers hgweb, bitbucket, googlecode, kilnhg and fisheye lets you provide a URL to the repository browser. With the URL specified the changes view of each build will have added links to the repository.
In order to build a project controlled in Mercurial you need to install the Mercurial plugin and have a hg installation configured in the global configuration.
In terms of project specific configuration you only need to specify the public URL of the repository.
If your Hudson Jobs rely on CVS there is no plugin configuration necessary, as the Hudson CVS Plugin and support for the CVS system is included as a part of the default Hudson distribution.
To configure CVS, find the CVS section in the Hudson Server configuration screen as displayed in Figure 9.18, “Global CVS Configuration”. From the Hudson start page, click on Manage Hudson, then click on Configure System, and scroll down to the CVS section of this configuration form. If CVS is already installed on your Hudson server and the cvs is available on the path, you do not need to configure a CVS installation. The plugin will pick up the installed version.
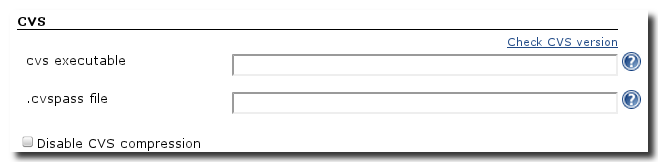
The CVS configuration section allows you to configure the following properties:
- cvs executable
- If the cvs executable is not available on the PATH, you can configure an absolute path to it in this input field.
- cvspass file
- Specify the path to the .cvspass file that contains the user credentials.
- Disable CVS compression
- Activate this option to disable CVS compression.
Selecting CVS under the Source Code Management section will display the configuration options shown in Figure 9.19, “Configuring CVS Source Control Information”.
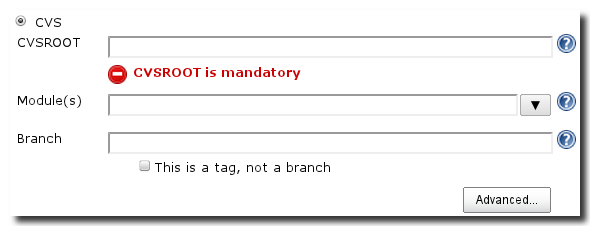
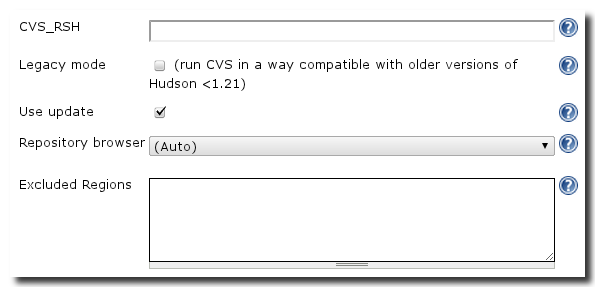
The section show in Figure 9.19, “Configuring CVS Source Control Information” and Figure 9.20, “Configuring CVS Source Control Information” contain the following options:
- CVSROOT
- This is the CVSROOT parameter for your source. You would enter in the same information here that you would use if you were checking out source code use the CVS client. The format for the URL is
<protocol>:<user>:<password>@<servername>:<serverpath>
Each component in the CVSROOT parameter
- protocol
-
The protocol defines the way the CVS client communicates to the
repository. Supported protocols are
:local:for local or net file system level connection,:pserver:as the standard unsecured protocol,:ext:,:ssh:and:extssh:for secure shell based connections and:sspi:for Windows based access.
Note
Due to concurrency and additional load on the repository, we recommend avoiding the local protocol for CI builds. Using the local protocol in Hudson often results in problems if too many clients are trying to access a CVS repository at the same time.
Warning
Please also keep in mind that the pserver protocol is insecure. If you storing sensitive data or code in a CVS repository, avoid the pserver protocol and use ssh as an alternative.
- user
- Supply the user name for the client-server protocol used.
- password
-
Specify the password when using the
:pserver:or:sspi:protocol. - servername
-
The server name of the repository server as reachable via the
network. It can be a fully qualified server and domain name, a
server name only or an IP number. The character
@is required at the beginning of the server name. - serverpath
-
The path to the repository on the server pre-pended by
:. The path itself can be either unix style like/opt/data/cvsrepoor Windows style likeC:\cvs\repository.
An example for a valid URL with a module is shown below.
:pserver:[email protected]:/cvsroot/tortoisecvs
- Module(s) and Branch
- Here you can provide specific modules and specific branches to be checked out by Hudson. Multiple module can be specified using a space separated list and with a parameterized build job parameters can be used to specify branch or module.
- CVS_RSH
- If you are using CVS over SSH, you can specify options and parameters in this variable.
- Use update
- Hudson can be configured to do a full checkout on each build or to use cvs update. Selecting this option will tell Hudson to use update instead of performing a clean checkout. For most reasonably sized projects you should activate this option.
- Repository browser
- The default Auto option will cause the plugin to attempt to detect a web-based user interface to access the CVS repository. Selecting one of the supported repository browsers ViewCVS and FishEye lets you provide a URL to the repository browser.
- Excluded Regions
- If the module you are checking out contains some files that you need to exclude from triggering a build when changed, you can exclude regions by populating this field with the respective patterns.