Apache Maven is the most widely used build tool for Java-based applications and beyond. It has excellent support in Hudson and is employed by most Hudson users.
In order to use Apache Maven for your project build you will have to configure one or more installs, as documented in Section 3.5, “Configuring Maven Installations”. Among the many factors that influence your choice of installation method you might want to consider the following:
- One or more Maven versions?
- Depending on the variety of projects you aim to be building on Hudson, you might need to have more Maven versions for building your projects available. This can be helpful to allow for a staged upgrade with one project at a time to minimize down times due to broken builds with newer versions as well.
- Variety of operating systems in build cluster
- Your build cluster might be using different operating system versions, which can make some installation methods harder or impossible to use. Reasons for using different operating systems in a cluster can be the need to run tests on them, facilitating pre-existing e.g. desktop workstations at night, the need to build native packages on their own platform or simply the fact that a certain build can only be done on a specific operating system.
- Control software via Hudson or something else?
- While Hudson has built in support to manage the JDK install as well as Apache Ant and Maven, your builds can require any number of further software to work. If your build requires a high number of these additional software packages installed, it will be increasingly difficult to keep your build cluster setup configured with all required components. If you or someone else in your company already uses a provisioning software or virtual machine or operating system snapshots for similar purposes and it would make sense to reuse the existing facilities and setup. Otherwise it might be worth getting a provision system suitable to your needs set up.
- Available expertise
- Your team or yourself might have pre-existing expertise with native package management, provisioning software, virtual machine snapshots or Hudson itself that can be an influencing factor on how to set up your Maven installs.
- Control Maven installation
- Some installation methods like using a pre-existing Maven install from an operating system package rely on third parties to create these installations at first. While convenient this implies a loss of control that might not be desired and has to be weighed against the additional effort of different install methods.
With assessing these influencing parameters you will be able to derive a strategy for your Maven install(s), that will work across the different machines in your build cluster and for all your projects. This strategy can potentially involve different installation methods. When using the recommended Maven 3 integration no Maven install is necessary, since a Maven 3 install is embedded with the plugin. Otherwise a minimal setup of one Maven install can be used to set up your first project, that is built with Maven on Hudson.
The recommended way to configure a Maven build on Hudson is to create a free-style software project as documented in Chapter 6, Creating Hudson Projects and then creating one or more build steps that Invoke Maven 3. More details on the specific configuration options and more can be found in Section 7.3, “Details of Configuring Maven 3 Build Options”.
If you require Maven 2 for your build for some legacy reason, even though Maven 3 is a higher performing, drop-in replacement you can fall back to using the Invoke Maven 2 (Legacy) build step documented in Section 7.4, “Details of Configuring Maven 2 (Legacy) Build Options”. Even though this option exists, we recommend moving forward and migrating to Maven 3 and the Maven 3 build step.
Finally your Hudson install may contain a separate project type
labelled Build a Maven 2/3 project (Legacy) available when creating a
new project. This feature has numerous issues with the use of
different Maven versions and use cases, especially Maven 3, and is not
supported in Hudson. We recommend not to use this job type. If you do
not need this job type anymore after migrating to the Maven 3 build
step and want to avoid the accidental creation of projects with this
type, you should disable the Hudson:: Maven(legacy) :: Plugin. Read more
about managing your plugins in Chapter 5, Managing Hudson Plugins.
Both the Maven 2/3 project type as well as the Maven 2 build step are part of Hudson as legacy components and are not the focus of active development and improvements. If your existing jobs use either of these we recommend migrating to Maven 3 build step based free-style projects.
In order to be able to keep existing legacy build around without cluttering to user interface or have inexperienced users create builds with the legacy systems, you can enable the blacklist plugin to disable certain views within Hudson without completely disabling the still required plugins.
After configuring the general project options as documented in Chapter 6, Creating Hudson Projects, you can configure one or more build steps. To add a build step, click on the Add build step button as shown in Figure 7.1, “Configuring a Maven 3 Build Step - Default Options”. To configure a Maven build, select Invoke Maven 3.
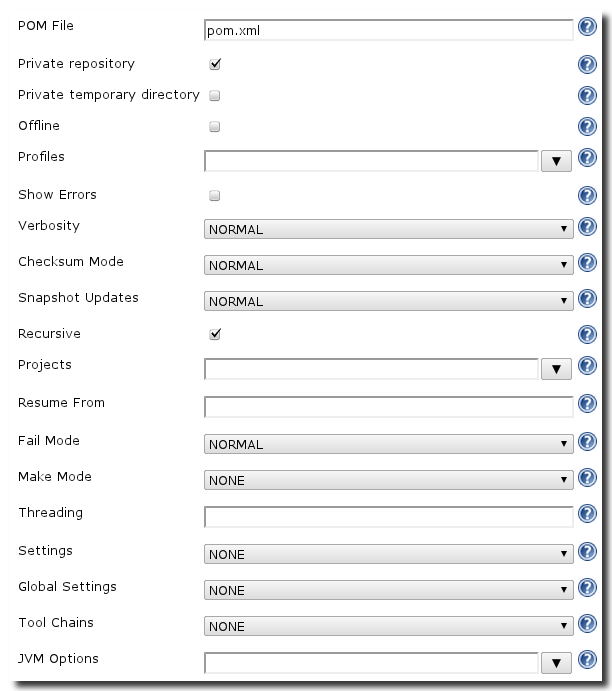
The basic and advanced options for configuring a Maven 3 build steps are shown in Figure 7.1, “Configuring a Maven 3 Build Step - Default Options” and Figure 7.2, “Configuring a Maven 3 Build Step - Advanced Options” . When adding a new Maven 3 build step all parameters are pre-populated with the default parameters defined for Maven 3 build steps. These are configured in the global Hudson configuration documented in Chapter 3, Hudson Configuration in Section 3.6, “Maven 3 Builder Defaults”.

- Maven Version
- Your Hudson installation may have one or more Maven 3 installations configured as part of the global Hudson configuration. This drop-down allows you to specify the version of Maven 3 to use with the current build step. By default the Maven 3 integration will use a bundled version of Maven 3, that is installed as part of the Maven 3 integration itself.
- Goals
-
This field allows you to specify the goals and phases you would like
to use for the Maven 3 invocation, separate by spaces and in order
of desired invocation just like you would use Maven 3 on the
command-line. Typically these would be
clean install, but depending on your project and build step others may apply. The plugin with automatically show the Maven version and operate in batch mode equivalent to the-Vand-Boptions. It is also to specify other specific Maven to command-line options like-Pfor profile selection, selection of a specificsettings.xmlfile,-Xfor debugging logging and so on. However this is not recommended since there are specific configuration settings for most parameters in the Advanced section. If you specify them in their dedicated option it will be easier to carry out programmatic changes e.g. via scripts in the Hudson console across all projects defined in your Hudson instance. - Properties
- You can pass one or more properties to the Maven process. This field accepts a list of properties with lines in a key=value format. These properties will be passed into the Maven build step invocation using the standard way of passing properties of -Dkey1=value1 -Dkey2=value2.
- POM File
-
If your project uses the standard
pom.xmlfile-name, there is no need to specify a POM. If your project uses a POM with an alternative name or path other than directly in the project root, you can specify that file name and path here. This setting is equivalent to the command-line option -f pomfilepath or—file pomfilepath. The path specified has to be relative to the project root. It is also necessary to specify the path to the POM file here if you SCM setup causes the POM file to be located in a sub-folder and not in the top level workspace folder. - Private repository
-
By default a Maven invocation will use a private repository in the
project workspace in a
.maven/repofolder. This ensures that other project builds do not have any side effects. However it can cause considerable usage of storage space, which consequently should be monitored carefully. If this option is disabled the standard Maven repository location in the current users home directory will be used. The user will the operating system user running Hudson and therefore invoking Maven 3 via the plugin. - Private temporary directory
-
When this option is activated the java environment variable
java.io.tmpdirwill be set to a folder.maven/tmpin the project-specific workspace. This is useful when your build accesses the temporary directory for storage of artifacts or any temporary files e.g. used while running tests. When using the option with builds that produce large amounts of data in the temporary folder it is important to monitor the size of the folder and potentially add a clean up routine to the host operating system regular scheduled jobs. - Offline
-
Activating this option causes Maven to be run with the
-ooffline option enabled and it will therefore not access any remote repositories. - Profiles
-
Adding a comma or space separated list of profile names causes the
Maven 3 integration to pass them to the invocation with the
-Pparameter. - Show Errors
-
Enabling the Show Errors option is equivalent to use the
-ecommand-line parameter, which will cause Maven to output any errors in the console. - Verbosity
-
Configure the verbosity of the log output to the console by Maven to
be at normal, quiet or debug levels. These levels are equivalent to
no option and the
-qand-Xoptions for Maven command-line invocation. - Checksum Mode
-
Configure the strictness of the check-sum validation when downloading
artifacts from repositories to be at normal, lax or strict
levels. These levels are equivalent to no option and the
-cand-Coptions for Maven command-line invocation. - Snapshot Updates
-
The Snapshot Updates option provides control over the way Maven
treats
SNAPSHOTartifacts. The NORMAL activates the standard Maven behaviour, where as FORCE and SUPPRESS will activate the-Uand-nsuoptions. - Recursive
-
Just like for normal Maven invocation this option is activated by
default, which means that nested modules in a multi-module project
will be build. Deactivating this feature is equivalent to the
non-recursive command-line option
-N. - Projects
-
The Projects option allows you to specify the projects that should
be added to the reactor during build. You can either specify them by
the relative path in your project workspace or by
artifactIdand optionallygroupIdin agroupId:artifactIdformat. The equivalent command-line option is-pl. - Resume From
-
The Resume From uses the same syntax as the Projects and sets the
-rfcommand-line option to resume the build from the specified artifact. - Fail Mode
-
The Fail Mode option supports the modes NORMAL, FAST, AT_END and
NEVER that determine how your Maven build proceeds in case of any
failures. The equivalent command-line options are no option,
-ff,-faeand-fn. This can have considerable impact on the load on your Hudson server e.g. by not proceeding past failed tests but instead failing the build so that developer can fix it before a long running build needs to be kicked off again. - Make Mode
-
The Make Mode option can be used to enable Make-like build behaviour
of Maven. The options are the default behaviour equivalent to NONE
and DEPENDENCIES, DEPENDENTS and BOTH respectively
-am,-amdand-am -amd. - Threading
-
This input takes the value for the
-Tcommand-line option that enables the experimental support for parallel builds in Maven 3. A value of4enables four threads for the build. A value of2.5Cwould enable 2.5 threads per CPU core. When activating this feature, keep the experimental nature of this feature as well as the not yet wide spread support for this feature in the various plugins in mind. Read on the Maven Wiki to find out more about this feature and the current status. - Settings
-
This option corresponds to the
-scommand-line option for Maven 3 and supplies a Maven 3 build step with a custom settings configuration file. The drop down for this field is populated with the Maven 3 Settings files configured in the Hudson Maven 3 Configuration page as shown in Figure 3.10, “Managing Maven 3 Settings in Hudson”. - Global Settings
-
This option corresponds to the
-gscommand-line option for Maven and isn’t used as frequently as the-soption. This option allows you to reference a custom global configuration file that is an alternative to the global settings file that ships with Apache Maven. - Tool Chains
- Tool chains for Maven 3 build steps can be configured globally for your Hudson install as documented in Section 3.10, “Managing Maven 3 Configuration”. The drop allows you to select one of these configured tool chains for to be used for the build step. Tool chains are a very useful, but lesser known feature of Maven and more documentation can be found in the mini guide on the Apache web site.
- JVM Options
- If your build requires specific JVM options, they can be set in this field. The options are passed straight through as MAVEN_OPTS and use the normal java command-line options syntax. A common configuration for complex builds is to specify a larger memory for the JVM running Maven via -Xmx1024m.
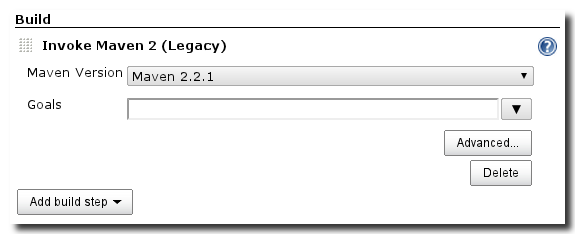
If for some reason you are still using Maven 2 and cannot upgrade to Maven 3 and therefore take advantage of the advanced performance and features of Maven 3 and the Maven 3 integration of Hudson offers you, you should use the Maven 2 (Legacy) integration in a free-style project build step. After configuring the general project options (see Chapter 6, Creating Hudson Projects), you can configure one or more build steps. To add a build step, click on the Add build step button as shown in Figure 7.3, “Configuring Project Build Options”. To configure a Maven build, select Invoke Maven 2 (Legacy).
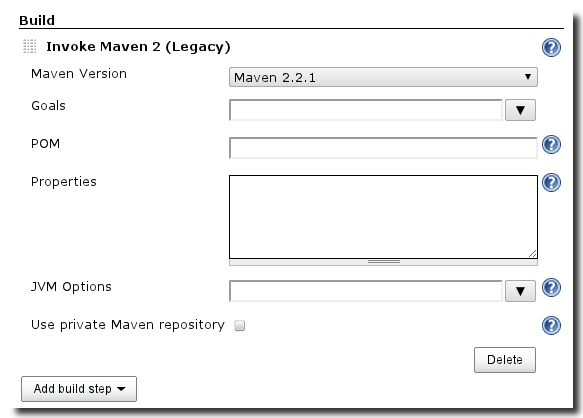
The basic and advanced options for invoking a Maven 2 (Legacy) target are shown in Figure 7.4, “Advanced Configuration of a Maven 2 (Legacy) Build Step”.
- Maven Version
- Your Hudson installation may have one or more Maven installations configured as part of the global Hudson configuration. This drop-down allows you to specify the version of Maven for usage with the current build step.
- Goals
-
This field allows you to specify the command-line parameters used
for the Maven invocation. These are phases, plugin goals as well as
specific Maven command-line options like
-Pfor profile selection, selection of a specificsettings.xmlfile and so on. - POM
-
If your project uses the standard
pom.xmlfile-name, there is no need to specify a POM. If your project uses a POM with an alternative name or path other than directly in the project root, you can specify that file name and path here. This setting is equivalent to the command-line option -f pomfilepath or—file pomfilepath. The path specified has to be relative to the project root. - Properties
- You can pass one or more properties to the Maven process. This field accepts a list of properties with lines in a key=value format. These properties will be passed into the Maven build step invocation using the standard way of passing properties of -Dkey1=value1 -Dkey2=value2.
- JVM Options
- If your build requires specific JVM options, they can be set in this field. The options are passed straight through as MAVEN_OPTS and use the normal java command-line options syntax. A common configuration for complex builds is to specify a larger memory for the JVM running Maven via -Xmx1024m.
- Use private Maven repository
-
By default a Maven invocation will use a local repository in the
current users home directory taking any further repository
configuration done in settings.xml into account. Depending on the
necessary separation of the different jobs running on Hudson it can
be useful to have a separate Maven repository for each
project. Activating this feature will cause the creation of a
separate Maven repository in a
.repositoryfolder in the projects workspace. This can cause considerable usage of storage space, which consequently should be monitored carefully.
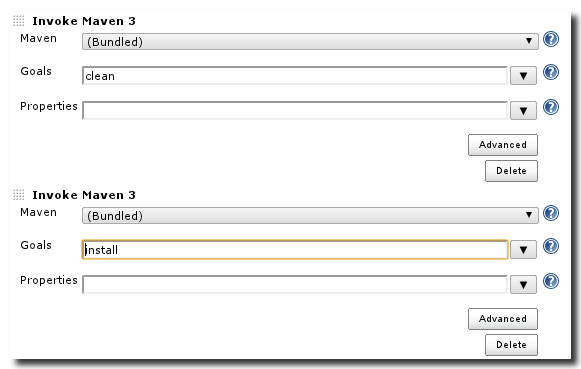
The standard way of invoking a Maven build is to run the clean and install life cycle phases in a command-line call like mvn clean install. This can be easily achieved by adding a Maven build step and adding clean install as a Goals parameter. If so desired these two life cycle phases can also be invoked separately by creating two Maven build steps with separate clean and install parameters. This would cause two separate invocations of Maven in sequence equivalent to mvn clean; mvn install Breaking up the invocations allows you to add further build steps in between and build an arbitrarily complex sequence of Maven and other invocations with completely separate parameters and so on.
You could for example slip a plugin goal invocation in between the clean and install invocations, that prepares the execution environment for your build for example by setting up a test environment like an emulator or a specific database and content. Since you can do this in a separate build step you can invoke a shell script or an Ant target for such tasks, in case it is not automated via a Maven plugin or configuration.