Once you’ve downloaded, installed, and started Hudson for the first time, the next step is to start creating new Hudson build jobs. As you’ll learn in the following chapter, there are an innumerable number of options, plugins, and extensions that can make the Hudson build job creation process a bit daunting to the first time user.
From SCM configuration to options relating to build triggers Hudson offers so many configuration points it is often difficult for new users to make sense of the process. This chapter takes the mystery out of build job creation and explores some of the options available when creating a new Hudson project. After reading this chapter, you’ll know what fields matter (and which fields can be safely ignored), you’ll understand how to stand up a new Hudson build job, and you’ll be ready to get started using the best CI server in the industry.
To create a new Hudson project, click on New Job in the left navigation menu, which will display the form shown in Figure 6.1, “Creating a New Job in Hudson”.
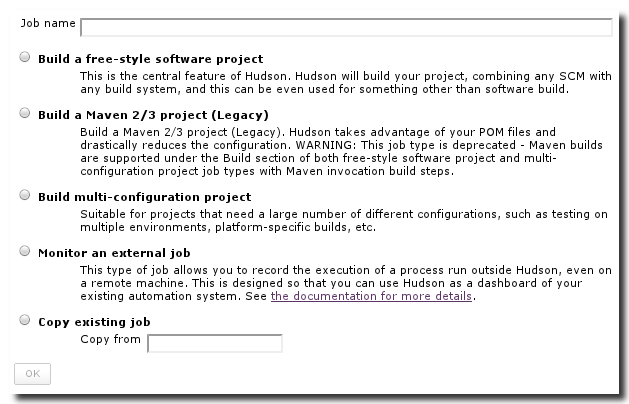
The most common way to create a new job using Hudson is to select "Build a free-style software project". If you are creating a project that is similar to an existing Hudson build, you may also choose "Copy an existing job" and then type in the name of the Hudson job in the Copy from text field. Once you have made your selection and provided a name for the new job, click on OK to continue.
You can also configure Hudson to Monitor an external job which can then trigger and affect other jobs. The last job type supported by Hudson is to Build a multi-configuration project, which can act like a container for a variety of different job executions.
Warning
Your Hudson installation may provide an option to Build a Maven 2/3 project (Legacy). This feature has numerous issues with the use of different Maven versions, and it is especially problematic when building a project with Maven 3. The authors of this book recommend not to using the legacy Maven project type. Instead, we encourage you to use the native Maven support which is available in a free-style software project.
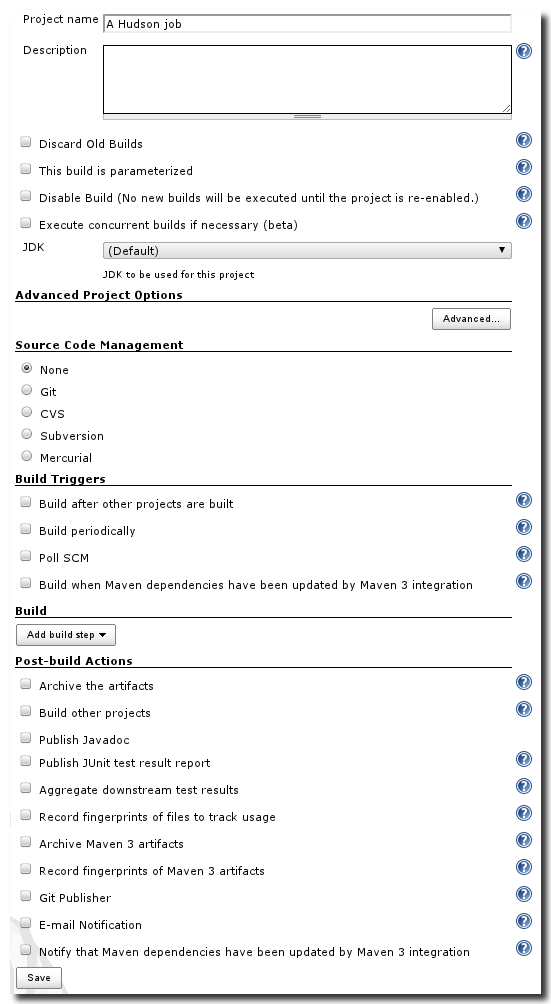
Once your job has been created, you will see a screen similar to the one shown in Figure 6.2, “Result of New Project Creation”, depending on your job type selection. You can now proceed to configure your project. If you need to change any of these settings at a later stage, navigate to a particular Hudson Project’s Summary page by clicking on the name of the project on the main Hudson page. Once you are on a Hudson Project’s Summary page, click on Configure in the left-hand navigation to load the Project Configuration screen.
Independent of the job type you selected you will be able to configure a few common settings separated in the following sections:
- General Project Settings
- Configure the project name, description and other general parameters
- Advanced Project Options
- Configure miscellaneous settings for advanced usage.
- Source Code Management
- Configure source code management-related parameters for various systems
- Build Triggers
- Configure how builds are started
- Post-build Actions
- Configure steps taken after a build completion
Depending on the job type you choose additional sections may be present in the project configuration screen. The following sections provide an overview of some common project configuration options.
The first section on the Project Screen is the general project information, which is shown in Figure 6.3, “Configuring Project Information”.

The section shown in the previous figure contains the following fields:
- Project Name
- The Project Name should be a short descriptive name that easily allows your Hudson users to see what this project is. Consider this to be the identifier that Hudson uses to keep track of everything associated to this project. We recommend that your project names consist of simple alphanumeric characters and dashes. While Hudson will save a Project name containing spaces, the file path of the workspace will also contain spaces. The presence of spaces in a project name can cause unforeseen issues with builds and may results in build failure. We suggest using e.g. underscores instead. The project name will be visible in the main Hudson page on the list of jobs.
- Cascading Project
- The Cascading Project drop down allows you to select another Hudson project as a template to inherit settings from. This feature is supported for free-style software as well as multi-configuration projects and is documented in more details in Section 6.2.6, “Working with Cascading Projects”.
- Description
- The Description should contain a paragraph that will inform Hudson users about the nature and purpose of a given Hudson project. Useful information for the users could for example be various source code management related parameters like branch or version or other parameters like target platform for the build artifacts. This will widely vary and depend on your job type. The description is visible on the main project-specific page.
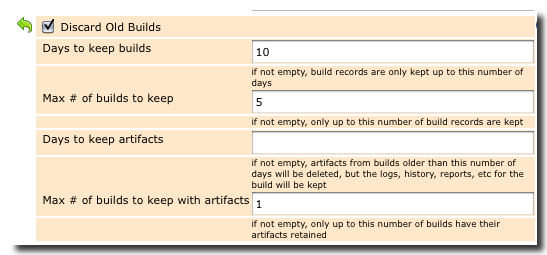
- Discard Old Builds
- If Discard Old Builds is not checked, Hudson will archive the results of all the builds it performs. Depending on build log and artifact size this can produce considerable amounts of storage space being used, which should in turn be monitored carefully. If Discard Old Builds is checked, the project configuration screen will display additional input fields that allow you to specify the number of builds and the number of days to retain builds. After pressing the Advanced button you can provide for separate configuration for the number of days the build artifacts are kept. Setting this value will cause older build artifacts to get deleted, without the logs, reports etc. getting deleted. An additional advanced configuration allows you to set maximum number of builds to keep including its artifacts.
- This Build is Parameterized
- Parameterized builds allow you to pass configuration to specific builds. For example, you can parametrize a build to accept a free-form variable that selects a specific branch in SCM. This way, a Hudson user can trigger a build and supply the name of this branch to the Hudson build. Hudson supports different data types adapting its user interface to it. The basic string parameter provides a simple input box. The password parameter will provide an input field with hidden characters. Boolean values are represented as check-box, while a choice parameter is rendered as a drop down box. File parameters, run parameter and subversion tags are other supported parameters. All these parameters need to be supplied when a project is build. Typically this is done via the user interface provided by the parameters when a build is kicked off manually in the user interface. Parameters can also be passed to Hudson via remote invocation with a URL like http://server/job/myjob/buildWithParameters?PARAMETER=Value
- Disable Build
- If Disable Build is selected, no new builds will be executed until the project is re-enabled. This means that any builds that might have been triggered by SCM activity or by a periodic schedule will not be executed. This feature is very useful if you need to fix an issue with a build or build specific related infrastructure like source code management system and you want to temporarily take a particular Hudson job offline without affecting the rest of your Hudson setup and jobs.
- Execute concurrent builds if necessary (beta)
- If this check box is selected, Hudson will be able to execute more than one build for this project at the same time. This can be useful if your project is parameterized, or if you have a longer build, which may need to run multiple concurrent builds in response to independent changes to SCM. In many cases this setting is particularly useful, when Hudson is set up as a build cluster.
- JDK
- This drop down allows the selection of a specific Java Development Kit (JDK) for the project. It will only be available if multiple JDKs are configured in the global Hudson configuration as documented in Section 3.3, “Configuring JDK Installations”.
- Restrict where this project can be run
- If Restrict where this project can be run is checked, Hudson will display options that will allow you to specify the nodes on which a project build can be executed.
Warning
If you are creating a continuous integration build that will run frequently, don’t forget to check Discard Old Builds and configure Hudson to free up drive space. If your project is built regularly due to frequent changes in source control or small times between fixed schedule builds you can easily fill up even the largest hard drive potentially resulting in your build server going offline.
The next section after the general project configuration is the Advanced Project Options section shown in Figure 6.4, “Configuring Advanced Project Options”.
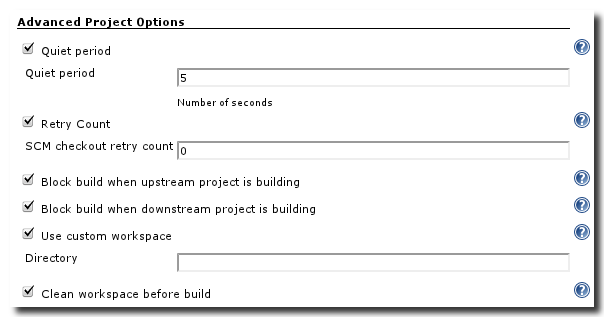
This section contains the following fields:
- Quiet period
- The project-specific Quiet Period set in this section overrides the global configuration documented in Section 3.1, “Global Hudson Configuration” and has the same effect. This setting depends on your build trigger configuration as documented below.
- Retry Count
- The project-specific Retry Count overrides the global SCM checkout retry count and has the same effect.
- Block build when upstream/downstream project is building
- Hudson builds can be configured to have upstream as well downstream dependencies. Upstream dependencies are projects upon which this particular project’s build depends. Downstream dependencies are projects that depend on the current builds results. If Block build when upstream/downstream project is building is selected this project will not start a build, if an upstream/downstream project is in the middle of a build or in the build queue.
- Use custom workspace
- If this selection is checked, you can instruct Hudson to use a custom directory for this project’s workspace. If this option is not checked, Hudson will automatically assign a workspace location that is based on the project’s name. As such it can be used to have projects names with spaces or other characters potentially causing file system level issues while using a save name for the workspace folder name.
Hudson is typically used in conjunction with the source of the project available in a source code management system. Support for a large variety of SCMs is one the strengths of Hudson. This section allows for the configuration of the respective settings for your SCM of choice. The available list of choices will contain all SCM systems provided by Hudson and the installed plugins. Chapter 5, Managing Hudson Plugins explains how to get support for your SCM installed, if it is not yet available. Once installed each SCM configuration will have different parameters, which are documented in Chapter 9, Working with Source Control.
The next section to configure is Build Triggers. A Hudson job can be configured to build in response to build activity on a Hudson instance, in accordance with a regular schedule, or as a reaction to activity in an SCM system. Build triggers are configured on a Project’s Configuration screen and the section is shown in Figure 6.5, “Configuring Build Triggers”.
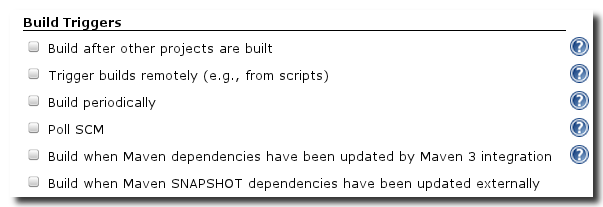
The following types of build triggers can be configured:
- Build after other projects are built
- If this option is selected, Hudson will present you with a text field that accepts the names of one or more projects. If this field is populated, Hudson will trigger this project’s build after a successful completion of one of the projects listed in this text field. The reverse behaviour of triggering a different project based on this project’s build completing can be configured in the Post-build Actions.
- Trigger builds remotely (e.g. from scripts)
- Enabling this option will allow you to define a authentication token for triggering a build by hitting a project specific URL together with the defined token. The URL follows the patterns http://hudsonurl/jobs/project/build?token=mytoken&cause=mycause with hudsonurl replaced by the URL of your hudson server including port number and context (e.g. http://buildserver:8080/hudson). mytoken will be the secret token you defined in the Authentication Token field and mycause an optional text to submit as the cause. To allow users to hit the URL you can e.g. host the link on a secured web page, send it via email or also use curl or wget from a script.
- Build periodically
- The Build periodically setting will cause Hudson to start a build of the project at regular intervals. Changes will be retrieved from the configured SCM, but a build will be triggered even if no changes were found. The interval configuration in the exposed text field accepts the same cron syntax as the Poll SCM configuration.
- Poll SCM
- Selecting Poll SCM will cause Hudson to periodically poll your source code management system for changes and trigger a build if changes have been found and successfully retrieved. Selecting this option displays a text area, which accepts a standard cron expression. This allows for arbitrary polling interval from minutes to weekly and way beyond. It is important to consider the impact of this polling frequency setting on your SCM infrastructure, since it can cause significant load specifically when multiple projects with small polling frequencies all access the same SCM server. This expression can also be useful to set up a schedule for a project that only polls the SCM for changes e.g. outside office hours and therefore only builds then. Similar setup ups can be used to do a nightly or a weekly build type setup.
- Build when Maven dependencies have been updated by Maven 3 integration
- Hudson projects using the Maven 3 integration can be configured to send out a notification to all projects that Maven dependencies have been updated as post build action (see Section 6.2.5, “Configuring Post-build Actions”). When you activate this build trigger a build of the project will be started once a such a notification is received. The projects triggering each other in this set up needs to be configured to access the same Maven repository.
- Build when Maven SNAPSHOT dependencies have been updated externally
- Activating this setting allows you to specify a schedule in cron syntax to use for polling the local Maven repository for updated SNAPSHOT dependencies. When selecting the Exclude internally produced dependencies option the regular check will only cause a build trigger firing when artifacts not built in a local Hudson job are updated.
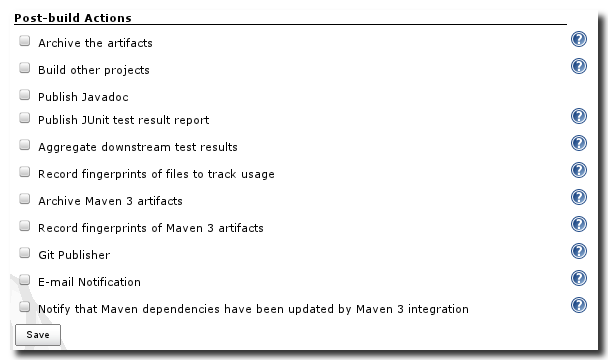
Post build actions are an important part of Hudson. They allow you to trigger a number of events upon build completion. These include the communication of the results of the build in various ways as well as chain other builds to this build. As such these actions fulfil a crucial role of a continuous integration server as communication tool. Other important actions allow you to deal with the various artifacts produced by the build in the form of test results, documentation as well as actual executables or archives produced.
Beyond the core post-build actions documented in the following, various plugins will make additional actions available. Source code management-related plugin documentation can be found in Chapter 9, Working with Source Control. The minimum list of build actions available is visible in Figure 6.6, “Configuring Project Post-build Options” and documented in more detail below.
- Archive Maven 3 artifacts
- If you activating this option Hudson will archive the artifacts built by the Maven 3 build steps during the build. Selecting the Include generated POMs additional cause the pom.xml files to be archived. With the option Discard old artifacts set, old artifacts will be removed after each successful build. This is a Maven 3 build step specific automation of the option to Archive artifacts without the need to specify the artifacts. The artifacts will be made available on the web interface like other archived artifacts. This option is especially useful in refactorings of the project and the resulting artifacts, since all artifacts are always archived and name or folder changes do not affect the archiving. Since there is no necessity to configure matching patterns, this option is more robust.
- Record fingerprints of Maven artifacts
- This option activated will trigger the Maven 3 integration of Hudson to record fingerprints of the created Maven artifacts, which will allow Hudson to keep track of when these artifacts are produced and used.
- Publish Javadoc
- If your build produces Javadoc you can configure Hudson to make it available to users on the project page of Hudson:
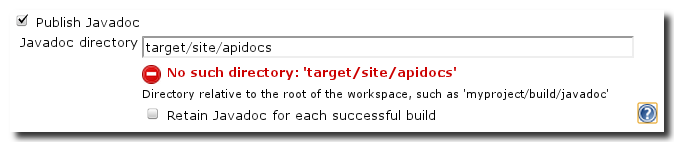
To configure this you have to select the check box and provide the relative path to the Javadoc in the Javadoc directory input field. Checking the Retain Javadoc for each successful build will keep the generated Javadoc for all successful builds in the specified folder for older builds instead of overwriting the documentation with each build.
If a warning of No such directory is visible, it means that the current project workspace does not contain the specified path. This is not a problem as long as your build will create the folder. The Console Output of a specific build contains logging information started by Publishing Javadoc that can be used to debug any problems.
- Aggregate downstream test results
- This feature allows you to pull the test results of this project and any downstream projects together. This is especially useful when long running test are set up as separate downstream projects. You can either let Hudson figure out all downstream projects automatically or supply a specific list of projects in the Jobs to aggregate input box.

- Publish JUnit test result report
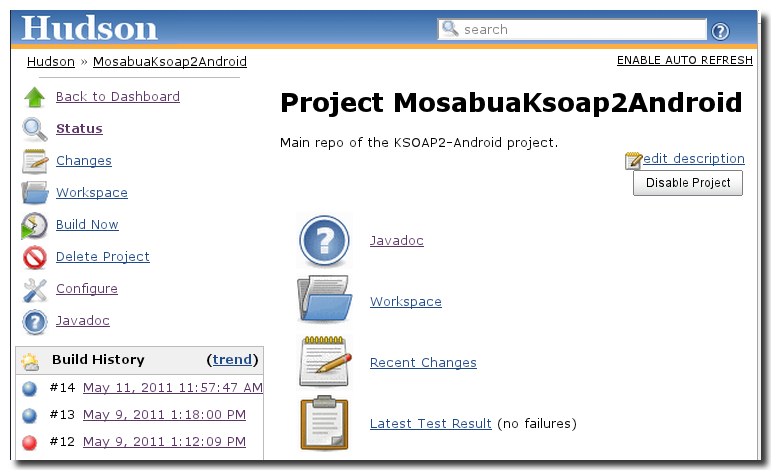
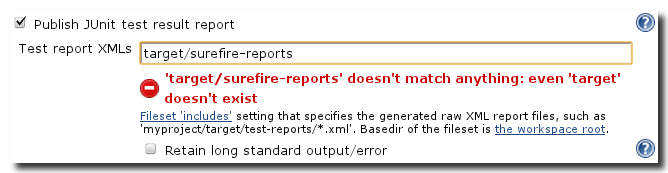
- Activating this feature allows Hudson to interpret the JUnit test report format, produced by your test runs in the project and produce historic test result trends, a web interface for viewing the reports accessible from the project page as visible in Figure 6.8, “Project page providing access to Javadoc and latest test results”. The location of the produced xml files has to be specified in the text input box, which allows the use of patterns to find files in multiple sub folders of the project.In addition it is possible to retain the build log output by checking the Retain long standard output/error.
- Archive the artifacts
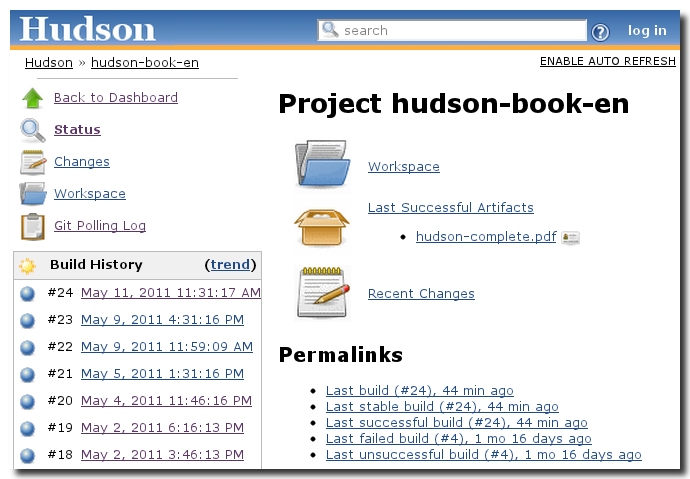
- With this feature enabled Hudson will keep the specified artifacts and make them available on the web interface. Using a wild-card syntax in the Files to archive as well as the Excludes input boxes you can specify the artifacts that should be saved after each successful build.The artifacts of the last successful build are available on the project overview page as visible in Figure 6.12, “A project overview page for the Hudson book project with the latest build artifact available for download”.
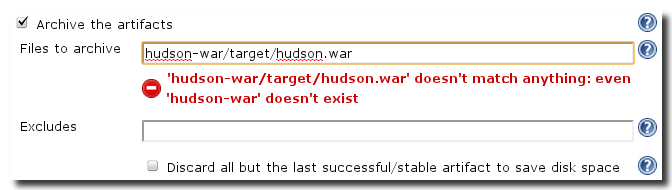
Figure 6.12. A project overview page for the Hudson book project with the latest build artifact available for download
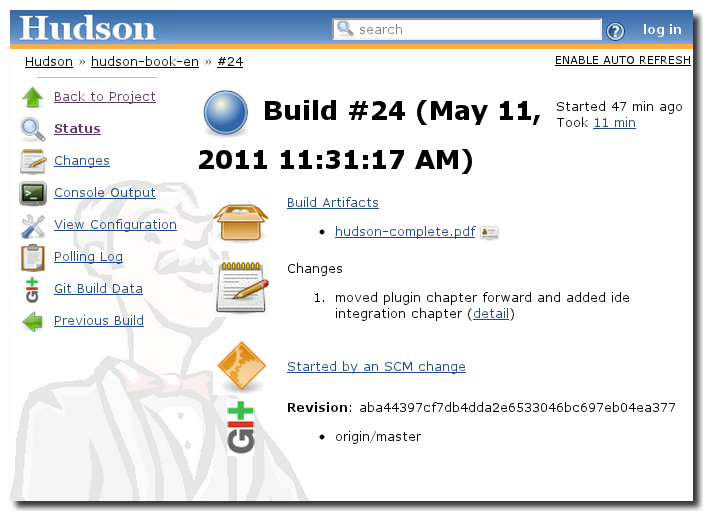
In addition Figure 6.13, “A build specific page for the Hudson book build with build artifact available for download” shows how the artifacts produced by a specific build can be accessed on build specific page.
Figure 6.13. A build specific page for the Hudson book build with build artifact available for download
This feature is useful to make release artifacts like war, ear or zip files available for retrieval by other users and for archival purposes. Hudson can be used as the reference storage place for these artifacts that are in turn used e.g. for QA and production deployments or for distribution to customers.
If your artifacts are created by a Maven 3 based build using Maven 3 build steps, it might be a better option to activate the option Archive Maven 3 artifacts for better archiving robustness as documented above in the respective section.
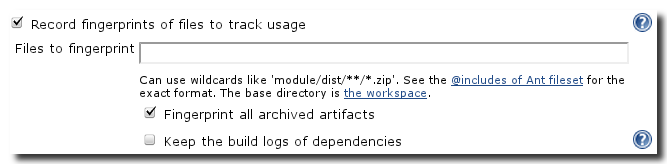
- Recording fingerprints of files to track usage
- The feature to Record fingerprints of files to track usage can help you track down, where files are used and produced. It will allow you to determine the build number that created an artifact by looking at the fingerprint, which is a unique identifier for the file that Hudson creates and keep track of.
- Build other projects
- Building other projects after completion of the current project build, is one of the key features that allows you to set up chains of project builds. They can then all be small in focus and build time. However in the bigger picture you are able to to run a build for very large and complex systems. The input box Projects to build accepts a comma-separated list of projects to build together with a check box that allows you to trigger the dependent builds even if the current project build failed.

Some examples for the usage of this feature are a main project triggering separate projects that invoke unit and/integration tests, shared libraries invoking server as well as client side application builds or build system plugin builds triggering all projects that use the plugin.
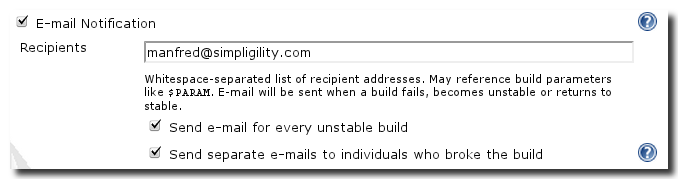
- E-mail Notification
- A very valuable post-build action for a continuous integration build is the sending of build notification emails. Hudson can be configured to send out build failure notices to any email address. In most instances it will be best to send the notices to an email list allowing the potential recipients to opt-in and out as well as access archives. This email is one of the primary ways in which developers are notified of build failures. To configure this feature, check the check box next to E-mail Notification and then specify the recipients email addresses in Recipients separated by white-space. Selecting Send e-mail for every unstable build will instruct Hudson to send an email for each build even if a build experience consecutive failures. Selecting Send separate e-mails to individuals who broke the build will send email to all SCM committers that affected a build that broke. The email will be sent with the configuration specified in Section 3.8, “Configuring E-mail Notification”.
- Notify that Maven dependencies have been updated
- When activating this option Hudson will notify all projects with a build trigger configured to watch for Maven dependencies that have been updated (see Section 6.2.4, “Configuring Build Triggers”). When the additional option Notify even when build is unstable is selected this notification will occur even when an unstable build ran. A side-effect of this could be that only some Maven dependencies have been updated, which could lead to further failures of the dependent projects.
Support for cascading projects is an addition to Hudson that makes managing a large number of projects easier by implementing single inheritance of project setting from one project to one or many others.
Warning
This feature has been introduced with Hudson 2.2.0, so you will have to update to it or a newer version to take advantage of it.
The Cascading Project drop down in Figure 6.3, “Configuring Project Information” is populated with all projects the current project can inherit settings from. These have to be of the same type - free-style or multi-configuration and you will be prevented from introducing cyclic inheritance.
Select a project you would like to inherit settings from in the drop down and the complete project configuration will be populated with the configuration values of the parent project.
If you change a configuration for the child project and save the configuration any setting that differs from the parent project setting will be highlighted on the configuration screen and augmented with green arrow on the left side of the input as visible in Figure 6.17, “A Discard Old Builds configuration in a child project overriding the parent project configuration.”. This arrow will revert any changes and reapply the configuration settings of the parent project.
Figure 6.17. A Discard Old Builds configuration in a child project overriding the parent project configuration.
The parent and child projects are linked internal and an user will not be able to delete a parent project as long child projects exist.
The inheritance works for general project parameters as well as builders, publishers, triggers and SCM related settings. When updating a parent project parameters these changed values are propagated to all child projects that do not have the values overridden.
Examples for useful applications of this feature among others are:
- a parent project for a main branch of a project and children for all other branches in the SCM system
- combination of different scheduling and build parameters e.g. for build with unit tests only vs with full integrations tests vs a nightly regression build
In addition to the common project configurations we discussed prior, a free-style Hudson project has a section for the build definition that allows you to add individual build steps. Press the Add build step button in the Build configuration section to set up one or multiple steps that define your build with the choices displayed in Figure 6.18, “Adding a free-style project build step” and documented below.
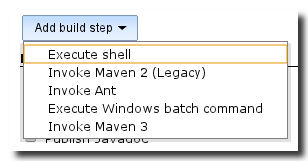
- Execute shell
- Executing a shell script as a build step is configured just like a Windows batch command. The unix convention to use the first line with a #! and the path to an executable allows you to write shell scripts in many available shell and scripting languages.
- Invoke Maven 2 (Legacy)
- A Maven 2 based build step can be configured as documented in Section 7.4, “Details of Configuring Maven 2 (Legacy) Build Options”. We recommend to use the Maven 3 invocation where possible.
- Invoke Ant
- Invoking an Ant target can be added just like a shell script task, but with more configuration options. Find out more on how to configure Ant invocations in Section 8.2, “Configuring Apache Ant Builds”
- Execute Windows batch command
- The Command input allows you to specify the the name of the batch file to execute. The script has to return an error level value of zero to be recognized as a build success by Hudson. The script will be executed with the current workspace of the project as the directory. A number of environment variables about Hudson and the current project are passed to the execution of the script and can be used from within the script.
- Invoke Maven 3
- A Maven 3 based build step can be configured as documented in Section 7.3, “Details of Configuring Maven 3 Build Options”
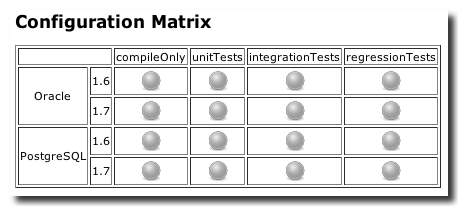
Multi-configuration projects have to be configured as such when initially creating the project as visible in Figure 6.1, “Creating a New Job in Hudson”. A multi-configuration project is a free-style project with additional parameters called axis defined. These axis values create a matrix of possible combinations. Each of these combinations is a possible build execution with the specific combination of parameters passed to the build.
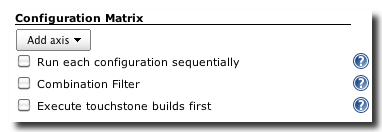
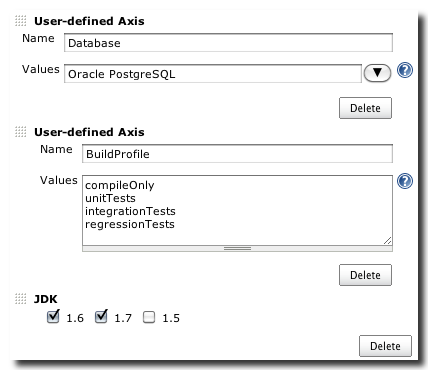
Figure 6.19, “Configuration matrix parameters for multi-configuration project” and Figure 6.20, “Axis definition for multi-configuration project” show the general Configuration Matrix section as well as an example of some axes defined. A pre-configured axis available offers the choice of JDK used for the project build. In the example two further axes are defined. For for a database backend used for the build and another for the type of build to execute. Axis can be added by creating the Add axis button and removed with the Delete button.
All these axis values create a configuration matrix on the project overview page as visible in Figure 6.21, “Configuration matrix display for multi-configuration project”.
The most important configuration steps is to define the axes that you will use for your project. The user-defined axis definition allows you to define a name and multiple values. These values will be passed to your build execution as variables and you have to ensure in your build configuration that they are e.g. used as Maven profile names in the a build step or passed in as properties and picked up to select the correct database connection. The values have to be separated by white-space in the values input field.
In addition you can configure the following settings.
- Run each configuration sequentially
- Selecting this option will cause Hudson to build each combination of axis values as sequential build invocations rather than executing them concurrently. This is especially useful if concurrent execution could cause conflicts when accessing resources needed by the build like a central database server.
- Combination Filter
- The combination filter input field allows you to define valid axis value combinations with a Groovy expression. Only expressions returning true will be executed.
- Execute touchstone builds first
- By defining a filter you can set up a touchstone build. It will be executed first and the required result will have to be met before any further combinations of the matrix configuration are executed.